
Service Manual


InstallingtheBedbar
g226763
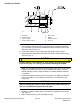
Figure73
1.Sideplate
5.Metalwasher
2.Rubberbushing6.Bedbar
3.Nylonbushing7.Bedbarpivotbolt
4.Plasticwasher(2each)
8.Locknut
1.Ifrubberbushing(item4inFigure73)wasremovedfromeithersideplate,
applygreasetooutsidesurfaceofnewbushingandinstallintosideplate
(1).Thebushing(4)shouldbeinstalledushwiththeinsidesurfaceofthe
sideplate;refertoFigure73.
2.Ifremoved,installthenylonbushings(5)withangefacingoutward.
3.Applyanti-seizelubricanttothethreadsandshankofeachbedbarbolt(8);
refertoFigure73.
CAUTION
Contactwiththereel,bedknifeorothercuttingunitpartscanresult
inpersonalinjury.Useheavygloveswhenhandlingthebedbar.
Note:Ifanewbedknifeisattachedtothebedbar,theremaybeinterference
betweenthebedknifeandthereelwheninstallingthebedbar.Turnthe
bedbaradjustingscrewscounterclockwisetoincreasebedknifeclearance
ifnecessary.
4.Positionthebedbarassembly(16)intothecuttingunit.Makesurethatthe
topofeachbedbararmisbetweenthewasher(17)andadjusterscrew
ange(12).
IMPORTANT
Wheninstallingthewashers,makesurethattheplasticwashers(6
and15)arepositionedagainstthesideplate.
5.Positiononeplasticwasher(6and15)betweenthebedbar(16)andeach
sideplate(1).
6.Slideametalwasher(7)ontothebedbarbolt(8).
DPACuttingUnits:ServiceandRepairs
Page8–8
Greensmaster
®
1018/1021/1026
18238SLRevC