
Service Manual


RollerAssemblies
RemovingtheFrontRoller
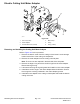
g285300
Figure165
1.Frontrollerassembly
4.Height-of-cutarm(2each)
2.Height-of-cutscrew(2each)5.Pinchbolt(2each)
3.Locknut(2each)6.Plowbolt(2each)
RefertoFigure165forthisprocedure.
1.Removethecuttingunitfromthemachineandplaceitonalevelworksurface.
Useanappropriatesupporttoraisethefrontrolleroffoftheworksurface.
2.Loosenthepinchboltsthatsecurethefrontrollershafttothefront
height-of-cutarms.
3.Removethelocknut,height-of-cutwasherandplowboltthatsecuresone
oftheheight-of-cutarmstothecuttingunitsideplateandremovethe
height-of-cutarm.
4.Slidethefrontrollerassemblyfromtheremainingheight-of-cutarm.
5.Removetheremainingheight-of-cutarmfromthecuttingunitifnecessary.
InstallingtheFrontRoller
RefertoFigure165forthisprocedure.
1.Placethecuttingunitonalevelworksurface.Useanappropriatesupportto
raisethefrontofthecuttingunitoffoftheworksurface.
2.Inspecttheconditionofbothheight-of-cutscrewsandreplacethemif
necessary.Applyanti-seizelubricanttothethreadsofanewheight-of-cut
screw.
Note:Wheninstallingtheheight-of-cutarms,makesuretabofthesideplate
tsbetweentheheadandthewasheroftheheight-of-cutscrew.
Greensmaster®eTriFlex3360and3370
Page7–23
DPACuttingUnits:ServiceandRepairs
19239SLRevC