
Installation Instructions


2
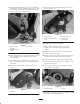
5. Remove the 2 locknuts securing the reel weight to the
right reel bearing housing and side plate. Remove the
weight (Fig. 1).
6. Loosen the nut on the end of the bedbar adjuster
(Fig. 2).
2
3
1
Figure 2
1. Bedbar
2. Bedbar adjuster
3. Bedbar adjuster nut
7. Remove the bedbar bolts, washers, and jam nuts
securing the bedbar to the side plate (Fig. 3). Remove
the bedbar.
1
2
3
3
Figure 3
1. Bearing housing
2. Bedbar bolt, washers and
jam nuts
3. Bolts
8. Remove the (2) bolts from bearing housing and
sideplate (Fig. 3).
9. Remove the reel bearing locknut on the reel shaft
(Fig. 3).
Note: The nut has left-hand threads.
Note: When removing the nut, secure the reel from
turning by using a wood block.
10. Insert (2) new bolts thru side plate and bearing
housing.
11. Reinstall bedbar. Refer to Operator’s manual for
procedure.
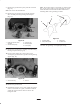
12. Position the right-hand groomer drive assembly on the
bearing housing and bolts (Fig. 4).
13. Secure groomer drive assembly to bearing housing and
side plate with (2) tapered nuts.
1
2
3
5
4
Figure 4
1. Right hand groomer drive
assembly
2. Groomer drive pulley
3. Grooming reel
4. Bearing support
5. Driven pulley
14. Install the groomer drive pulley onto the reel shaft
(Fig. 4).
Note: The nut has left-hand threads.
15. Slide one end of the grooming reel shaft into the
bearing support in the groomer housing assembly
(Fig. 4).
16. Mount the driven pulley to the end of the groomer
shaft and torque to 100–120 in.-lb.
Note: Use a 1/4 in. Allen socket on a torque wrench.
1
2
3
Figure 5
1. Groomer drive pulley
2. Grooming reel
3. Driven pulley