
Service Manual


Height–of–Cut Adjustment (Floating Cutting Unit)
Overview of Procedure:
1. Adjust reel to bedknife contact
2. Level rear roller to reel
3. Final height–of–cut adjustment using gauge bar.
STEP 1 – Adjust Reel to Bedknife Contact
A. Adjust reel to bedknife contact on all cutting units.
(Refer to Adjusting Reel To Bedknife Contact).
STEP 2 – Level Rear Roller to Reel
B. Start engine and lower the cutting units onto a flat
surface such as a piece of 3/4” or 1” plywood (at
Figure 6
least 20” x 30” in size). Stop engine and remove key
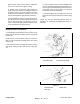
Cutting Unit Float Position
from switch. Lock cutting units in the fixed position,
2. Jam nut
by loosen—ing the jam nut on lockout pin (Fig. 6) and
1. Lockouts
screwing pin into hole in pivot arm (Fig. 7). Tighten
nut to secure lockout. Raise the front rollers up so
they do not contact the flat surface.
C. Insert a piece of bar stock 25” – 28” (70 cm) long
(Fig. 8), and approximately 3/8” (9.5 mm) thicker
than the desired height–of–cut, under the reel and
up against the bedknife cutting edge (Fig. 8). The
reel (not bedknife) must contact the bar stock along
its full length.
NOTE: Using a bar 3/8” (9.5 mm) thicker than height–
of–cut provides proper bedknife attitude (heeled ”up” in
back) required for excellent low height–of–cut perfor
-
mance.
D. Loosen rear roller jam nuts and adjusting knobs
and push roller down against flat surface. At this
point the reel should contacting the bar stock and
the rear roll contacting the flat surface. Contact
should exist along the entire length of the reel a rear
roller. Tighten rear roller adjustme knobs and jam
nuts. Recheck to be sure roller and reel are both still
making contact after jam nuts have been tightened.
Check roll contact by trying to slide paper between
the roller and the flat surface.
E. Rear roller is now leveled to the reel.
Figure 7
Cutting Unit Fixed Position
1. Lockout pin 2. Jam nut
HOC + 3/8”
Figure 8
Leveling Rear Roller to Reel
Cutting Units
Page 6 – 6 Rev. A
Reelmaster 450–D