
Service Manual


Adjustments
CAUTION
ways stop the engine and remove the key
first.
Never install or work on the cutting units or lift
arms with the traction unit engine running. Al-
Adjusting Reel to Bedknife Contact
Before adjusting height–of–cut and each day before op-
erating, check reel to bedknife contact, regardless if
quality of cut had previously been acceptable.
NOTE: A 3/4” wrench is required for making the reel to
bedknife adjustment.
A. Slowly and carefully rotate reel,listening for light
contact across the full length of the reel and bed
-
knife.
CAUTION
fully latch cutting units. Remove key from the
while adjusting cutting units.
Before adjusting reel to bedknife, raise and
ignition switch. Keep others off machine
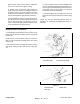
B. If no contact – loosen the adjuster locking nut on
each adjuster (Fig. 5). Then, equally turn each ad
-
juster knob clockwise until light contact is felt and
heard.
C. If excessive contact – Turn the adjusting knobs
counter–clockwise until no contact is noticed. Then
equally turn both adjusting knobs clockwise, until
light contact is felt and heard between the reel and
bedknife. Final adjustment should always be in the
tightening (clockwise) direction.
D. Tighten adjuster locking nuts when completed
making adjustments.
CAUTION
gloves and use care when turning reels by
hand. Sharp edges can cut or pinch hands or
fingers.
When adjusting the cutting units, wear heavy
IMPORTANT: Adjusted correctly, the reel will cut pa-
per (approx. .003” thick) across its entire length.
The cutting units will provide optimum mowing perfor-
mance when adjusted and maintained correctly. Keep-
ing a precise reel to bedknife adjustment (light contact),
at each end of the cutting unit will produce a continual
self–sharpening action. Therefore, sharp cutting edges
are maintained, good quality of cut assured, and the
need for corrective re–sharpening reduced.
IMPORTANT: Cutting units with excessive contact
between the reel and bedknife are noisy, consume
excessive power, shorten component life and result
in overall poor performance. Light contact between
the reel and bedknife, once the cutting unit is
warmed up, provides optimum mowing perfor
-
mance and component life.
Figure 5
1. Adjuster locking nut
2. Adjustment knob
Reelmaster 450–D
Page 6 – 5 Rev. A
Cutting Units