
Service Manual


AssemblingtheGroomerPlateAssembly(continued)
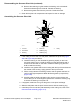
6.Checkthatthegroomerreelheightandmowerheight-of-cutsettings.Adjust
asnecessary.
7.Lubricatethegroomerbearings.
Note:Aftergreasingthegroomerbearings,operatethegroomerfor30
seconds,stopthemachine,andremovetheunwantedgreasefromthe
groomershaftandseals.
GroomerReel
g215965
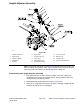
Figure388
7inchcuttingreelwithcastironsideplates
1.Flangenut(2each)
9.Extensionspring17.Flangenut
2.Socket-headscrew(4each)
10.Retainingring18.Drivenpulley
3.Pivothubassembly(non-drive)
11.Drivepulley
19.Washer(asnecessary)
4.O-ring(2each)
12.Flange-headscrew20.Pulleyspacer
5.Cuttingreel
13.Locknut
21.Excluderseal(2each)
6.Groomershim
14.Idlerpulleyassembly
22.Groomerreel
7.Groomerplate(drive)
15.Idlerplate
23.O-ring
8.Pivothubassembly(drive)16.Squarekey24.Groomerplate(non-drive)
Reelmaster
®
5410/5510/5610Series
Page10–15
BeltDrivenGroomer(Optional):ServiceandRepairs
15216SLRevD