
Service Manual


g228648
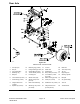
Figure302
Machineswith2-wheeldrive
1.Rearaxleassembly4.Jamnut
7.Cotterpin
2.T abwasher5.Nutretainer
8.Wheel-lugnut(5eachper
wheel)
3.Wheelassembly6.Dustcap9.Wheelhubassembly
RemovingtheRearAxle
1.Parkthemachineonalevelsurface,lowerthecuttingunits,shutoffthe
engine,settheparkingbrake,andremovethekeyfromthekeyswitch.
2.Blockthefrontwheelswithchockstopreventthemachinefrommoving.
3.Removethe2rearwheelassemblies;refertoRemovingtheWheel(page
8–6).
4.Removethesteeringcylinder(withthehydraulichosesattached)fromthe
rearaxle;refertoRemovingtheSteeringCylinder(page6–226).
5.Removebothwheelmotorhousingsfromtherearaxle;refertoRemoving
theRearAxleMotorHousings(page8–17).
6.OnmachinesequippedwithCrossTraxAWD,doasfollows:
A.Unlatchandopentheradiatorscreenassembly.
B.Removethe3bolts(item2inFigure304),3lockwashers,and3spacers
thatsecuretheCrossTraxAWDcontrolmanifoldtotheframesothatthe
rearaxlepivotpin(item1inFigure301)canbeaccessed.Lowerand
supportthemanifold,ensurethatyoudonotdamagethehydraulictubes.
7.Removethejamnut(item35inFigure301)andthrustwasherthatsecure
theaxlepivotpintotheframe.
8.Supporttherearaxletopreventitfromfalling.
9.Pulltheaxlepivotpinfromtheframeandrearaxle.Thisreleasestherear
axleand2thrustwashers(item6inFigure301)fromtheframe.
Note:OnmachineswithCrossTraxAWD,donotdamagetheCrossTrax
AWDcontrolmanifoldorattachedhydraulictubesduringaxleremoval.
10.Carefullyremovetherearaxlefromthemachine.
ServicingtheRearAxle
1.Cleantherearaxlepivotpin.Inspectthepinforwearandreplacethepivot
pinifitiswornordamaged.
Chassis:ServiceandRepairs
Page8–20
Reelmaster
®
5410/5510/5610Series
15216SLRevD