
Service Manual


Reelmaster 3100−DPage 7 − 14SPA Cutting Units
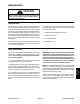
Backlapping
DANGER
TO AVOID PERSONAL INJURY OR DEATH:
− Never place hands or feet in reel area while the
engine is running.
− While backlapping, reels may stall and restart.
− Do not attempt to restart reels by hand or foot.
− Do not adjust reels while the engine is running.
If the reel stalls, stop engine before attempting to
clear the reel.
− Reel motors are connected in series, moving
one motor moves the other two.
Note: Additional instructions and procedures on
backlapping are available in the Toro General Service
Training Book, Reel Mower Basics (part no. 09168SL).
1. Position machine on a clean, level surface. Lower
cutting units, stop engine, engage parking brake, and
remove key from the ignition switch.
2. Remove console cover to expose the controls.
3. Rotate backlap knob on the manifold block clockwise
to the BACKLAP position. Rotate reel speed knob to
position 1 (Fig. 20).
4. Make initial reel to bedknife adjustments appropriate
for backlapping on all cutting units. Start engine and set
engine speed to low idle.
5. Engage reels by moving mow/transport lever to
MOW and depressing the reel ON/OFF switch.
CAUTION
Be careful when lapping the reel because contact
with the reel or other moving parts can result in
personal injury.
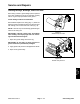
Figure 19
1. Long Handle Brush
1
6. Apply lapping compound with a long handled brush.
1. Backlap knob 2. Reel speed knob
Figure 20
1
2
7. To make an adjustment to the cutting units while
backlapping, turn off the reels by pushing in the reels
ON/OFF switch on instrument panel to OFF position and
stopping the engine. After adjustments have been com-
pleted, repeat steps 4 through 6.
8. When backlap operation is completed, rotate back-
lap knob counter−clockwise to the MOW position, set
reel speed controls to the desired mowing setting, and
wash all lapping compound off the cutting units.
Note: For a better cutting edge, run a file across the
front face of the bedknife when the lapping operation is
completed. This will remove any burrs or rough edges
that may have built up on the cutting edge.
ÉÉÉÉÉÉÉÉÉÉÉ
ÉÉÉÉÉÉÉÉÉÉÉ
ÉÉÉÉÉÉÉÉÉÉÉ
ÉÉÉÉÉÉÉÉÉÉÉ
Top
Front Angle
Top
Remove Burr
(without dulling
Angle
Surface
sharp corner)
Figure 21