MOTORIZED TREADMILL Thank you very much for purchasing our product. Please read this manual carefully before use it and keep the manual at proper place.
Contents 1、CAUTION…………...……………………….……………….................................( 4-5 ) 2、SAFETY NOTICE………………………………….………………………................( 5 ) 3、CAUTION DURING USE………………..…….…….............………………...….....( 6 ) 4、TECHNICAL SPECIFICATION…………………………...…..………………..........( 7 ) 5、PRODUCT MAIN PARTS ………………….………...…......………………...……. ( 7 ) 6、PRODUCT SPARE PARTS ………………………..….……………………...…......( 8 ) 7、ASSEMBLY.....................................................................................................
1、 CAUTION TION To avoid injury please read this manual carefully before operating this machine. NEVER attempt to mount the treadmill while the running belt is moving. NEVER step off the treadmill while the running belt is moving. NEVER operate the treadmill if it is damaged or is not working as it should be. DO NOT overexert yourself or work to exhaustion. If you feel any pain or abnormal symptoms, stop your workout immediately and consult your doctor.
temperature) will increase the risk of damage to electrical components. We recommend that you store the machine in a dry room with constant temperature. 2、 SAFETY NOTICE TION This machine is not suitable for children under 14 years of age. Use the treadmill only for its intended use as described in this manual. Children, elderly users and pregnant women are advised NOT to use the treadmill. Assemble and operate the treadmill on a solid, level surface.
3、CAUTION DURING USE TION Keep both the machine and power cord away from heated surfaces. Make sure you are wearing proper exercise clothing and shoes during a workout—no loose clothing. Tie back long hair. Keep all loose towels away from the running surface. The running belt will not stop immediately if an object becomes caught in the belt or rollers. If you begin to feel unwell during use, stop immediately and consult your doctor or personal trainer before continuing.
4、TECHNICAL SPECIFICATION Product name Voltage Frequency Power Speed Treadmill 110V 50-60Hz 2.5HP 0.5-7.
6、PRODUCTS SPARE PARTS Serial NO.
7、 ASSEMBLY For your convenience, you can scan this QR code to see the video for assembling treadmill on YouTube, or input this link to watch. https://youtu.be/8TSzVgyBUoI 1 Open the box, take out the treadmill and accessory package gently from the box. Place the treadmill on the ground.
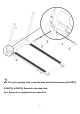
2 Lift up the upright tube, screw the tube and the base frame with PART① & PART② & PART③. Repeat on the other side. Tips: Please do not tighten these screws first.
3 Remove the preset screws and nuts at the top of upright tubes, then screw it with desk. Connect the wire of control board with the wire in the right handrail. Tips: Please do not press the tube on the wires in case of being damaged.
4 Keep the desk flat, screw PART⑤ to fix the desk with the upright tubes. Then tighten all the bolts and screws above. Screw PART⑥ to fix the base frame. Put PART④ in the hole of the tube.
5 Lift the pad holder, and lift the clip back the pad holder, you can adjust the angle of pad holder you want.
6 Put PART⑦ safety key on the red place. Switch on the power.
8、 CONSOLE INSTRUCTION 1. Check that the red power switch on the back of the machine is turned off. 2. The power supply socket should be turned off at the wall, then insert the power cable into the socket. 3. Turn on the power supply at the wall and turn on the red power switch at the back of the machine. 4. Place the emergency safety key on the front of the console. Clip the other end of the safety key onto your clothes and stand on the running belt facing the console. 5.
7. Press" "key, the screen will show Time/Step, Speed, Distance/Calories, data will be shown every 5 seconds. Press" " key and it will be stay in fixed mode. When machine is in standby status, press " " key to select user required Time, Distance or Calories, then press "+" or "-"key to set required value. Time set range 5:00~99:00, Distance set range 1~99, Calories set range 20~990. 8. When machine is in standby status, press this" Then press" "key to select P1~P12.
(1) Function of the Remote Control 2.1 "Start/Stop": (1) In standby or countdown mode: Press " " button to start the machine. Please note that the default speed is 0.5 MPH. (2) Choose the preset program: Press " and then press " " to choose P1-P12, " to start the machine, the speed will change according to the preset speed. (3) In running state: Pressing " ", then the treadmill will stop slowly and back to standby state. 2.2 "+"/"-" button is to adjust speed. Keep pressing "+" or "-" button over 0.
How To Match A New Remote Control 2.1 Power off the treadmill 2.2 Press the “+” and “P” button in the remote control at the same time, keep pressing for 5 seconds.The light on the remote control will flash, and the remote control will enter the pairing mode. 2.3 Power on the treadmill within 5 seconds, the remote control will match the machine automatically. If any error codes appear on the screen, then please check below: Err: Without safety key - Please make sure the safety key is put on.
9、 FOLDING UP AND SETTING DOWN 1, Unscrew the locking knobs⑤ under the control desk and lift the desk 2, Unscrew the stretch knob⑥ on the base frame. 3, Lift the base frame to the place where the fixed knob④ can put in to fix the base frame. 10、USAGE OF SILICONE OIL Before you start the treadmill, please lubricate the running belt first. Pull up the running belt tightly. Then apply the silicone oil to the running board. Start the machine and run for 3 minutes without people.
For your convenience, you can scan this QR code to see the video for lubricating the running belt on YouTube, or input this link to watch. https://youtu.be/MksJIoi8Obo 11、RUNNING BELT ADJUSTMENT (1) Running belt deviates to left Start the machine at speed 1-1.5 mph (don't stand on machine). Use the Allen wrench to turn the screw clockwise until desired fit (see fig1). Then let the machine run without loading for 1-2 minutes.
is in the middle. For your convenience, you can scan this QR code to see the video on YouTube, or input this link to watch. https://youtu.be/uoXqZXk1Bx8 (2) Running belt deviates to right Start the machine at speed 1-1.5 mph (don't stand on machine). Use the Allen wrench to turn the screw counterclockwise until desired fit (see fig2). Then let the machine run without loading for 1-2 minutes. Please adjust like this until the belt is in the middle.
(3) Running belt stuck If the running belt is not moving, use the Allen wrench to turn the screws 180 degrees on both left and right sides until this is solved. For your convenience, you can scan this QR code to see the video on YouTube, or input this link to watch. STEP1: https://youtu.be/Xqri9ug5J7c STEP2: https://youtu.be/nyZ75WFTZZw 12、 WARRANTY Your purchase includes a hassle-free Money Back Guarantee and a free replacement exchange for one year.
13、 EXERCISE GUIDE PLEASE NOTE: Before beginning any exercise program, consult your physician. This is important especially if you are over the age of 45 or individuals with pre-existing health problems. The pulse sensors are not medical devices. Various factors, including the user’s movement, may affect the accuracy of heart rate readings. The pulse sensors are intended only as an exercise aid in determining heart rate trends in general.
Warm-up Start each workout with 5 to 10 minutes of stretching and some light exercises. A proper warm-up increases your body temperature, heart rate and circulation in preparation for exercise. Ease into your exercise. Training zone Exercise After warming up, increase the intensity to your desired exercise program. Be sure to maintain your intensity for maximum performance. Breathe regularly and deeply as you exercise-never hold your breathe.
Workout Guidelines TARGET ZONE THIS IS HOW YOUR PULSE SHOULD BEHAVE DURING GENERAL FITNESS EXERCISE. REMEMBER TO WARM UP AND COOL DOWN FOR A FEW MINUTES. The most important factor here is the amount of effort you put in. The harder and longer you work the more calories you will burn. Effectively this is the same as if you were training to improve your fitness, the difference is the goal.