
Installation guide


B
15.
Checking
that
the
finger
guard
moves
easily
It
is
now
essential
to
check
that
the
finger
guard
moves
easily.
At
a
later
time
any
required
corrections
will
be
more
difficult.
Note:
The
supplied
finger
guard
can
be
used
for
both
sides
of
tne
door
hinge.
Because
of
different
installation
possibilities,
the
finger
guard
has
to
be
shortened
to
the
required
length.
m=
Shorten
the
finger
guard
at
the
upper
side
above
the
covering
strip
by
55
mm
(1,).
m
=
Push
the
offcut
on
the
hinge
side
into
the
gap
between
the
appliance
and
cavity
wall.
The
part
has
to
be
easy
pushing
and
pulling
(2.)!
28
Ensure
smooth
running
at
all
positions
of
the
door
(3.).
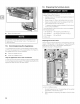
16.
Connecting
the
water
to
the
appliance
CAUTION
When
bending
the
water
pipe,
do
not
kink
it,
otherwise
there
is
a
risk
of
leaks
and
water
damage.
NOTE
When
connecting
the
water
pipe
to
the
solenoid
vaive
of
the
appliance,
follow
the
instructions
supplied
by
the
manufacturer
of
the
ice
maker
installation
kit
enclosed
with
the
installation
manual.
Remove
the
cap
from
the
appliance
connection
(1.).
Bend
the
water
pipe
according
to
the
location
of
the
connection
on
the
appliance
(2.).
Push
the
union
nut
and
seal
onto
the
water
pipe.
Push
the
end
of
the
water
pipe
into
the
appliance
connection
and
screw
on
the
union
nut
(3.).
Tighten
hand-tight.
Using
the
open-ended
wrench,
tighten
the
union
nut.
Do
not
overturn!
Open
the
shut-off
valve
and
main
water
tap.
Check
the
connection
on
the
shut-off
valve
and
on
the
appliance
for
leaks.