
Use & Care Guide


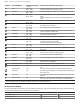
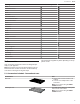


Table Of Contents
- Professional® Series Single Steam Oven and Double Steam Oven
- en-us
- Table of contents
- 1 IMPORTANT SAFETY INSTRUCTIONS
- 2 Preventing material damage
- 3 Environmental protection and energy-saving
- 4 Familiarizing yourself with your appliance
- 5 Accessories
- 6 Before using for the first time
- 7 Basic Operation
- 7.1 Turning the appliance on
- 7.2 Turning the appliance off
- 7.3 Operating the full-touch display
- 7.4 Setting the heating mode and temperature
- 7.5 Changing the heating mode or temperature
- 7.6 Canceling a heating mode
- 7.7 Heating time limitation
- 7.8 Preheating
- 7.9 Fast preheat
- 7.10 Turning the panel lock on or off
- 7.11 Meat probe
- 8 Timer functions
- 9 Basic settings
- 10 Operating the steam oven
- 10.1 Filling the water tank
- 10.2 Removing the water tank during or after operation
- 10.3 Rack positions
- 10.4 Inserting the wire rack
- 10.5 Using the telescopic rack
- 10.6 Getting the best results
- 10.7 General tips for heating modes
- 10.8 Opening the oven door during a steam mode
- 10.9 Using a steam cooking mode
- 10.10 Using steam assisted cooking mode
- 10.11 Automatic steam programs
- 11 Operating the conventional oven
- 11.1 Rack positions
- 11.2 Inserting the wire rack
- 11.3 Inserting the telescopic rack
- 11.4 Rotisserie
- 11.5 Getting the best results
- 11.6 General tips for heating modes
- 11.6.1 How to use bake mode
- 11.6.2 How to use convection bake mode
- 11.6.3 How to use convection multi-rack/true convection mode
- 11.6.4 How to use pizza mode
- 11.6.5 How to use roast mode
- 11.6.6 How to use convection roast mode
- 11.6.7 How to use broil mode
- 11.6.8 How to use convection broil mode
- 11.6.9 How to use proof mode
- 11.6.10 How to use warm mode
- 12 Home Connect™
- 13 Cleaning and maintenance
- 13.1 Cleaning agents
- 13.2 Cleaning the conventional oven
- 13.3 Cleaning the steam oven
- 13.4 Maintenance
- 14 Eliminating faults
- 15 Disposal
- 16 Customer service
- 17 STATEMENT OF LIMITED PRODUCT WARRANTY
- fr-ca
- Table des matières
- 1 IMPORTANTES CONSIGNES DE SÉCURITÉ
- 1.1 Définitions des termes de sécurité
- 1.2 Informations générales
- 1.3 Utilisation prévue
- 1.4 Restriction sur le groupe d'utilisateurs
- 1.5 Utilisation sécuritaire
- 1.6 Sécurité des enfants
- 1.7 Cuisson vapeur
- 1.8 Fonction de nettoyage
- 1.9 Installation et entretien appropriés
- 1.10 Mises en garde conformément à la proposition 65 de l'État de Californie
- 2 Prévenir les bris matériels
- 3 Protection de l'environnement et économies
- 4 Description de l'appareil
- 5 Accessoires
- 6 Avant d'utiliser pour la première fois
- 7 Opération de base
- 7.1 Allumer l'appareil
- 7.2 Éteindre l'appareil
- 7.3 Utilisation de l'écran tactile
- 7.4 Réglage du mode de chauffage et de la température
- 7.5 Modification du mode de chauffage ou de la température
- 7.6 Annulation d'un mode de chauffage
- 7.7 Limitation du temps de chauffage
- 7.8 Préchauffage
- 7.9 Préchauffage rapide
- 7.10 Activer ou désactiver le verrouillage du panneau
- 7.11 Sonde thermométrique
- 8 Fonctions de minuterie
- 9 Réglages de base
- 10 Fonctionnement du four à vapeur
- 10.1 Remplissage du réservoir d'eau
- 10.2 Retrait du réservoir d'eau pendant ou après le fonctionnement
- 10.3 Positions des grilles
- 10.4 Insertion de la grille métallique
- 10.5 Utilisation du support télescopique
- 10.6 Obtenir les meilleurs résultats
- 10.7 Conseils généraux pour les modes de chauffage
- 10.8 Ouverture de la porte du four en mode vapeur
- 10.9 Utilisation d'un mode de cuisson vapeur
- 10.10 Utilisation du mode de cuisson à la vapeur
- 10.11 Programmes de vapeur automatiques
- 11 Fonctionnement du four conventionnel
- 11.1 Positions des grilles
- 11.2 Insertion de la grille métallique
- 11.3 Insertion de la grille télescopique
- 11.4 Rôtissoire
- 11.5 Obtenir les meilleurs résultats
- 11.6 Conseils généraux pour les modes de chauffage
- 11.6.1 Comment utiliser le mode de cuisson
- 11.6.2 Comment utiliser le mode de cuisson par convection
- 11.6.3 Comment utiliser le mode de convection multi-grille/vraie convection
- 11.6.4 Comment utiliser le mode pizza
- 11.6.5 Comment utiliser le mode de rôtissage
- 11.6.6 Comment utiliser le mode de rôtissage par convection
- 11.6.7 Comment utiliser le mode gril
- 11.6.8 Comment utiliser le mode de cuisson au gril par convection
- 11.6.9 Comment utiliser le mode de fermentation
- 11.6.10 Comment utiliser le mode maintenir au chaud
- 12 Home Connect™
- 13 Nettoyage et entretien
- 13.1 Produits de nettoyage
- 13.2 Nettoyage du four conventionnel
- 13.3 Nettoyage du four à la vapeur
- 13.4 Entretien
- 14 Dépannage
- 15 Élimination
- 16 Service à la clientèle
- 17 ÉNONCÉ DE LA GARANTIE LIMITÉE DU PRODUIT

en-us Basic Operation
18
2. Setting the language:
‒ Touch the bottom line on the full-touch display.
‒ Swipe to the left or right in the bottom line until the
desired language is in focus.
‒ Touch the bottom line and swipe to the left or right
until the correct language is in focus.
‒ Touch the top line.
3. Setting the clock display:
‒ Touch "Clock Display".
‒ Touch the bottom line.
‒ Swipe to the left or right to select "digital" or "ana-
logue".
‒ Touch the top line.
4.
Setting the water hardness. →
Page18
6.2 Setting the water hardness
You will need to descale your steam oven at regular inter-
vals. Set the correct water hardness level to ensure your
appliance reminds you when descaling is necessary.
Note:If you move or if your water source changes, you
will need to reset the water hardness level.
1. Determine the water hardness using a water hardness
test strip or ask your water utility company.
→
"Water hardness levels", Page18
2. Touch "Water Hardness".
3. Touch the bottom line.
4. Swipe to the left or right to select the appropriate water
hardness level.
5. Touch the top line.
Water hardness levels
Here you can find an overview of the water hardness lev-
els and the recommended settings.
Water hardness level Setting
1 (0 - 17mg/L) 1 - softened
2 (18 - 60mg/L) 2 - soft
3 (61 - 120mg/L) 3 - medium
1
4 (121 - 180mg/L) 4 - hard
5 (over 180mg/L) 5 - very hard
1
Factory setting (may vary according to model)
6.3 Pairing your oven with HomeConnect™
In order to utilize the full feature potential of the appliance,
download the HomeConnect™ app on a smart device and
pair the appliance to the home's Wi-Fi device.
▶
For step-by-step instructions, see
→
"HomeConnect™ ", Page35
.
6.4 Cleaning the appliance before using it for
the first time
Clean the oven cavities and accessories before using the
appliance to prepare food for the first time.
NOTICE:
ENAMEL DAMAGE!
▶
Do not start an operation if water is on the bottom of the
oven cavity.
▶
Let the appliance cool down and wipe the water from
the oven cavity bottom before starting an operation.
Note:There may be a slight odor during first uses. This is
normal and will disappear.
1. Remove all packaging materials from inside and outside
the oven. Check both oven cavities.
2. Before heating the appliance, wipe the smooth surfaces
in the oven cavities with a soft, damp cloth and dry.
3. Keep the room ventilated while the appliance is heating.
4. Close both oven doors.
5. Carry out the following steps for the steam oven cavity:
‒ Fill the water tank of the steam oven and slide it in.
→
"Filling the water tank", Page24
.
‒ Select the heating mode and temperature.
→
"Basic Operation", Page18
Heating mode Steam
Temperature 212°F (100°C)
Duration 30minutes
a This initial operation also calibrates the steam oven to
the air pressure at your location.
6. Carry out the following step for the conventional oven
cavity:
‒ Select the heating mode and temperature.
Heating mode Bake
Temperature 475°F (245°C)
Duration 30minutes
7. Switch off the appliance after the specified cooking time
by pressing turning all selector knobs to OFF.
8. Wait until the oven cavities have cooled off.
9. Clean the smooth surfaces with soapy water and a dish
cloth.
10. Wash the accessories thoroughly with soapy water and
a cloth and rinse well.
Basic Operation
7 Basic Operation
Basic Operation
7.1 Turning the appliance on
▶
Turn the mode selection knob to the desired mode or
press the desired touch key.