
Installation Instructions


10
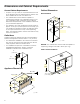
Three-wire Connection
▯ Connect red wire from oven to red wire in junction box.
▯ Connect black wire from oven to black wire in junction
box.
▯ Connect both green ground wire and white wire from
oven to white, green or bare neutral wire in junction
box.
The conduit cable, where connected at the oven, swivels.
Rotate conduit cable upward (or downward) and direct
through hole prepared in cabinet to attach to junction
box.
To maintain serviceability, the flex conduit must not be
shortened and should be routed to permit temporary
removal of the oven.
Install Appliance
Note: The appliance is heavy. It is advisable to install it
with a second person.
NOTICE: Before installing the appliance, be sure to
verify the cabinet dimensions and electrical connections.
Mount to Cabinet
1.
Fully insert the appliance and center it. Do not kink the
electrical cable.
2.
Screw the appliance into place.
Testing Operation
1.
Turn on power at the breaker.
2.
Check power at junction box using a volt meter.
For 240 V installation, the reading between the red
and black wires (line to line) should be 220 to
240 volts.
For 208 V installation, the reading between the red
and black wires (line to line) should be 190 to
208 volts.
3.
Test the oven mode:
Select “True Convection” mode. See the Use and Care
Guide for detailed instructions on how to do this.
NOTICE: Never run the microwave unless there is
food or water in the oven cavity.
4.
Verify that the oven light comes on and the oven
begins to preheat.
5.
Test the microwave:
Place a cup of water into the oven cavity. Follow the
instructions in the Use and Care Guide on how to heat
a beverage.
6.
Verify that the oven light comes on and the water is
heated.
7.
If any of the tests do not result as explained above,
contact Service for assistance. Otherwise, the
installation is complete at this time.
SRZHUVXSSO\
MXQFWLRQER[
UHGZLUHV
ZKLWHEDUHRU
ZKLWHZLUH
JUHHQZLUH
JUHHQZLUH
FDEOHIURP
8/OLVWHG
EODFNZLUHV
RYHQ
FRQQHFWRU