
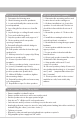
User's Manual


• Ensure amplier is in nal location
• Ensure speaker and sensor cables are neatly routed
• Cut the speaker wire to the appropriate length
• Strip about
3
/8” o the end of each speaker wire.
• Twist the wire and if you have a soldering iron, tin the wire ends
• Unplug the phoenix connector, insert (+) wire (with printed writing) into either outside (+)
terminal. Plug the other (-) wire into center (-).
• Tighten set screws.
• Repeat for other pair and insert plug rmly into speaker receptacle
• Plug amplier power supply into AC outlet
7
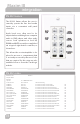
Four speakers
1. Determine the mounting surface and
location based on the seating area
2. Ordinary installation is to locate the
speakers on each side wall. The rst set
should be in line with the front row of
listeners
3. Mount the speakers 6–7 ft above the
oor
4. Install the mounting brackets in the
vertical (up/down) orientation
5. Mount brackets using the appropriate
hardware
6. Insert speaker with the tweeter in
upper position
7. Secure speaker in bracket with the
hand fasteners
8. Orient each speaker toward the center
of that half of the listening area
9. Strip speaker cable ends ½” and
connect to speaker
10. Observe speaker polarity: Connect (+)
wire (with printed writing) to (+) terminal
and (-) wire (unprinted & textured) to
the (-) terminal
11. Route speaker cable to the receiver/
amplier in a safe, least visible, tidy
manner
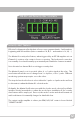
final connection of the system
1. Determine the listening area.
2. Divide listening area into quadrants
3. Locate and identify the center most tile
in each quadrant
4. Lay ceiling tile face down on clean at
surface
5. Lay tile bridge on ceiling tile and center it
6. Trace and cut the large hole
7. Strip the speaker cable ends, approx. ½"
8. Route speaker wire from speaker
opening to amplier
9. Reinstall ceiling tile with tile bridge in
place above the hole
10. Pull speaker cable back down through
speaker hole
11. With a pointed tool or paper clip, lift up
and remove speaker grille
12. Connect speaker cable to speaker
terminals
13. Observe speaker polarity, connect wires
to (+) and (-) terminals respectively
14. With the mounting clamps folded back,
position speaker into speaker hole
15. With a #2 Phillips screwdriver, tighten
the mounting clamps
16. Reinstall speaker grille and remove any
soil or ngerprints
17. Repeat these steps for other speakers
SP-2000 wall mount speakers
SP-628 ceiling speakers
8