
Installation Sheet


5
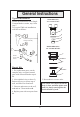
Typical Installation:
Follow the instructions in the Single
Vacuum Breaker section, step 1 thru
step 5.
Two typical T&S unit installations
will look as follows:
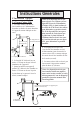
Repair Kit:
1. For replacement parts, reorder
complete unit, or replace internal
parts with aVacuum Breaker repair
kit.
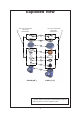
2. (See exploded view on sheet 2)
Remove the two no.1 from top of
no.2, and lift off no.2 and no.3.
3. Unscrew and remove no.4, no.5,
no.6 and no.7 from inside no.8.
4. Replace parts with new parts from
kit.
B-0929 Atmospheric Vacuum
Breaker Assembly
5. Reassemble in reverse order.
Note: Make sure surface inside the
body is clean, and then tighten no.4
until it is fi rmly seated against the
inside shoulder of no.8.
B-0968-RK01 (Kit)
3/8” Vacuum Breaker
B-0657
Service Sink
Faucet
4
5
6
7
General Instructions
4
7
6
5
install here
install here
B-0969-RK01 (Kit)
1/2” Vacuum Breaker