
MANUAL ROOF FANS008

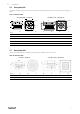


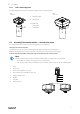
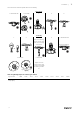


Table Of Contents
- 1 General information
- 2 Important safety information
- 3 Warranty
- 4 Delivery, transport, storage
- 5 Description
- 6 Name plate and type key
- 7 Accessories
- 8 Installation
- 9 Electrical connection
- 10 Commissioning
- 11 Operation
- 12 Troubleshooting/maintenance/repair
- 13 Cleaning
- 14 Deinstallation/dismantling
- 15 Disposal
- 16 Commissioning Report

Installation |
11
8 Installation
Safety information
♦ Observe 2 Important safety information, page 1
♦ Use installation material with fire resistance classes that meet temperature requirements.
♦ Provide contact and intake protection and ensure safety distances according to DIN EN ISO13857 and DIN 24167-1.
♦ To reduce transmission of vibration to the duct system, we recommend flexible connections from our accessory
range, see chapter Accessories.
Preconditions
♦ Ensure that the fan and all its components are
undamaged.
♦ Fit the fans in such a way that there is sufficient
access for installation, troubleshooting, maintenance
and repair.
♦ Protect against dust and moisture when installing.
♦ Ensure that the information on the name plates (fan
and motor) matches up with the operating conditions.
8.1 Installation of the ventilation system
Leaking roof due to wrong installation.
♦ The roof seal (e.g. plastic or bitumen foil) has to be pulled and
fixed under the base plate of the roof fan, see below picture.
Leaking duct system.
♦ When installing the roof fan and accessories all mounting
surfaces have to be sealed air tight.
Condensate formation due to thermal bridge.
1. Check if the fan and accessories form a thermal bridge.
2. Insulate the fan and accessories with vinyl rubber (e.g. Armaflex)
in sufficient thickness.
The below installation diagram is an example.
1
3
4
5
6
7
8
9
2
1 Base plate of the roof fan
6
VKS/VKM Back draft damper
2
SSS
Slanting socket silencer
7
Has to be realized on-site
3
Roof seal
e.g. plastic or bitumen foil
8 ASS
Flexible connection
4
Isolation
9
Duct system
5
Roof construction
Damage to the bearings or other parts of the fan can occur.
♦ Do not place a duct bend directly before or after the fan!
♦ Ensure a smooth and constant air flow to the device.
• Rectangular duct system: D = Hydraulic diameter
• Round duct system: D = Nominal diameter
min.
2,5x Ø D
Ø D
| 008