
Installation Instructions


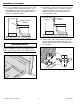


13. After the mortar/thinset has set up (24 hours), install
1/2” moisture-resistant wallboard, as shown. The
ideal installation results when the outside surface of
the wallboard and shower floor flange are flush, as
shown in the illustration below.
To prevent possible water damage (wicking affect) to the
wall, the wallboard must have a 1/2” gap around the
shower floor flange, as shown in the illustration below.
14. A Swanstone, or alternate shower wall material, can
now be installed over the 1/2” moisture-resistant
wallboard and shower floor flange. Follow the
installation instructions for the wall panel system
when installing the walls.
15. Lubricate both rubber caulking gasket (5) and drain
pipe (9) with dishwashing liquid. Slide the rubber
caulking gasket over the drain pipe and down into
the drain body.
ADA-016A
9
5
ADA-002
Swanstone
Wall Panel
Moisture-Resistant
Wallboard
ADA-006
1/2"
1/2"
IMPORTANT NOTICE
ADA-005
1/2"
Moisture-Resistant
Wallboard
The Swan Corporation – Swanstone 14 800-325-7008
Installation Procedure