
Operating Instructions and Installation Instructions


28 | DHB-E SLi www.stiebel-eltron.com
INSTALLATION
Installation
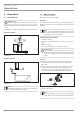
Drill the holes and secure the wall mounting bracket at 2
points using suitable fixing materials (screws and rawl plugs
are not part of the standard delivery).
Fit the wall mounting bracket.
Making the water connection
!
Material losses
Carry out all water connection and installation work in
accordance with regulations.
12
D0000053319
Seal and insert the twin connectors.
D0000050947
1
4
5
2
3
2
1 DHW with tee
2 Gasket
3 Cold water with 3-way ball shut-off valve
4 Strainer
5 Flow limiter or plastic profile washer (see chapter "Installa-
tion/ Water installation/ Flow rate")
Note
A second flow limiter is provided with the DHB-E 18/21/24
SL. Install the appropriate flow limiter for output of the
appliance (see "Flow rate regulator" in chapter "Installa-
tion/ Specification/ Data table"):
4.0l/min = pink
7.5 l/min = blue
8.5 l/min = green
Secure the tee and and 3-way ball shut-off valve, each with a
flat gasket, to the twin connector.
!
Material losses
Never use the 3-way ball shut-off valve in the cold water
inlet to reduce the flow rate.
Installing the appliance
26�02�02�0811
For easier installation, push the cable grommet of the upper
electrical connection into the back panel from behind.
Remove the transport plugs from the water connections.
Remove the fixing toggle from the upper part of the back
panel.
Route the power cable through the cable grommet from
behind until the power cable rests against the cable sheath.
Align the power cable.
Enlarge the hole in the cable grommet if the cross-section of
the power cable is >6mm².
Push the appliance over the threaded stud of the wall mount-
ing bracket, so that it breaks through the soft seal. If neces-
sary, use a screwdriver.
Push the fixing toggle on to the threaded stud of the wall
mounting bracket.
Push the back panel firmly against the wall. Lock the fixing
toggle by turning it 90° clockwise.
26�02�02�0858
Fit the pipes with flat gaskets onto the twin connectors.
!
Material losses
The strainer must be fitted for the appliance to function.
When replacing an appliance, check whether the
strainer is installed.