
User's Manual


14
3
天井への取り付けかた/Attaching to the ceiling/Montage au plafond/
Montage an der Decke/Montaje en el techo/Montaggio al soffitto/
4
日本語
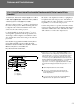
3 ボルトM8×20 (c)2本を、ワッシャー (e)、スペーサー (g)
の 順に 通しベースボックス ( a ) のヒンジ 部に 仮 止 め する。
ベ ース ボック スのヒン ジ 部 に 、サスペンションブラケット(b)
を 引 っか け プロジェクターを 吊るす 。
4 ボルトM6×12 (d)4本とワッシャー M6 (f)を取り付けて、
プロジェクターのスクリーン角度を合わせる。角度調整後、
ボルトM6×12 (d)4本すべてと手順3で仮止めしたボル
トM8×20 (c)2本をしっかり締めて固定する。
5 固定後にプロジェクター本体のレンズシフト機能を用いて
画像とスクリーンの位置を調整する。
English
3 Tighten loosely two bolts M8 × 20 (c), washers (e)
and spacers (g) to the base box hinge pins (a). Hang
the projector with the suspension bracket (b) on the
base box hinge pins (two bolts M8 × 20 (c)).
4 Attach four bolts M6 × 12 (d) and washers M6 (f),
tighten all bolts M6 × 12 (d) (angle holding) and two
bolts M8 × 20 (c) (attached in step 3) to secure the
projector to the screen angle.
5 After having secured the projector, adjust the
position of the screen and projected image using
SHIFT function of the projector.
(b)
(f)
(d)
(f)
(d)
(a)
(a)
(f)
(d)
(b)
(f)
(d)
(c)
(g)
(e)
(c)
(g)
(e)