
User's Manual


9
System Setup
Install and Power the Hardware
A
UX IN
MASTER
lockout
p
o
w
er
ethe
r
net
ne
t
w
o
r
k audio
au
t
omix link
dual mi
x
er
LIM
A
B
-
9
-1
8
-2
4
-3
6
-4
8
-6
0
0
gain
limi
t
er
L+R SUM
gain
l
o
w cut
hi shelf
me
t
er
push to solo | hold to mute
1 2 3 4 5 6 7 8
A
B
HEADPHONE
Rackmount the ANI
Use the screws and washers supplied in the Hardware Kit to mount the ANI.
Mount the APT
① Position the Access Point
The access point contains multiple directional antennas to provide
steady, reliable wireless communication. The cardioid radiation pattern
is strongest from the top of the face plate.
Use the following guidelines when mounting the access point:
•Direct the antenna toward the intended coverage area.
•Position access point so there is nothing obstructing a line of sight to
the microphones.
•Keep antennas away from large metal objects.
•Mount access points at least four feet apart.
Important: Always perform a "walk around" test to verify coverage before
using a wireless system during a speech or performance. Experiment
with antenna placement to find the optimum location. If necessary, mark
"trouble spots" and ask presenters or performers to avoid those areas.
② Mount the Unit
Secure the unit to a ceiling or wall using the supplied mounting screws.
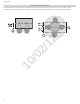
Power the Hardware
① ANI
Connect the IEC power cable from the back panel to an AC power
source. Turn on the power switch.
② APT
The APT requires PoE to operate. Use a Cat5e cable to connect the
APT to the ANI port 1 or to a gigabit switch with PoE. There is no power
switch.
③ Charger
Connect the PS45 external power supply from the charger to an AC
power source. Turn on the power switch.
④ Gigabit Ethernet Router or Switch
Connect the router or switch to an AC power source. Turn on the power
switch.
2
1
Additional Equipment Requirements
① Network Cables
Ensure all network cables are shielded Cat5e or higher and do not exceed 100 m between network devices.
② Audio Cables
Reference the guide supplied with the MXWANI Hardware Kit to assemble the output cables to the connectors and strain relief tabs.
③ Gigabit DHCP Router
DHCP routers provide the most reliable networking hub for the system.
++++++++ ++
www.shure.com
MXWANI8
M XW AN I8
uplin k
Input: 100-240V ~ 1A max. 50/60 Hz
234
Class 0 Po E
1
++++++++ ++
www.shure.com
MXWANI8
M XW AN I8
uplin k
Input: 100-240V ~ 1A max. 50/60 Hz
234
Class 0 Po E
1
uplin k
234
Class 0 Po E
1
Class 0 Po E
1
②
①
②
③
①
7
8
6
5
1
2
3
4
7
8
6
5
1
2
3
4
15V 0.6A
power
④
③
Link
Power
10/02/12