
Installation manual


33
Heat & Glo • SL-550TRSI-AUE • 2079-902 Rev. K • 10/08
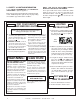
2.2 POWER OUTAGE
In the event of a power interruption during operation,
either push the OFF button on the remote control or
open access door and push the switch to OFF (as
shown in Figure 48) to shut off manually. The switch
must be returned to the ON position prior to operation
once power is restored.
Figure 47.
SWITCH IS SHOWN
IN “ON” POSITION
2.3 FAN OPERATION
The accessory fan is wired in series with a speed con-
trol switch and a temperature sensor switch. Set the
speed control to an "ON" position and light the heater.
The temperature sensor switch will automatically start
the fan when the switch warms up—and stop the fan
when it cools down. You can manually stop the fan by
turning the speed control switch to "OFF". See Figure
42 for fan wiring diagram.
!
3.0 SERVICING AND MAINTENANCE
A. HEATER SERVICING: Frequency of heater servic-
ing will depend upon use and type of installation.
B. IMPORTANT: TURN OFF GAS AND ELECTRICAL
POWER BEFORE SERVICING APPLIANCE. IT IS
RECOMMENDED THAT A COMPETENT SERVICE
TECHNICIAN PERFORM SERVICE CHECK-UPS AT
THE BEGINNING OF EACH HEATING SEASON.
C. The appliance and fl ue system should be inspected
before initial use and at least annually by a qualifi ed
fi eld service person.
D. Inspect the external fl ue cap on a regular basis to
make sure that no debris is interfering with the air
fl ow.
E. Keep the control compartment, logs, and burner
area surround the logs clean by vacuuming or
brushing at least twice a year.
CAUTION: THE LOGS GET VERY HOT - HANDLE
ONLY WHEN COOL.
Figure 48.
Pilot Assembly
WARNING: DO NOT USE ABRASIVE
CLEANERS ON THE GLASS DOOR AS-
SEMBLY. DO NOT ATTEMPT TO CLEAN
THE GLASS DOOR WHEN IT IS HOT.
F. The glass door should be cleaned using a house-
hold glass cleaner. DO NOT handle or attempt to
clean the glass when it is HOT.
G. Visually inspect the fl exible power supply cord; if
damaged, contact the service agent for a special
replacement cord assembly.
H. In order to properly clean the burner and pilot as-
sembly, turn off the gas to the unit and remove the
logs exposing the burner and pilot assembly. Clean
all foreign materials from top of burner. Check to
make sure that the burner orifi ce is clean.
Visually inspect the pilot periodically. Brush or blow
away any dust or linen accumulations. If the pilot orifi ce
is plugged, disassembly may be required to remove
any foreign materials from the orifi ce or tubing. When
the appliance is put back in service, check burner fl ame
patterns. Flames should be steady, not fl oating.
To obtain proper operation, it is imperative that the
pilot and main burner fl ame characteristics are steady,
not lifting or fl oating. Typically, the top 10 mm of the
thermocouple should be engulfed in the pilot fl ame
(Figure 49).