
Operation Manual


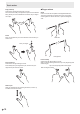


Table Of Contents
- IMPORTANT INFORMATION
- DEAR SHARP CUSTOMER
- SAFETY PRECAUTIONS
- TIPS AND SAFETY INSTRUCTIONS
- MOUNTING PRECAUTIONS
- Supplied Components
- System Requirements
- Part Names
- Connecting Peripheral Equipment
- Connecting the Power Cord
- Binding Cables
- Preparing the Remote Control Unit
- Turning Power On/Off
- Touch action
- Basic Operation
- Drawing
- LocalMM
- File Explorer
- Wireless Display
- Menu Items
- Functional Restriction Setting (Function)
- Controlling the Monitor with a computer (RS-232C)
- Troubleshooting
- Specifications
- Intellectual Property Rights and Other Matters
- Mounting Precautions (For SHARP dealers and service engineers)

13
E
Connecting Peripheral Equipment
4. TOUCH PANEL terminal 1 (for touch panel)
• Tousethetouchpanelwithacomputer,connectthe
touchpaneltothecomputerwithaUSBcable.
• Tousethisterminal,connectyourcomputertotheHDMI
1inputterminalonthefrontofthemonitor.
5. Audio input terminal
• Useanaudiocablewithoutresistance.
• Whenusingthisterminalforinput,donotinputaudiofrom
anyotherterminals.
• Youcannotadjustthevolumewithvolumeadjustment.
Pleasecontrolvolumeonsourcedevice.
6. Digital audio output (optical) terminal
• Audiothatisinputintothemonitorisoutput.
• Connectusingacommerciallyavailableaudiodigital
cable.
• Theoutputsoundvariesdependingontheinputmode.
• Youcanadjustthevolumewithvolumeadjustment.
7. LAN terminal
• WhenPowerSaveModeisOff,youcanuse“Wakeon
LAN(MagicPacket)”toturnonthepowerviaLAN.
8. HDMI 2 input terminal
9. HDMI 3 input terminal
• UseacommerciallyavailableHDMIcable(conformingto
theHDMIstandard)thatsupports4K.
10. RS-232C input terminal
• Youcancontrolthemonitorfromacomputerby
connectingacommerciallyavailableRS-232straight
cablebetweentheseterminalsandthecomputer.The
terminalonthemonitorisafemale-typeconnector.
11. Component input terminals (AV/YPBPR)
• ChangetheinputmodetoYPBPR.
• Thiscanbeusedasavideoinputterminal.Connectto
the[VIDEO]inputterminal,andchangetheinputmodeto
AV.
12. Audio input terminals (for Component input terminals)
13. Audio output terminal
• Theoutputsoundvariesdependingontheinputmode.
• Youcanadjustthevolumefromthespeakersofthis
monitorandtheaudiooutputterminalsimultaneouslyby
usingVOLUME.
• Whenacableisconnectedtotheaudiooutputterminal,
audioisnotoutputfromthemonitorspeaker.
• Itisnotpossibletocontrolthesoundoutputfromthe
audiooutputterminalwiththeAudiomenu.
14. TOUCH PANEL terminal 2 (for touch panel)
• Tousethetouchpanelwithacomputer,connectthe
touchpaneltothecomputerwithaUSBcable.
• Tousethisterminal,connectyourcomputertothevideo
inputterminalontherearofthemonitor.
15. SD card slot
• InsertanSDmemorycardorSDHCmemorycard.SD
memorycards(upto2GB)andSDHCmemorycards(up
to32GB)aresupported.Theexplanationsinthismanual
refertobothSDmemorycardsandSDHCmemorycards
as“SDmemorycards”.
• BeforeremovinganSDmemorycard,followthestepsfor
removal.(Seebelow.)
Supported SD memory cards
FileSystem FAT32
Capacity
Upto32GB
(maximumfilesize4GB)
• DonotuseanSDmemorycardwithasecurityfunction
orawriteprotectionfunction.
16. D-sub 1 input terminal (VGA1)
17. D-sub 2 input terminal (VGA2)
18. D-sub output terminal
19. Audio input terminal 1
20. Audio input terminal 2
• Useanaudiocablewithoutresistance.
n
How to remove a USB flash drive or an
SD memory card
1. In the home screen of APPLICATION mode, touch
and touch “Storage”.
2. Touch
of the device you want to remove.