
Operation Manual, Machine Adjustment Guide


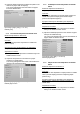


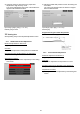


Table Of Contents
- 1 Image Quality Adjustment
- 1.1 Laser Adjustment
- 1.2 Density Adjustment
- 1.3 Fuser Adjustment
- 1.4 Transfer
- 1.5 Image Quality Adjustment
- 1.6 Other Functions
- 2 Image Position/Ratio/Area Adjustment
- 3 Peripheral Adjustment
- 3.1 Saddle Finisher (When the 100-sheet saddle finisher is installed)
- 3.1.1 Staple Position Adjustment
- 3.1.2 Paper Alignment Width Adjustment for Staple Position
- 3.1.3 Fold Position Adjustment for Saddle Fold
- 3.1.4 Fold/Staple Position Adjustment for Saddle Stitch
- 3.1.5 Staple Position Fine Adjustment for Saddle Stitch
- 3.1.6 Paper Alignment Width Adjustment for Saddle Stitch/Saddle Fold
- 3.2 Trimming Module
- 3.3 Finisher (When the 100-sheet finisher is installed)
- 3.4 Punch Module (When the 100-sheet saddle finisher and the punch module for the finisher is installed)
- 3.5 Folding Unit
- 3.1 Saddle Finisher (When the 100-sheet saddle finisher is installed)
- 4 Print Setting Value List
- 5 Combined Auto Adjustment
- 6 Layout of the 10-key Pad
- Appendix A: Symptoms to Adjust Transfer Values

36
3.4 Punch Module (When the 100-sheet saddle
finisher and the punch module for the
finisher is installed)
Select [Punch Module] in the Peripheral Adjustment
screen.
3.4.1 Punch Position Adjustment
Modes the adjustment is effective in:
Copy and printer modes
Overview:
This performs adjustment of punch position from paper
edge or in the direction of paper width.
Symptoms that may be alleviated by the adjustment:
Punch position misalignment in front-rear direction
Adjustment Procedure:
1) Select [Punch Position Adjustment] in the Punch
Module screen.
2) Adjust the hole positions in relation to the lead edge
and in the direction of paper width.
The 10-key pad appears when the textbox is tapped.
Enter the desired value.
Sub Scan Direction:
Input range: [50] to [150] (1 = 0.1 mm)
Default: [100]
Main Scan Direction:
Input range: [85] to [115] (1 = 0.1 mm)
Default: [100]
3.4.2 Punch Mode Switch
Modes the adjustment is effective in:
Copy and printer modes
Overview:
This switches punch operation mode.
High Accuracy Mode: Prioritizes punch position accuracy
when punching.
High Production Mode: Prioritizes speed when punching.
Symptoms that may be alleviated by the adjustment:
Variation of punch position against paper
Adjustment Procedure:
1) Select [Punch Mode Switch] in the Punch Module
screen.
2) Select [High Accuracy Mode] or [High Production
Mode] for punch mode.
Default: [High Production Mode]
Note:
Select [High Accuracy Mode] when punch hole is
skewed against paper.
3) Tap the [Register] key to switch to the desired mode.
3.4.3 Punch Operation Skew Adjustment
Modes the adjustment is effective in:
Copy and printer modes
Overview:
This performs skew (paper tilt) adjustment for punch in
High Accuracy Mode.
Perform this adjustment when the punch hole is skewed
against paper in high accuracy mode.
Symptoms that may be alleviated by the adjustment:
Punch position skew against paper
Adjustment Procedure:
1) Select [Punch Operation Skew Adjustment] in the
Punch Module screen.