
Owner's Manual


122
CHECKING THE STAMP LAYOUT (Layout)
After stamp items have been selected, you can check the print layout, change the print position, and delete print items.
1
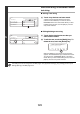
Touch the [Special Modes] key.
2
Select Stamp.
(1) Touch the keys to switch through
the screens.
(2) Touch the [Stamp] key.
3
Touch the [Layout] key.
If the layout is correct, touch the [OK] key.
The [Layout] key can only be touched when stamp items have been selected.
4
Touch the key of the print item that you
want to delete or whose position you
want to change.
A maximum of 14 characters appear in each key.
5
To change the position of the print item,
touch the [Move] key. To delete the item,
touch the [Delete] key.
If the [Move] key is touched, a screen for selecting the
destination position appears.
If the [Delete] key is touched, the print item is deleted. (Go to
step 8.)
Ready to scan for copy.
2-Sided Copy
Original
8 x11
1
/
2
0
Output
Special Modes
File
Quick File
Full Color
Color Mode
2.
3.
4.
1.
8 x11R
8 x14
11x17
8 x11
Auto
Exposure
100%
Copy Ratio
Job Detail
Settings
1
/
2
1
/
2
1
/
2
8 x11
Plain
1
/
2
Special Modes
OK
Stamp
Quick File
Image Edit
File
Color
Adjustments
Proof Copy
3/4
(1)(2)
Stamp
OKCancelLayout
1/2
Date
Page
Numbering
Stamp
Text
Layout
OK
DO NOT COPY
1,2,3..
AAA AAA
CONFIDENTIAL
1
4
2
5
3
6
1 2 3
4 5 6
Do you want to move or delete the
selected item?
Cancel Delete Move