
Specifications


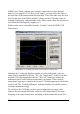


better with the related horizontal sliders. Observe how the image view is
changed when you alter these values.
The best positions of Low and High control are as follows: the Low count
should be on the count value representing black on the image. Any pixel with
value lower than this count will be displayed black. The High count should be
on the count value representing white on the image. Any pixel with value
higher than this count will be displayed white.
Similar adjustments are usually called brightness and contrast adjustments.
● Brightness is changed by moving both Low and High values together
up and down. Try to move both values using the second slider below
the histogram chart.
● Contrast is changed if the relative distance between Low and High
values changes. Try to narrow or widen the distance between Low and
High values.
But astronomers often need precise control of Low and High values so the
terms brightness and contract are not used within SIMS.
Calibration
If you preform short exposure of bright object, the signal to noise ratio of the
image is very high. Image artifacts related to CCD chip (like hot/cold pixels or
thermal noise) almost do not affect the image. But all unwanted effects of
unevenly illuminated field, CCD thermal noise etc. significantly degrade image
quality when imaging dim deep-sky objects for many minutes.
This is why every CCD image should be calibrated. Image calibration basically
consists of two steps:
1. Dark frame subtraction
2. Applying flat field
Image calibration is supported by the “Calibration” tool in SIMS .
The raw image downloaded from the camera contains not only the information
desired (the image of the target field), but also CCD chip thermal noise and
artifacts caused by unevenly illuminated field (vignettation), shadows of dust
particles on camera cover glass and filters etc.
38