
Operating instructions


Intellex RMS Digital Video Management System
Setup Options 97
NOTE: You can only configure one light change target area at a time.
1. Set the Sensitivity: 1 to 100.
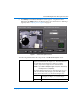
2. Move the mouse pointer to the image area.
3. Draw the boundaries of the target area.
NOTE: The target area must be enclosed to activate the filter.
a. Move the mouse pointer to the first corner of the target area and click the
mouse button.
NOTE: To erase the last endpoint, double-click the right mouse button.
b. Move the mouse pointer to the next corner of the target area. The unit draws a
line as the pointer moves.
Sensitivity The unit uses this setting to distinguish between valid
and invalid changes in the target area. At higher settings,
small changes trigger the filter. At lower settings, larger
changes are required to trigger the filter.
NOTE: When setting the filter sensitivity level, be sure to
consider the variations in lighting conditions, such
as exterior cameras recording from day to night
or interior cameras recording areas with lighting
turned on or off. To ensure that useful video is
recorded or filtered, nominal lighting in the area is
required. You should adjust the filter sensitivity for
the lowest lighting condition that applies (e.g., low
sensitivity for low lighting), and then test the filter
to ensure its proper activation. More lighting in
the area will allow higher sensitivity settings to be
safely used.
1 … 100 Use this slide control to set the
sensitivity for the filter from
minimum (1) to maximum (100).
The sensitivity number represents
the area of changing video relative
to the active zone area. Maximum
sensitivity (1) requires that a larger
fraction of the active zone change
before the alarm is generated.
Default Click to reset the sensitivity to its
default middle position (50).