
Users Manual

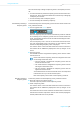


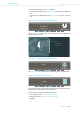
Table Of Contents
- Digital_9000_Manual_06_2017_EN
- Important safety instructions
- Digital 9000 – System overview
- Delivery includes
- EM 9046 receiver
- EM 9046 CAB cable set
- Antennas and antenna boosters
- GZL 9000 antenna cables
- SKM 9000/SKM 9000 COM radio microphone
- Microphone heads for the SKM 9000 radio microphone
- SK 9000 bodypack transmitter
- Microphones for the SK 9000 bodypack transmitter
- KA 9000 COM command adapter for the SK 9000 bodypack transmitter
- CI 1-4 line/instrument cable for the SK 9000 bodypack transmitter
- B 60/B 61 battery packs
- BA 60/BA 61 accupack
- L 60 charger
- Product overview
- EM 9046 receiver
- Antennas and antenna boosters
- GZL 9000 antenna cable
- SKM 9000/SKM 9000 COM radio microphone
- SK 9000 bodypack transmitter
- KA 9000 COM command adapter for the SK 9000 bodypack transmitter
- BA 60 accupack
- BA 61 accupack
- B 60 battery pack
- B 61 battery pack
- L 60 charger
- Preparing the EM 9046 receiver for use
- Preparing the A/AB/AD 9000 antennas and/or antenna boosters for use
- Preparing the SKM 9000 radio microphone for use
- Preparing the SK 9000 bodypack transmitter for use
- Preparing the L 60 charger for use
- Cascading several chargers
- Setting up or mounting the charger
- Preparing the Digital 9000 system for use
- Using the EM 9046
- Using the SKM 9000
- Using the SK 9000
- Using the L 60
- Cleaning and maintaining the Digital 9000 system
- If a problem occurs ...
- Specifications

Using the EM 9046
60 | Digital 9000
“Range detail scan” – performing an optional frequency scan of
the active frequency range and assigning frequency presets to the
channels
왘 Call up the “Range detail scan” menu item.
The activated booster frequency scan and the result of the last fre-
quency scan (“Frequency scan” or Range detail scan”) are displayed.
“Select channel or press SET to scan” appears in the menu selection.
You can now perform a new frequency scan of the activated booster fre-
quency range (optional) or immediately assign frequency presets to the
channels.
Performing a frequency scan To perform a new frequency scan of the activated booster frequency range
(optional):
왘 Start the frequency scan by pressing the jog dial G.
Please note: All audio outputs will be muted!
Assigning frequency presets to
the channels
To assign frequency presets to the channels:
왘 Select one of the channels 1–8 by pressing its channel button M.
A mark with a flag and a channel number appears.
please select booster range
774.000 778.000 782.000 786.000 790.000 794.000 798.000
MHz
Select channel or press SET to scan.
detail scan
n.
.
.
detail sca
n
Numeric
measured
values
Selected
frequency
preset
please select booster range
774.000
Name: „CH1“
778.000 782.000 786.000 790.000 794.000 798.000
MHz
Preset Freq MHz.
freq scan
ch_1
RF A: -104.5 dBm RF B: -106.5 dBm
Range: 774 - 798 MHz
B8.19
785 000
“HD” “HD/LR” “LR/HD” “LR”