
User Manual


–14–
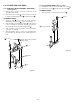
3-6. FE HEAD AND ACE HEAD
3-6-1.AUDIO R/P HEAD ASSEMBLY (ACE HEAD)
(See Fig.3-6-1)
1) Unplug the connector from the audio R/P head
assembly (ACE head).
2) Remove the two screws
, then remove the audio R/
P head assembly (ACE head)
and the washer .
ASSEMBLY NOTES:
1. Align the hole on the audio R/P head assembly
(ACE head) with the pin
on the chassis unit.
2. After assembly, check that the clamp
on the cleaner
roller assembly has snapped into the mounting of
the audio R/P head assembly (ACE head)
.
3. After assembly, clean the surface of the head with a
soft cloth or chamois.
4. After assembly, refer to section 4-3, and adjust the
head height, the azimuth and the tracking (X) posi-
tion.
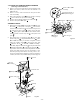
3-6-2. FULL ERASE HEAD (See Fig.3-6-2)
1) Unplug the connector from the full erase head .
2) Remove the screw
and the full erase head .
ASSEMBLY NOTE:
1. After assembly, clean the full erase head .
Fig.3-6-1
Fig.3-6-2
Screws
Audio R/P head assembly
(ACE head)
Hole
Clamp
Pin
Washer
Full erase head
Screw