
User Manual


CLOCK ADJUSTMENT
The time for the second and subsequent VCRs can be
set to the same time as the first VCR.
A signal from a separate device can also be used to set
the time for the second and subsequent VCRs to the
same time as the first VCR. When using the signal from
a separate device to set the time, input a 0 V signal to
the CLOCK IN terminal of the first VCR for 100 ms or
longer.
1
Press the MENU button to display the MAIN MENU.
2
Press the l (or j) button to select the “3.GENERAL
SET” line, then press the ENTER button.
3
Press the l (or j) button until the “CLOCK
ADJUST” setting is highlighted, then press the
ENTER button.
4
Press the l (or j) button to set the hour at which
the adjustment will be conducted, then press the
ENTER button.
NOTE:
œ The clock adjustment cannot be set to “00:00”.
Example
<GENERAL@SET>
TAPE@IN@MODE@@@@@STOP
TAPE@END@MODE@@@@REW
CLOCK@ADJUST@@@@@03:00
THREAD@CHECK@@@@@N
VIDEO@LOSS@@@@@@@N
REMOTE@@@@@@@@@@@MENU
VIDEO@@@@@@@@@@@@COLOR
5
Press the MENU EXIT button.
The setting procedure on the first VCR is now
completed.
6 Repeat the procedure for all the other VCRs, setting
“CLOCK ADJUST” (to the same time as set on the
first VCR).
NOTE:
œ This function will not operate on the day the daylight
saving/standard time is changed.
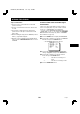
Connection
VCR No. 1 VCR No. 2
To CLOCK IN terminal
To COM terminal
CLOCK IN COM CLOCK OUT CLOCK IN COM CLOCK OUT
NF4Q/NA2 (SRC-800A GB) Tue. Sept., 10/2002
English
29