INST.
INST. MANUAL-BE4D-A (AUS) 4/1/08 5:37 PM Page 2 2 Warning and Caution Warning High voltages are used in the operation of this television receiver. Do not remove the cabinet back from your set. Refer servicing to qualified service personnel. Do not drop or push objects into the television cabinet slots or openings. Never spill any kind of liquid on the television receiver. To prevent fire or electrical shock hazard, do not expose the television receiver to rain or moisture.
INST. MANUAL-BE4D-A (AUS) 4/1/08 5:37 PM Page 3 3 Contents Warnings and Cautions . . . . . . . . . . . . . . 2 Contents . . . . . . . . . . . . . . . . . . . . . . . . . 3 Plug & Play . . . . . . . . . . . . . . . . . . . . . . . 3 Front Control . . . . . . . . . . . . . . . . . . . . . 4-5 Remote Control Transmitter . . . . . . . . . . 6 Battery Installation of the Remote Control Transmitter . . . . . . . 6 General Operation Remote Control Operation . . . . . . . . . 7 OFF TIMER . . . . . . . . . . . .
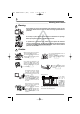
INST. MANUAL-BE4D-A (AUS) 4/1/08 5:37 PM Page 4 4 Each button listed in this section has the same function as it’s corresponding button on the remote control. Front Control Model CA21XS2S, CP21XS2S Press to open 3 2 1 VIDEO L-AUDIO-R TV/AV MENU 10 9 8 7 - 6 + CH 5 4 Model CA21YS2S, CP21YS2S Press to open 3 2 1 AV2 IN VIDEO L-AUDIO-R 10 9 8 1. 2. 3. 4. 5. 6.
INST. MANUAL-BE4D-A (AUS) 4/1/08 5:37 PM Page 5 5 Each button listed in this section has the same function as it’s corresponding button on the remote control. Front Control Model CA21KS2, CP21KS2, CA21KS2K, CP21KS2K Pull to open TV/AV MENU - 5 76 VIDEO L-AUDIO-R 10 9 POWER + CH 4 3 2 1 8 Model CA21SF1, CP21SF1 TV/AV MENU 76 1. 2. 3. 4. 5. 6. Mains ON/OFF Button Remote Control Detector Stand-by and Power Indicator Programme UP/DOWN VOLUME MENU - + 5 POWER CH 4 3 2 1 7.
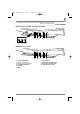
INST. MANUAL-BE4D-A (AUS) 4/1/08 5:37 PM Page 6 6 Remote Control Transmitter TIMER button TV / AV Power ON/OFF button TV / AV Selector button TIMER MUTE button RECALL/COLOUR SYSTEM button Programme Selector button P -/- - P DIGIT button SWAP CH SCAN CH CHANNEL SCAN button SWAP button VOLUME - button VOLUME + button MENU STEREO/MONO button Programme DOWN button BASS EXPANDER button ALTERNATE button Programme UP button PICTURE MODE button A •B BASS CH SOUND PICTURE S.
INST. MANUAL-BE4D-A (AUS) 4/1/08 5:37 PM Page 7 7 General Operation ❒ Remote Control Operation Standby/Power-on To switch the TV on and off. For shutting off a power supply completely, Press the Mains ON/OFF button on the front control of TV set. -/- - -/- - /- - -/- - -/- - -/- - -/- - -/- - -/- - -/- - -/- - -/- - TIMER -/- -/- - -/- - -/- - -/- - -/- - -/- --/-/- - Direct programme selector direct access to programmes using the (0-9) numeric button.
INST. MANUAL-BE4D-A (AUS) 4/1/08 5:37 PM Page 8 8 General Operation ❒ Off Timer ❒ On Timer (Continued) The OFF TIMER will switch off the TV automatically after 30 minutes, 1 hour, 1 hour and 30 minutes, or 2 hours. 2 1 2 3 Press the TIMER button. OFF 0:00 Press the VOLUME ( + or - ) button to select the time period. ■ Just one minute before switching off the TV, “OFF 0:01” will be display on the screen. ■ To cancel the OFF TIMER, select “OFF 0:00” by pressing the VOLUME (+ or - ) button.
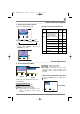
INST. MANUAL-BE4D-A (AUS) 4/1/08 5:37 PM Page 9 9 Colour and Sound System ❒ Setting of the Sound System (Semi-Auto or Manual Tuning mode ) MODE SEARCH POSITION SYSTEM SIF SKIP MEMORY Broadcast Transmission System List SELECT Country Area SEMI START 2 AUTO BG OFF -- Middle Union of Arab Emirates, East Kuwait, Oman, Qatar, ADJUST Asia BACK EXIT BG I DK M (5.5MHz) (6.0MHz) (6.5MHz) (4.5MHz) 2) To enter a sound system selection into the memory, select “MEMORY” and press the VOLUME + or - button.
INST. MANUAL-BE4D-A (AUS) 4/1/08 5:37 PM Page 10 10 Picture Adjustment ❒ Basic Picture Adjustment Operation (Continued) 2 When “PICTURE” is not selected, select ■ To return to Main menu, press the ALTERNATE button. “PICTURE” with the Programme UP or DOWN button. ■ To return to the normal TV mode, press the MENU button. ( Or will automatically return to PICTURE the normal TV mode after 20 seconds.) AUDIO PRESET LANGUAGE 3 Press the VOLUME + or - button to display Picture Adjustment menu.
INST. MANUAL-BE4D-A (AUS) 4/1/08 5:37 PM Page 11 11 Tuning of the Channels Up to 256 broadcast stations in your reception area can be stored in the electronic memory. There are three ways of tuning as follows; 1. Automatic Tuning (the basic way): All receivable channels are automatically tuned in and memorized in consecutive programme position. 2. Semi-Auto Tuning: Use to preset a receivable channel in any desired programme position, e.g. the position with the same number as the channel. 3.
INST. MANUAL-BE4D-A (AUS) 4/1/08 5:37 PM Page 12 12 ❒ Channel Copy This function can be utilized after Automatic Tuning. For example, to copy a TV channel on programme position “2” onto programme position “6”; Select programme position “2” 1 3 Press the DIGIT button, “ 1 “ button and then “ 2 ” button on the remote control to enter programme number 12. (For example, to enter programme number “ 3 “, press “ 3 ” button only.
INST. MANUAL-BE4D-A (AUS) 4/1/08 5:37 PM Page 13 13 ❒ Skip Channel Set and cancel (Continued) 4 Select “SKIP” by pressing the Programme UP or DOWN button,then press the VOLUME + or - button to set SKIP to ON. To cancel Skip Channel function, set to OFF. MODE SEARCH POSITION SYSTEM SIF SKIP MEMORY SELECT Select “MEMORY” by pressing the Programme UP or DOWN button, then press the VOLUME + or - button for memory.
INST. MANUAL-BE4D-A (AUS) 4/1/08 5:37 PM Page 14 14 Setting of the OSD Language 1 Press the MENU button for MAIN menu display. ENGLISH ENGLISH 2 Select “LANGUAGE “ by pressing programme UP or DOWN button. the PICTURE AUDIO PRESET LANGUAGE 3 ENGLISH PyCC NN FRANCAIS PORTUGUES PICTURE AUDIO PRESET LANGUAGE Press the VOLUME + or - button for Language menu display.
INST. MANUAL-BE4D-A (AUS) 4/1/08 5:37 PM Page 15 15 ❒ Connecting To the Rear AV1 Input Jacks (Continued) ■ When watching a video program input from the AV1 terminal, press the TV/AV button to select AV1.
INST. MANUAL-BE4D-A (AUS) 4/1/08 5:37 PM Page 16 16 ❒ Connecting To the Front AV2 Input Jacks (Optional Model) To Audio Input-R (AV2) To Audio Input-L (AV2) To Video Input (AV2) It is convenient to use the AV input jack on the front panel for equipment that is often connected and disconnected. ■ To watch the Front AV2 video input picture, select AV2 position by pressing the TV/AV Selector. AV2 Video/DVD Player * Model CA21SF1, CP21SF1 are not equipped with Front AV2 input terminal.
INST. MANUAL-BE4D-A (AUS) 4/1/08 5:37 PM Page 17 17 Aerial Connection ❒ Connecting Outdoor Aerial Connect the cable with a plug from a UHF (or VHF) aerial to the aerial socket on the cabinet back. Outdoor Aerial Aerial Cable Aerial Socket For all aerial circuit problems please consult your local dealer. Care and Cleaning The surface of the cabinet can be damaged if not properly maintained.
INST. MANUAL-BE4D-A (AUS) 4/1/08 5:37 PM Page 18 18 Specifications Power Source AC 127-240 Volts, 50/60Hz Colour System PAL/NTSC4.
INST. MANUAL-BE4D-A (AUS) 4/1/08 5:37 PM Page 19 19 Helpful Hints - Problems/Solutions Before requesting service check the following chart. Problem: Check these Conditions / Try these solutions: No picture, no sound ● Check if TV is plugged in. ● Try a different channel, if OK, probably station trouble. Poor picture, sound OK ● Adjust Brightness or Contrast control. ● Adjust Fine Tuning. (See page 9.) ● Check aerial connection. No colour, Picture OK ● Adjust Colour or Tint control.
INST. MANUAL-BE4D-A (AUS) 4/1/08 5:37 PM Part No. 1AA6P1P5578-A BE4D-A (FC8-A) Page 20 SANYO ELECTRIC Co., Ltd.