Instruction Manual Manuel d'utilisation Bedienungsanleitung Gebruiksaanwijzing Manuale d'Istruzioni CE42SRE1 Manual de instrucciones LCD Monitor Moniteur d'affichage à cristaux liquides LCD-Monitor LCD-Display Monitor LCD Monitor de LCD GB English Page 2~11 F Français Page 12~21 D Deutsch Seite 22~31 NL Nederlands Bladzijde 32~41 I Italiano Pagine 42~51 E Español Página 52~64 Please read this Instruction book before using your LCD monitor.
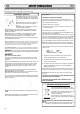
GB GB CAUTION: Please read and retain for your safety. This unit has been engineered and manufactured to assure your personal safety, but improper use can result in potential electric shock or fire hazards. In order not to defeat the safeguards incorporated in this monitor observe the following basic rules for its installation, use and servicing. Installation and Use Do not allow anything to rest on the power cord. Do not locate this LCD monitor where the cord will be damaged by people walking on it.
GB GB Servicing Your monitor is fully transistorised and does not contain any user serviceable components. You must not remove the rear cover of the monitor by yourself. The apparatus is working with high voltages and could damage objects or even endanger people. Leave all required repair and service jobs to an authorised service technician. He will exclusively use such spare parts that are complying with the same safety standards as applicable to the original parts.
GB GB Step : 1 Mains Connection ■ Connect the display unit to VGA, BNC and Scart connector as required. AC connection 1. Connect the IEC power connector to the mains inlet at the rear of the LCD monitor as shown above. 2. Connect the power cord of the LCD monitor to a wall outlet. ✐ As this product does not have a mains On/Off switch, please ensure your mains plug is easily accessible. ✐ The LCD monitor is prepared for a mains voltage AC220~240V, 50Hz.
GB GB Remote control battery installation Install two "AA" 1.5 volt batteries so that the "+" and "-" marks on the batteries match the "+" and "-" marks inside the unit into the remote control handset.
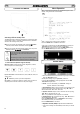
GB GB Controls and Menus Menu Operation Many of your monitors functions are controlled through the menu function, using the remote control handset. 1. The LCD display has a Standby light to show there is power. Switching into/from standby mode The Standby mode is used for switching the LCD monitor off for short periods of time. In standby mode the monitor is switched off but is still receiving mains power. ● To turn the monitor into standby mode, press the 4 button.
GB GB Sound menu Press the MENU button and select Sound using the e or d buttons, press the1 button to enter. Select and adjust to obtain the best sound settings for your environment using the e , d and 1 2 buttons. Press the MENU button to return to Main Menu. These settings automatically store when you exit the menu.Press the MENU button to exit menu. Setting menu ■ OSD Language Use the 1 or 2 button to select the prefered OSD language (French, German, Italian, Spanish, Dutch).
GB GB RS232C settings This monitor can be controlled via the RS232C connector using a suitable computer/ control commands. Serial Interface Specification Transfer Specification 1. Transmission Speed: initial setting value is 19200. 2. Transmission speed can be changed via the Installation menu (see below baud rate) Installation Menu This LCD monitor allows you to set up the following:- ■ Programme position at Start up SETTING PROCEDURE 1 .
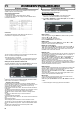
GB GB Specification Common specification Power source 220~240V 50Hz Colour system PAL NTSC3.5 ,SECAM AV terminal AV1: Scart CENELEC Standard Input: Composite video, RGB (5V RGB with 5V sync to pin 14) and audio-L/R AV2: BNC Input: RGB, H and V / Y, Pb, Pr and audio L/R Output: RGB, H and V / Y, Pb, Pr AV3: BNC Input: Composite video Output : Composite video Audio Monitor.Out: CINCH L/R Audio Speaker out: 2 x 6W DVI PC Input : Input: DVI-D GROUP Standard Mini D-SUB 15 PIN and Audio 3.
GB PC/DVI-D / COMPONENT SIGNAL SUPPORT TIMING LIST GB 11
F F ATTENTION : Pour votre sécurité, lisez attentivement ce qui suit. Ce moniteur a été conçu et fabriqué pour garantir votre sécurité personnelle, mais peut poser un risque de choc électrique ou d'incendie en cas d'utilisation incorrecte. Afin de faciliter le bon fonctionnement des dispositifs de sécurité intégrés, veuillez observer les règles de base suivantes, relatives à l’installation, l’utilisation et l'entretien de votre moniteur.
F F Entretien Votre moniteur LCD est entièrement transistorisé et ne contient aucun composant réparable. Vous ne devez pas enlever le capot arrière du moniteur par vos propres moyens. L’appareil fonctionne sous haute tension et vous risqueriez d'endommager ses composants ou de provoquer un accident. Confiez les réparations nécessaires à un technicien agréé. Celui-ci utilisera exclusivement des pièces de rechange conformes aux normes de sécurité des pièces d'origine.
F F Etape 1 : Connexion à la prise secteur ■ Raccordez le moniteur au connecteur VGA, BNC et péritel selon les besoins. 3. Connexion Y/ Pb/Pr / RGBHV (AV2) Ce moniteur LCD possède toute une gamme de connexions, Y, Pb, Pr ou RGB H/V. Vous pouvez raccorder votre lecteur DVD aux sorties Y, Pb, Pr au lieu d’utiliser un câble péritel .Ces sorties peuvent supporter une haute définition en format analogique. Les sorties RGB H/V peuvent être utilisées comme entrée PC via la sortie BNC.
F F Étape 2 : Installation de la pile de la télécommande Installez deux piles “ AA “ de 1,5 volts de manière à ce que les marques “ + “ et “ - “ des piles correspondent aux marques “ + “ et “ “ à l’intérieur du boÎter de la télécommande.
F F UTILISATION DES MENUS Commandes et terminaux De nombreuses fonctions de votre moniteur sont accessibles depuis la fonction de menu de votre télécommande. 1. Le moniteur LCD est équipé d'un voyant de veille indiquant que l’appareil est sous tension. Mode de veille Le mode de veille permet d’éteindre le moniteur pendant de brèves périodes de temps. En mode de veille, le moniteur est éteint mais reste sous tension. ●Pour passer le moniteur en mode veille, appuyez sur le bouton 4.
F F Menu son Appuyez sur le bouton MENU et sélectionnez le menu Son en appuyant sur le bouton e oud , puis appuyez sur le bouton 1 pour entrer. Pour ajuster les réglages Image, sélectionnez Image à l'aide des touches e ou d de la télécommande, puis appuyez sur la touche 1 pour entr- Sélectionnez et réglez pour obtenir le son optimal pour votre environnement, en utilisant les boutons e d et 1 2 . Appuyez sur le bouton MENU pour retourner au Menu principal.
F FONCTIONNEMENT DU PC Réglages du RS232C Le moniteur peut être commandé via le connecteur RS232C à l'aide d'un ordinateur/de commandes adéquats. F Installation Ce moniteur LCD vous permet de configurer les paramètres suivants : ■ Position du programme au démarrage. Procédure de réglages 1. Appuyez et maintenez enfoncé la touche verte de la télécommande pendant 5 secondes ( le menu Installation s'affiche). Spécifications de l’interface série Spécifications de transfert 1.
F F CARACTERISTIQUES Caractéristiques communes Caractéristiques communes Alimentation 220~240V, 50 Hz Système couleurs PAL/SECAM/NTSC 3.58 AV1 : Péritel CENELEC standard Entrée : vidéo composite, RGB (5 V RGB avec 5 V synch.
LICENSE DE L’UTILISATEUR FINAL F License de l'utilisateur final Le Produit (soit l'équipement ou l'appareil auquel se réfère la présente documentation) comprend un Logiciel (applications, utilitaires et modules du logiciel vendus avec le Produit) qui est la propriété de Sanyo ou de ses concédants de license. Lire les conditions d'utilisation de la license de l'utilisateur final décrites ci-dessous avant d'utiliser le Produit.
D D ACHTUNG: Bitte lesen und zu Ihrer Sicherheit aufbewahren. Dieses Gerät wurde so konstruiert und hergestellt, daß Ihre persönliche Sicherheit gewährleistet ist. Unsachgemäßer Gebrauch kann jedoch zu elektrischem Schlag oder zu Feuergefahr führen. Beachten Sie die folgenden Grundregeln für den Anschluß, den Gebrauch und die Wartung, um die in diesen Monitor eingebauten Schutzvorrichtungen nicht außer Kraft zu setzen. Anschluß / Gebrauch Stellen Sie keine Gegenstände auf das Netzkabel.
D D Wartung Ihr LCD-Monitor ist voll transistorisiert und enthält keine vom Benutzer zu wartenden Teile. Sie dürfen die Rückwand des LCD-monitors nicht selber entfernen. Der Apparat arbeitet mit hohen Spannungen und könnte Sachen beschädigen oder sogar Menschen gefährden. Überlassen Sie alle erforderlichen Reparaturen und Servicearbeiten einem autorisierten Servicetechniker. Dieser wird ausschließlich solche Ersatzteile verwenden, welche dieselben Sicherheitsanforderungen erfüllen wie die Originalteile.
D D Schritt : 1 Netzanschluss ■ Einhaltung der Vorschriften des Herstellers sicher an der Wand befestigt werden." ■ Monitor nach Bedarf mit VGA-, BNC- und SCART-Steckern AC-Anschluss verbinden. Auswahl der Eingänge Zum Umschalten zwischen den Modi TV, AV1, RGB, AV2 RGB H/V oder Y, Pb, Pr, AV3, DVI oder PC drücken Sie mehrmals die TV/AVTaste auf Ihrer Fernbedienung.
D D Schritt : 3 Einlegen der Batterien für die Fernbedienung Legen Sie zwei 1,5 Volt Batterien (Typ "AA") ein und achten Sie darauf, dass die "+" und "-" Markierungen auf den Batterien den "+ "und "-" Markierungen auf der Innenseite der Fernbedienung entsprechen.
D D Bedienungselemente / Anschlüsse MENÜBETRIEB Wenn Sie die Menübedienung aufrufen, wird unten auf dem LCD Monitor angezeigt, welche Bedientasten zur Verfügung stehen. Zum Aufrufen des Hauptmenüs die Taste u drücken. 1. Die rote Standby-Leuchte des Gerätes zeigt die vorhandene Stromversorgung an. Schalten in den/aus dem Standby-Modus Der Standby-Modus wird benutzt, wenn der LCD-Monitor für kurze Zeit ausgeschaltet werden soll.
D D Ton menu Drücken Sie MENU, um zum Hauptmenü zurückzukehren. Bei Beenden des Menüs werden die Einstellungen automatisch gespeichert. Einstellungen PC-Menü Schließen Sie Ihren PC über den Stecker an PC-IN oder RGBHV order DVI an der Rückseite des Monitors an. Wählen Sie anschließend über die Taste v auf Ihrer Fernbedienung den PCModusoder AV2 (RGBHV, siehe Seite 25 für AV2-Einstellungen)order DVI aus. Das Gerät wird dann zum Monitor für den PC.
D D Einstellungen RS232C Dieser Monitor kann unter Verwendung geeigneter Computer/Steuerungsbefehle über den RS232C-Anschluss gesteuert werden. Anschlussmenü An diesem LCD-Monitor können Sie folgende Einstellungen vornehmen: EINSTELLMETHODE ■ Senderposition beim Einschalten. 1.Die grüne Taste auf der Fernbedienung für 5 Sekunden drücken. Daraufhin erscheint das Anschlussmenü. 2. Anhand der Taste 5 oder 6jede Option Anschluss modus auswählen und diesen über die Taste 1 ein2 . bzw. ausschalten.
D D Nützliche Hinweise Technische Daten Allgemeine Daten Netzspannung Farbsysteme 220~240V, 50 Hz PAL NTSC3.
LIZENZVEREINBARUNG D D Lizenzvereinbarung Lizenzablauf Das Produkt (d. h. das Gerät bzw. die Anlage, auf die sich diese Dokumentation bezieht) beinhaltet Software (die in das Produkt eingebetteten Softwareprogramme, Hilfsprogramme und Module), die Eigentum von Sanyo oder dessen Lizenzgebern ist. Lesen Sie sich vor dem Gebrauch dieses Produkts bitte die Bedingungen für die Lizenzvereinbarung für Endnutzer durch.
NL NL LET OP: De onderstaande informatie voor uw eigen veiligheid goed doorlezen en bewaren. Dit toestel is ontworpen en gemaakt met het oog op uw persoonlijke veiligheid. Verkeerd gebruik kan echter een elektrische schok veroorzaken of brandgevaar opleveren. Om te voorkomen dat de beveiligingen die in dit toestel zijn ingebouwd buiten werking worden gezet, dient u de volgende basisregels voor installatie, gebruik en onderhoud in acht te nemen. Installatie / Gebruik Zet geen voorwerpen op het netsnoer.
NL NL Onderhoud Uw LCD-Monitor is volledig getransistoriseerd en bevat geen onderdelen die door de gebruiker kunnen worden vervangen. Gelieve de achterzijde van deLCD-Monitor niet zelf te verwijderen. Het apparaat werkt met hoge spanningen en kan objecten schade toebrengen en zelfs mensen in gevaar brengen. Laat alle nodige reparaties en ander onderhoud over aan bevoegde technici. Zij gebruiken enkel onderdelen die voldoen aan de veiligheidsprocedures van de originele onderdelen.
NL NL 1. AV1 Stap : 1 Netaansluitingen ■ SCART-aansluiting 2. RGB Sluit het toestel naar wens aan op de VGA-, BNC- of TTL-invoer (5V RGB-signalen) naar SCART-uitgang 3. Y, Pb, Pr/ AC schakelaar Scartaansluiting. 1. Sluit de IEC-netsnoerkoppeling aan op de connector van het toestel zoals hierboven weergegeven. RGBHV-aansluiting (AV2) Deze LCD-monitor biedt u de keuze uit Y, Pb, Pr of RGB , H/V verbindingen.
NL Stap 3: Installatie van de batterij voor afstandsbediening NL Bij dit produkt zijn batterijen geleverd. Wanneer deze leeg zijn, moet u ze niet weggooien maar inleveren als KCA. Twee "AA" batterijen van 1,5 volt zodanig installeren dat de "+"- en ""-aanduidingen op de batterijen overeenstemmen met de "+"- en "-"aanduidingen in de eenheid voor afstandsbediening.
NL NL Bedieningsknoppen en menu’s MENUWERKING De meeste functies van uw LCD-monitor worden ingesteld via het menu, met behulp van de afstandsbediening. 1. De rode Standby-lamp van uw LCD-Monitor wijst op de aanwezigheid van stroom. Standby in-/uitschakelen Standby wordt gebruikt om het LCD-monitor korte tijd uit te schakelen. In standby is de televisie uitgeschakeld, maar staat er wel nog stroom op.
NL NL Geluidsmenu Druk op de toets MENU en selecteer Geluidsmenu door op de toets e of d te drukken. Druk op de toets1 om het geluidsmenu op te roepen. Selecteer de geluidsinstellingen en stel deze optimaal in voor uw kamer met behulp van de toets e of d en de toets1 of 2. Geluidsinstelling: Selecteer Muziek, Stem, Theater of Persoonlijk met de toets 1 of 2 . 2. Surround: Selecteer met de toets 1 of 2 het gewenste niveau van surround-geluid: UIT, Midden of Max.
BESTRURING VIA PC NL Installatiemenu Instellingen RS232C Deze monitor kan worden ingesteld via de RS232C-aansluiting met behulp van de juiste computer-/besturingsopdrachten. NL Met deze LCD-monitor kunt u het volgende instellen: ■ Programmapositie bij aanzetten. Instelprocedure 1. Houd de toets groen op de afstandsbediening ingedrukt en dan op de knop 5 op de LCD-monitor . 2. Druk op de toets 5 of 6 om de lnstallatiefunctie te selecteren en de toetsen 1 of 2 om tussen de functies te wisselen.
NL NL Specificaties Algemene specificaties Stroomvoorziening Kleursysteem 220~240V, 50Hz PAL NTSC 3.
EINDGEBRUIKERSLICENTIE NL NL Eindgebruikerslicentie Het product (d.w.z. de uitrusting of het apparaat waarnaar deze documentatie verwijst) bevat Software (de toepassingen, hulpprogramma’s en modules die deel uitmaken van het product) die in eigendom is van Sanyo of zijn licentiegevers. Voordat u het product in gebruik neemt, moet u eerst de onderstaande voorwaarden van de eindgebruikerslicentie lezen.
I I ATTENZIONE: Leggere e conservare per motivi di sicurezza. Questo apparecchio è stato progettato e fabbricato per garantire la sicurezza dell’utilizzatore ma un uso inappropriato può causare scariche elettriche o rischio d’incendio. Al fine di non invalidare i circuiti di sicurezza incorporati nel monitor, osservare le seguenti regole di base durante la sua installazione, utilizzo e manutenzione. Installazione / Utilizzo Non poggiare alcun tipo di oggetto sul cavo di alimentazione.
I I Manutenzione Il monitor LCD è totalmente transistorizzato e non contiene alcun componente da sottoporre a manutenzione. Non e assolutamente consentito all’utente di rimuovere in parte o interamente, parti aderenti all apparecchio, come ad esempio il retro del mobile. Durante la funzione dell’apparecchio, sono presenti all’interno, tensioni ad alto livello. Esposti ad oggetti o a persone, questi livelli d’alta tensione, possono danneggiare o creare gravi ferite.
I I Passaggio 1: Connessioni (Essenziale) ■ Collegare l'unità di visualizzazione a una presa VGA, BNC e SCART, secondo necessità. Connettore CA 1.Collegare la presa di alimentazione IEC alla presa di rete sul retro del monitor LCD, come mostrato sopra 2. Collegare il cavo di alimentazione dell'unità di visualizzazione a una presa a muro. 4.
I I Passaggio 3: Installazione delle batterie del telecomando Installare due batterie "AA" da 1,5 volt in modo che i segni "+" e "-" riprodotti sulle batterie corrispondano ai segni "+" e "-" riprodotti all'interno del telecomando.
I I Comandi / Terminali FUNZIONAMENTO DEL MENU Molte delle funzioni del monitor LCD sono controllate da menu. 1. Il monitor LCD a cristalli liquidi è dotato di una spia rossa di Standby per indicare che l’alimentazione elettrica è collegata. Attivazione/disattivazione del modo di standby Il modo di standby va utilizzato per spegnere il monitor LCD per un breve periodo di tempo. In posizione di standby il televisore è spento, ma continua a ricevere la corrente di rete.
I I Menu suono Premere il pulsante MENU e selezionare Audio utilizzando i pulsanti e o d. Premere il pulsante 1 per accedere. Selezionare e regolare le impostazioni audio più appropriate all'ambiente utilizzando i pulsanti ed o 12. Premendo il pulsante MENU sul telecomando apparirà una finestra di menu da cui potranno essere regolate le impostazioni.
I I Impostazioni RS232C mento dei dati dal PC ai monitor Il monitor può essere controllato mediante il connettore RS232C utilizzando un computer adeguato o dei comandi di controllo Installazione ■ Posizione programmi all’avvio. Procedura per l’impostazione 1. Mantenere premuto il pulsante verde sul telecomando e quindi premere il pulsante 5 sul monitor LCD. 2. Evidenziare Modalità Installazione mediante il pulsante 5 o 6, quindi selezionare ON o OFF mediante il pulsante 1.
I I Specifiche TV Specifiche generali Alimentazione Sistema a colori CA 220~240 V 50 Hz PAL/SECAM (PAL/SECAM/NTSC3.58 in modalità AV) Consigli Utili ■ QUANDO NON E' PRESENTE NÉ SUONO NÉ IMMAGINE ● Controllare se il monitor è alimentato. ● Verificare che il monitor non sia in stand by Terminale AV AV1: standard CENELEC Input: video composito, RGB (5V RGB con 5V sync in 14 poli) e audio-L/R AV2: BNC Input: RGB, H e V/ Y,Pb,Pr. audio-L/R Output: RGB, He V/ Y,Pb,Pr.
Licenza per l’utente finale I I Licenza per l’utente finale Limitazione di responsabilità Il prodotto (ossia l’attrezzatura o l’apparecchio cui si riferisce la presente documentazione) contiene Software (le applicazioni software, utility e moduli incorporati nel Prodotto) di proprietà della Sanyo o dei propri licenziatari. Prima di utilizzare il prodotto, leggere le condizioni della licenza per l’utente finale descritte in seguito.
E E PRECAUCION: Le rogamos que lea y conserve este manual para su seguridad. Este aparatose ha diseñado y fabricado para asegurar su seguridad personal, pero la utilización indebida puede dar como resultado descargas eléctricas o riesgos de incendio. Para evitar situaciones peligrosas que no puedan evitar las medidas de seguridad de este monitor, cumpla las siguientes normas básicas para su instalación, utilización y mantenimiento.
E E Mantenimiento Su monitor está totalmente transistorizado y no contiene ningún componente en el que pueda realizar labores de mantenimiento el usuario. No debe retirar la tapa trasera de su monitor. El aparato trabaja con tensiones elevadas que podrian dañar objetos o incluso poner en peligro a las personas.
E E Paso 1: Conexión a la alimentación ■ Conecte el monitor a los conectores VGA, BNC y euroconector Conexión CA según sea preciso. 1.Conecte el conector IEC a la toma de alimentación situada en la parte trasera del monitor de LCD, tal y como se muestra en la ilustración anterior. 2. Conecte el cable de alimentación del monitor a una toma de pared.
E E Paso : 3 Instalación de las pilas del mando a distancia Instale dos pilas tipo “AA” de 1,5 voltios de modo que las marcas “+” y “-” de las pilas se correspondan con las marcas “+” y “-” en el interior del alojamiento del mando a distancia.
E E Controles y menús FUNCIONAMIENTO DEL MEN Muchas de las funciones de su monitor se controlan mediante la función “menú” 1.El monitor LCD mostrará una luz roja de Standby para señalar que está encendida. Cómo entrar y salir del modo de espera El modo de espera se utiliza para apagar el monitor durante breves periodos de tiempo. En el modo de espera, el monitor está desconectado, pero sigue recibiendo alimentación de energía.
E E Menú de Sonido Pulse el botón MENU para volver al Menú Principal. Las opciones configuradas quedarán guardadas automáticamente al salir del menú. Ajustes del menú del PC Conecte su PC bien a la toma PC-IN o a la toma RGBHV / DVI situadas en la parte trasera del monitor. Una vez conectado, seleccione el modo PC o AV2 (RGBHV, consulte en la página 4 el ajuste de entradas por AV2) o DVI utilizando el botón v del mando a distancia. El monitor se convertirá en un monitor para el PC.
E E Ajustes del RS232C Este monitor puede controlarse a través del conector RS232C utilizando un ordenador adecuado y comandos de control. Menú de instalación Este monitor de LCD le permite ajustar: ■ Posición de programa al inicio. Procedimiento de configuración 1. Pulse y mantenga pulsado durante 5 segundos el botón verde del mando a distancia. Aparecerá el menú de instalación. 2. Sírvase del botón 5 o 6 para resaltar el Modo hotel y pulse1 para activar o desactivar esta opción seleccionando SÍ o NO.
E E Especificaciones Especificación común Fuente de alimentación Sistema de color ■ NO HAY IMAGEN NI SONIDO 220~240 V c.a. 50 Hz PAL / SECAM (PAL / SECAM / NTSC3.58 en modo AV) Terminal AV AV1: Norma CENELEC Entrada:Vídeo compuesto, RGB (RGB de 5V con sincr. a clavija 14) y audio i/D. AV2: BNC Entrada: RGB, H y V / Y,Pb,Pr. audio-I/D Salida: RGB, H y V / Y,Pb,Pr.
LICENCIA DE USUARIO FINAL E Licencia de usuario final El producto (concretamente el equipo o el aparato al que se refiere la presente documentación) incluye software (las aplicaciones, utilidades y módulos de software integrados en el producto) propiedad de Sanyo o de terceros que le hayan otorgado la licencia a Sanyo. Antes de utilizar el producto, sírvase leer las Condiciones de la licencia de usuario final que se detallan a continuación.
COMPONENT SIGNAL SUPPORT TIMING LIST 62
RS-232C COMMAND TABLES 63
Part No. 1KA6P1P0436-64 N4GT Printed in U.K.