
User's Manual


66
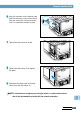
Align the connector on the network card
with the connector on the control board.
Push the card firmly into the connector
until it is completely inserted in place.
77
Tighten the two screws as shown.
88
Tighten the two screws, then replace
the plate.
99
Reconnect the power cord and printer
cable, then turn the printer on.
Network Interface Card
Note: For information on configuring and using the printer on a net work environment,
refer to the documentation provided with the network card option.
H.5
PRINTER OPTIONS