
Installation guide


S9v 18’ Mk II Installation Guide
_____________________________________________________________________________
________________________________________________________________________
19
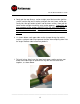
5. Raise the S9v. This is the fun part! To raise the S9v, simply grab it and
lower it down over the ground pipe.
6. Connect Feed Line (or Unun) to Antenna. If you are using the S9v as a 20
meter monoband vertical, proceed with step “a”, below. If you are using the
S9v as a multi-band antenna (20 – 6 meters), skip to step “b” on the next
page now.
a. If you are using the S9v as a 20 meter monoband vertical, position the 1:1
current choke balun in-line with your coax feed line, outside of the radial
field. Then, solder the two supplied ring terminal connectors to the
antenna end of your coax feed line. (If you are using a commercial 1:1
choke balun, this would be the ‘antenna end’ of the coax that you run from
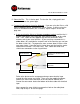
the balun to the S9v.) To prepare the coax, remove about 3 inches of the
coax outer jacket. Leave the braid 3 inches long and trim back the center
connection to around 1-1/2 inches long. Then, solder the center and
shield coax connections to the ring terminals.
Refer to the picture on the next page and wrap some electrical tape
around the coax center and shield. Then, using the supplied hardware,
connect the coax center connector to the S9v vertical element wire.
Secure the coax center lead to the bottom of the base tube with electrical
tape.
Next, connect the coax shield to a convenient hole on the radial plate.
Now, skip to step “c” on the next page.
Solder
Coax
Shield
to Ring
Terminal
Solder
Coax
Center
to Ring
Terminal
About 3 Inches
About
1
-
1/2
Inches