
Use and Care Manual


WWW.RSIWW.COM
20 of 40
NOTE: The door frame is 69¼” from the base. To avoid adjusting the placement after
assembly, prepare door frame using the exact measurements listed in these steps.
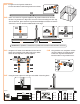
Assemble Front Wall and Gable
Make certain the pieces are in the correct positions before securing.
Carefully follow the order of assembly to ensure an easy installation.
Wear proper safety gear including work shoes, gloves and goggles.
Prepare four D-8 hinges. Fit S-8 bolts in holes in D-8 hinge.
Line up with S-2A nuts under hinge. Screw together.
Do not tighten. Repeat to prepare three more hinges.
Slide two D-8 hinges into bolt track of both F-8 profiles and
position exactly as shown. Use Phillips screwdriver to tighten
S-7 bolts to hold D-8 hinges in place.
Turn profiles over. Slide six T-bolts into bolt track of both profiles and position as shown.
Fit B-2 connector onto profile and position so top of
connector measures exactly 67” from bottom of profile.
Prepare two F-6 profiles. Slide T-bolts into both bolt tracks on mitered end of profile and one
bolt track on the other end. The single T-bolt will sit on outside when installed. Hand tighten
each T-bolt to hold in place.
Secure each B-2 connector
with two S-2C caps.
5.1A
5.1B
5.1c
5.1D
5.1f
5.1e
D-8
S-8
S-2A
F-8
7”
(178mm)
7”
(178mm)
D-8 D-8
D-8
F-8
WARNING: The cut edge of F-8 profile is
sharp. Use extreme caution when handling.
F-8
F-8
67”
(1701mm)
B-2
B-2
B-2
F-6
F-6
B-2
S-2C 4
2
S-7 18
Connector
QTY
Connector
QTY
S-8
S-2A 8
8
D-8 4
QTY
Prole
F-8
F-6 2
2
23”
72”