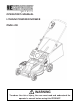
OPERATOR'S MANUAL LITHIUM POWERED MOWER PMLI-20 WARNING To reduce the risk of injury, the user must read and understand the operator's manual before using this PRODUCT.
PRODUCT SPECIFICATION Component Battery Capacity Specifications 36 V d.c. 10.5AH Lithium Charge Time 4 hours Cutting Time 40-45 min No-load Speed 3,500r /min Cutting Path 20 in. (508 mm) Height Adjustment 1-3/4–3-3/4 in. ( 45mm – 95mm) Wheel Sizes 7in. (front)/ 8 in. (rear) Gross Weight (G.W) 75 lbs. (34kgs) Net Weight (N.W) 66 lbs. (30kgs) Battery Charge Cycles over 500 times WARNING SYMBOLS Severing of toes or fingers from rotary mower blade. Thrown objects from mower deck.
SAFETY INSTRUCTIONS WARNING: Read all instructions when using electric gardening appliances. Basic safety precautions should always be followed to reduce the risk of fire, electric shock and personal injury. FOR ALL LAWN MOWERS a) Avoid Dangerous Environment Don’t use this product in damp or wet locations. Use ONLY for Intended purpose. b) Do not Use In Rain c) Keep Children Away All bystanders should be kept at a safe distance from work area. d) Dress Properly Do not wear loose clothing or jewelry.
SAFETY INSTRUCTIONS SAFETY INSTRUCTIONS FOR BATTERY-OPERATED LAWN MOWERS a) Do not charge lawn mower in rain or in wet locations. b) Do not use battery-operated lawn mower in rain. c) Remove or disconnect safety key before servicing, cleaning, or removing material from the lawn mower. d) Use only the following type and size battery: type PMLI-20,22018,22025 lithium battery. e) Do not dispose of the battery in a fire. The cell may explode. Check with local codes for possible special disposal instructions.
SAFETY INSTRUCTIONS 16. Always wear eye protection when operating machine. 17. See manufacturer’s instructions for proper operation and installation of accessories. Only use accessories approved by the manufacturer. II. SLOPE OPERATION Slopes are a major factor related to slip and fall accidents, which can result in severe injury. Operation on all slopes requires extra caution. If you feel uneasy on a slope, do not mow it. 1. Mow across the face of slopes; never up and down.
BATTERY & CHARGER Lithium-Ion rechargeable batteries require routine maintenance and care in their use and handling. Read and follow the guidelines in this document to safely use Lithium-Ion batteries and achieve the maximum battery life span. Overview 1. Do not leave batteries unused for extended periods of time, either in the product or in storage. When a battery has been unused for 6 months, check the charge status and charge or dispose of the battery as appropriate. 2.
BATTERY & CHARGER TRANSPORTATION 1. Always check all applicable local, national and international regulations before transporting a Lithium-Ion battery. 2. Transporting an end-of-life, damaged or recalled battery may, in certain cases, be specifically limited or prohibited. DISPOSAL AND RECYCLING 1. Lithium-Ion batteries are subject to disposal and recycling regulations that vary by country and region. Always check and follow your applicable regulations before disposing of any battery. 2.
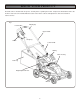
KNOW YOUR PRODUCT Read this owner's manual and safety rules carefully before operating the mower. Compare the illustration below to the mower in order to become familiar with the location of the various controls and adjustments. Save this manual for future reference. Fig.
ASSEMBLING YOUR MOWER Parts List • Mulch plug (Installed at the rear of the mower at the factory) • Grass catcher bag • Side discharge chute • 36V Battery (Pre-installed at the factory) • Battery Charger • Manual Note: • Carefully remove the parts from the box. • Inspect the parts carefully in order to verify that no breakage or damage occurred during shipping. • Do not discard the packing material until all parts have been examined. ASSEMBLING THE HANDLE 1.
ASSEMBLING YOUR MOWER INSTALLING THE GRASS CATCHER BAG (see Fig.4) 1. REMOVE SAFETY KEY AND WAIT FOR BLADE TO COME TO A COMPLETE STOP. 2. Lift the chute cover (1). 3. While holding up the cover (1), place the grass catcher bag hanger hooks (2) into the opening on the chute cover (1) to allow the hanger hooks to attach to the rod (3) which secures the chute cover. Fig.4 2 1 3 NOTE: For optimal performance empty grass bag often during use.
ASSEMBLING YOUR MOWER INSTALL THE SIDE DISCHARGE CHUTE (see Fig.5) This mower has 3 different functions - mulch, side discharge and rear bag. If you wish to discharge the clippings rather than mulch, perform these steps. 1. REMOVE SAFETY KEY AND WAIT FOR BLADE TO COME TO A COMPLETE STOP. 2. Lift the side discharge cover (1). 3. Align the grooves on the discharge chute (2) with the pins on the underside of the discharge cover (1). 4.
ASSEMBLING YOUR MOWER INSTALLATION OR REMOVAL OF THE MULCH PLUG (see Fig.6) 1. REMOVE SAFETY KEY AND WAIT FOR BLADE TO COME TO A COMPLETE STOP. 2. To remove the mulch plug lift the chute cover (1) and pull out on the handle. 3. The mulch plug (2) is inserted on an angle so it will require some force when removing.
ASSEMBLING YOUR MOWER ADJUST THE UPPER HANDLE HEIGHT (see Fig.7) 1. Loosen the upper handle knob. 2. Adjust the handle to the most comfortable of the 3 positions. 3. Tighten the upper handle SECURELY. Fig.
OPERATING YOUR MOWER TO START & STOP THE MOWER: Carefully follow the illustration below, in order, when starting or stopping the mower. (see Fig.8) STARTING / STOPPING THE MOWER See Fig 8 1. For the proper operation of this lawn mower, you need to insert the safety key in position, then the lawn mower can be operated by moving the lever release first to make the switch control lever available , then hold the switch control lever for operation . 2.
OPERATING YOUR MOWER ADJUST THE CUTTING HEIGHT( see Fig.10) 1. Simply depress the lever (1) towards the wheel and move to desired position. This sets all wheels to the same position. 2. To raise the height, pull the height adjustment lever from the current stop position towards the back of the mower. 3. To lower the height, pull the height adjustment lever from the current stop position towards the front of the mower. 7-Position Height Adjustment 1. 1-3/4 in. 5. 3 in. 2. 2 in. 6. 3-1/4 in. 3.
OPERATING YOUR MOWER CHARGING PROCEDURE Note: The battery can be charged in or out of the mower. The charger that is supplied with this mower is a specially designed 2-stage charger. Step 1: The red light will light up during the recharge cycle. Step 2: The green light will light up when the battery is fully charged. 1. Remove the jack cover. 2. Plug the charger connector into the jack on the battery. 3. Insert the 110 V plug from the charger into a functioning electrical outlet. 4.
OPERATING YOUR MOWER WARNING: Do not mow a slope that has an angle of greater than 15° (a rise of approximately2-1/2 ft. [ 75 m] every 10 ft. [3m]).Mow across the face of a slope, and never up and down. MOWING TIPS NOTE: A sharp blade will greatly enhance the performance of the mower, especially when cutting high grass.
OPERATING YOUR MOWER NOTE: Be sure to replace the parts in the exact order in which they were removed. When installing the cutting blade, verify that it is installed with the curved ends pointing toward the mower deck. CLEAN THE MOWER WARNING: To reduce the risk of electric shock, do not expose the mower to water. The underside of mower deck should be cleaned after each use as grass clippings, leaves, dirt and other debris will accumulate causing rust and corrosion.
KNOW YOUR PRODUCT 1. When servicing the mower, use only replacement parts that are available from the manufacturer. In order to obtain replacement parts, call the toll-free helpline. The use of parts that do not meet the original equipment specifications may lead to improper performance and may compromise safety. 2. Before cleaning, repairing, or inspecting, verify that the blade and all moving parts have come to a complete stop and remove the safety key.
50 1 55 2 9 51 3 52 53 4 56 54 75 8 71 6 7 5 57 70 58 59 60 47 61 48 49 73 69 34 74 35 46 36 37 38 39 40 41 42 43 44 45 72 62 10 68 67 66 65 64 63 11 12 13 14 15 16 17
PARTS LIST Item No. 1 2 3 4 5 6 7 8 9 10 11 12 13 14 14 16 17 18 19 20 21 22 23 24 25 26 27 28 29 30 31 32 33 34 35 36 37 38 39 40 41 42 Part No.
PARTS LIST Item No. 43 44 45 46 47 48 49 50 51 52 53 54 55 56 57 58 59 60 61 62 63 64 65 66 67 68 69 70 71 72 73 74 75 Part No.
WARRANTY ONE (1) Year RESIDENTIAL USE Limited Warranty – MODEL PMLI-20 Driven by Solar Inc., maker of the Recharge Mower®, warrants to the original retail purchaser that this Recharge Mower® product is free from defects in material or workmanship under normal use and maintenance from the date of retail purchase for the applicable Warranty Period. Certain components are excluded from coverage and other limitations apply, as described in this document. Driven by Solar Inc.