
Product Description


Invisible Fence
®
Brand
Boundary Plus
®
2.0 System
Field Test Plan
7 of 20
U:\My Documents\Invisible Fence\Field Testing\Boundary Plus 2.0\Pre-Pilot-1\191002co Boundary Plus 2_0 Field Test Plan.docx
4.3.1 Receiver Setup
Programming settings into the Receiver requires the use of the Program Tool sent with your test units or
received during Salesforce training.
1) Plug a USB to USB mini cable (CF3000/GPSC) into your computer and plug the cable into the
Program Tool.
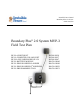
2) Insert Program Tool into Receiver and rotate 1/8
th
turn. The Program Tool will only fit smoothly in
one direction and will only work in one direction. Image 3 below shows the correct orientation.
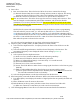
3) Open the Desktop App.
The Desktop App will open on the Firmware Updater tab (Image 4). In the event new firmware is
required during this field test, the firmware and instructions will be sent out to the Pro Staff.
4) Select the Collar tab at the top of the App (Image 4).
5) This tab displays information about the network and Receiver that is connected. This page shows
information about the connected device (column 1), the current settings of the device for the selected
transmitter (column 2) and the selectable options to program into the device (column 3). Columns 2
and 3 are broken down into three set groups, Device/Network ID, System Frequency and Receiver
Function. Each are programmed individually using the orange bars with the chevrons.
Image 3
Image 4
0-9
0-5
5-30
On/Off
Receiver ID
Avoid
a)
Program Buttons
Poor Data Quality
and
Reset All
b)
c)
d)
i)
d)
iii)
Transmitter ID
f)
Column 1
Column 3
Column 2
d)
ii)