
Installation Sheet


1of2
For Style HEN2712C
Installation Guide IS-HEN2712C#
Pleasegoto forproductcleaningtips.Gotothe selection.
Flatheadscrewdriver,Phillipsscrewdriver,pliers,wirecutters,wirestrippers,electricaltape,safetyglasses,markingpen,1/4”
drillbitanddrill.
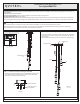
IntegratedLED45W
MinimumHangingHeightis19”,MaximumHangingHeightis105”.
Contactyouroriginalplaceofpurchase.
www.quoizel.com Care+Maintenance
ToolsRequired:
LightSource:
FixtureHangingHeight:
EstimatedAssemblyTime:
Preparation:
30-45minutes
Identifyandinspectallpartsbeforebeginninginstallation.Checkpackagecontentlistanddiagramsbelowtobesureallpartsare
present.Ifanypartsaremissingordamaged,donotattempttoassemble,install,oroperatethefixture.
Warnings and Cautions
Turn off electricity at circuit breaker or main fuse box before installation. Consult a licensed electrician if in doubt.
These instructions are provided for your safety. It is very important you read them completely before installing the fixture. We strongly
recommend that a licensed, professional electrician perform the installation.
2019 QuoizelInc.
ReleasedDate:2019-01-22
visit us on-line at www.quoizel.com
Package Contents
B
Crossbar
x1
Assembly
A
Fixture Body
x1
STEP 2 Adjust Fixture Height-
A. Press each button on the bottom of the ceiling canopy and adjust
each cord in or out of the ceiling canopy to achieve your desired
fixture height.
B. Move safety clips next to the hex nut inside of the ceiling canopy.
Figure 1
STEP 1 - Install the Crossbar Assembly to Outlet Box
A. Attach the Crossbar Assembly (AA) to the Outlet Box with the head
of the Green Ground Screw facing you. Secure it with Outlet Box
Screws (not included), tighten until snug.
A
Green Ground Screw
Outlet Box Screw
(not included)
Cord
Button
Ceiling Canopy
Safety Clip
B
Figure 2