
User manual


Getting Started and Tutorial
2373_en_B PHOENIX CONTACT 2-5
2.3 Starting nanoNavigator
This section describes starting nanoNavigator and getting ready to create a project. Follow
these steps:
1. From the Windows “Start” menu, select
“Programs... Phoenix Contact... nanoNavigator... nanoNavigator” to start the program.
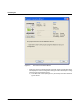
Each time nanoNavigator starts, it displays a startup dialog box (see Figure 2-2).
Figure 2-2 nanoNavigator startup dialog box
2. The next step depends on whether or not there is a physical connection between the
nanoLC and PC. Do one of the following:
– If nanoLC is connected to the PC, select the “Run Connection Wizard” button. This
displays the “nanoLC Connection Wizard” (see Figure 2-3). If there is a project
loaded on the nanoLC, nanoNavigator displays a message indicating that a project
exists and the “Upload” button is available. If there is no project on the nanoLC,
nanoNavigator displays a message to that effect and the “Upload” button is grayed
out. In either case, click the “New” button. nanoNavigator automatically detects the
nanoLC configuration and displays the initial flow chart workspace.
If you need to update the firmware in the nanoLC, select the “Run Connection Wizard”
button and see “Updating nanoLC Firmware” on page 6-11.