Instrukcja obsługi PicoPix Kieszonkowy projektor PPX5110 Register your product and get support at www.philips.
Spis treści Przegląd .........................................................3 Szanowny Kliencie, ................................................... 3 O instrukcji obsługi .................................................... 3 Zawartość opakowania ............................................3 Najważniejsze cechy produktu ............................. 3 1 Ogólne informacje dotyczące bezpieczeństwa ......................................4 Przygotowanie urządzenia do pracy ...................4 Naprawy ....
Przegląd Szanowny Kliencie, Zawartość opakowania Dziękujemy za zakup produktu. Mamy nadzieję, że będą Państwo zadowoleni z zakupionego urządzenia i jego funkcji! 1 – Projektor (PPX 5110) 2 – Zasilacz sieciowy 3 – Wtyczki sieciowe (UE, Wlk. Bryt., USA) 4 – Skrócona instrukcja 5 – Etui O instrukcji obsługi Korzystając z dołączonej do urządzenia skróconej instrukcji, można szybko i łatwo rozpocząć użytkowanie urządzenia. Szczegółowe opisy są podane w kolejnych rozdziałach niniejszej instrukcji obsługi.
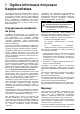
1 Ogólne informacje dotyczące bezpieczeństwa Nie należy dokonywać jakichkolwiek zmian ani wprowadzać ustawień, które nie są opisane w niniejszej instrukcji obsługi. Nieprawidłowe postępowanie może być przyczyną obrażeń ciała, uszkodzenia urządzenia lub utraty danych. Należy stosować się do wszystkich znaków ostrzegawczych i informacji dotyczących bezpieczeństwa. Przygotowanie urządzenia do pracy Urządzenie przeznaczone jest wyłącznie do eksploatacji w pomieszczeniach.
Zasilanie Zastosowany zasilacz sieciowy musi posiadać certyfikat zgodności z produktem (patrz Dane techniczne, strona 20). Sprawdzić, czy napięcie zasilania sieciowego w miejscu instalacji jest zgodne z wymaganymi parametrami zasilania urządzenia. Urządzenie jest przystosowane do napięcia podanego na obudowie. Pojemność akumulatora zmniejsza się w miarę upływu czasu. Jeżeli urządzenie działa tylko przy zasilaniu z sieci, oznacza to, że akumulator jest uszkodzony.
2 Przegląd Widok od tyłu i spodu Widok z boku 1 – Przycisk Reset 1 – Gniazdo statywu 2 – Dioda LED włączenia/wyłączenia/ładowania W czasie ładowania pulsuje niebieska dioda LED ładowania. Gdy akumulator projektora jest w pełni naładowany, dioda LED przestaje pulsować. 3 – DC-IN zasilacza (Wejście DC) 2 – B Zasilanie / tryb Aby włączyć i wyłączyć urządzenie, nacisnąć przycisk B i pozostawić go wciśniętym przez 8 sekund.
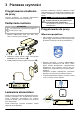
3 Pierwsze czynności Przygotowanie urządzenia do pracy Ustawić projektor na płaskiej powierzchni naprzeciwko powierzchni projekcyjnej. OSTROŻNIE! Do wyłączania i wyłączania projektora służy przycisk B. 1 Wybrać odpowiedni wtyk (UE, Wlk. Bryt., USA) i nasunąć go na zasilacz. EU NIEBEZPIECZEŃSTWO! Ryzyko wybuchu w przypadku użycia nieprawidłowego akumulatora! Nie próbować wymieniać akumulatora samodzielnie. Podłączanie zasilania US W czasie ładowania pulsuje niebieska dioda LED ładowania.
4 Podłączanie do urządzenia odtwarzającego Podłączanie do urządzeń z wyjściem HDMI Do podłączenia urządzenia do odtwarzacza Blu-ray, konsoli do gier, kamery cyfrowej, aparatu cyfrowego, notebooka, komputera PC lub smartfona należy użyć kabla HDMI–mini HDMI. 1 Kabel podłączyć do gniazda mini HDMI z tyłu lub z boku urządzenia. Podłączanie głośników zewnętrznych lub słuchawek NIEBEZPIECZEŃSTWO! Niebezpieczeństwo uszkodzenia słuchu! Przed podłączeniem słuchawek obniżyć poziom głośności urządzenia.
5 Bezprzewodowe wyświetlanie ekranu z urządzeń na platformie Android obsługujących technologię Miracast Wskazówka Aby móc skorzystać z funkcji dublowania ekranu, urządzenie musi obsługiwać technologię Miracast. Nie wszystkie urządzenia z systemem Android oferują taką funkcję. Często też jest ona ukryta pod różnymi nazwami, takimi jak: Screencast, Screen Sharing, WiFi Direct, Wireless Display itp. Więcej informacji można znaleźć w broszurze informacyjnej dołączonej do urządzenia Android/Miracast.
6 Projekcja z urządzeń na platformie iOS Wskazówka Funkcja została przetestowana z urządzeniem z systemem iOS 11. Jej działanie zależy od wersji i modelu urządzenia. Bezprzewodowe dublowanie ekranu potrzeby wprowadzić (12345678). hasło do Wi-Fi PPX5110-xxx Wskazówka Nie wszystkie treści mogą być przesyłane pomiędzy urządzeniem iPhone a projektorem. Dotyczy to zwłaszcza nagrań wideo chronionych prawem autorskim lub udostępnianych w Internecie (na przykład w serwisie YouTube).
4 Wybrać PPX5110-xxx. Dublowanie ekranu przez USB (iOS) 2 W menu Settings (ustawienia) urządzenia iPhone wybrać Personal Hotspot (hotspot osobisty). 3 Ustawić przełącznik Personal Hotspot (hotspot osobisty) w położeniu On (włączone). 1 Przełączyć projektor na tryb iOS. Aby przełączyć pomiędzy trybami iOS i Android, nacisnąć przycisk B i pozostawić go wciśniętym przez 1 sekundę.
4 Podłączyć kabel Lightning do portu USB projektora oraz odpowiedniego gniazda w urządzeniu iPhone. 6 Otworzyć Control Centre (centrum sterowania) poprzez przesunięcie palcem w górę na ekranie, a następnie wybrać Screen Mirroring (dublowanie ekranu). 7 Wybrać PPX5110-xxx. 5 Potwierdzić komunikat wyświetlony na ekranie.
7 Łączenie projektora z Internetem W polu adresu wyszukiwarki internetowej smartfona wprowadzić adres IP 192.168.49.1, aby skonfigurować środowisko bezprzewodowe. Pozwoli to na przeszukiwanie Internetu w smartfonie przy jednoczesnym bezprzewodowym wyświetlaniu ekranu. 1 Aby przełączyć urządzenie na tryb iOS, nacisnąć przycisk B i pozostawić go wciśniętym przez 1 sekundę. 2 Podłączyć telefon do hotspotu utworzonego przez projektor. 5 Wybrać Scan (skanuj).
7 Wprowadzić hasło i nacisnąć Submit (wyślij).
8 Serwis Instrukcje dotyczące postępowania z akumulatorem Pojemność akumulatora zmniejsza się w miarę upływu czasu. Czas pracy akumulatora można przedłużyć, przestrzegając poniższych punktów: • Po odłączeniu od zasilania zewnętrznego urządzenie działa w oparciu o wbudowany akumulator. Po rozładowaniu akumulatora urządzenie wyłącza się. Wówczas projektor należy podłączyć do zewnętrznego zasilania. • Regularnie ładować akumulator. Nie przechowywać urządzenia należy z całkowicie rozładowanym akumulatorem.
Bezprzewodowa aktualizacja oprogramowania wbudowanego 3 Nacisnąć Submit (wyślij) pod opcją OTA host (host OTA). OSTROŻNIE! Ryzyko utraty danych! Procesu aktualizacji nie można przerwać. Wskazówka Upewnić się, że projektor jest podłączony do źródła zasilania za pomocą kabla micro USB. 1 Podłączyć projektor do Internetu (patrz Łączenie projektora z Internetem, strona 13). 2 Wybrać Advanced (zaawansowane). Projektor automatycznie uruchomi się ponownie i połączy z serwerem aktualizacji.
Rozwiązywanie problemów 3 Aby włączyć urządzenie, nacisnąć przycisk B i pozostawić go wciśniętym przez 8 sekund. 4 Wcisnąć przycisk Reset. 5 Aby włączyć urządzenie, nacisnąć przycisk B i pozostawić go wciśniętym przez 8 sekund. 6 Jeśli problem będzie się utrzymywać, należy skontaktować się z naszym serwisem technicznym lub sprzedawcą. Naprawa przez wyłączenie i włączenie zasilania Jeżeli występują problemy, których nie można skorygować za pomocą niniejszej instrukcji, należy wykonać poniższe czynności.
Problemy Rozwiązania Funkcja dublowania ekranu nie działa w moim urządzeniu. • • W czasie oglądania nagrań wideo dochodzi do chwilowych zakłóceń dźwięku lub obrazu bądź dźwięk nie jest zsynchronizowany z obrazem. • • • Do czego służy port micro USB? • • • • Nie działa dublowanie ekranu przez złącze USB. • • • 18 Aby móc skorzystać z funkcji dublowania ekranu, urządzenie musi obsługiwać technologię Miracast. Nie wszystkie urządzenia z systemem Android oferują taką funkcję.
Problemy Rozwiązania Czy do projektora można podłączyć powerbank? • • • Powerbank można podłączyć do projektora za pomocą portu micro USB. Minimalne parametry zasilania wymaganego do zapewnienia prawidłowego działania urządzenia to: 3 A/5 V. Nie uruchamiać projektora, jeżeli parametry zasilania są niższe od wymaganych. Powierzchnia obudowy projektora jest ciepła. • W czasie pracy projektor emituje niewielką ilość ciepła. Jest to zjawisko normalne.
9 Aneks Dane techniczne Technologia/optyka Technologia optyczna ..................................... DLP® Źródło światła .............................................LED RGB Rozdzielczość .............. 854 × 480 pikseli (WVGA) Żywotność LED.............................. do 20 tys. godz. Kontrast............................................................... 1000:1 Współczynnik kształtu ........................................ 16:9 Jasność ...........................................
Symbol CE stanowi potwierdzenie, że produkt jest zgodny z głównymi wymaganiami dyrektyw Parlamentu Europejskiego i Rady nr 2014/35/ UE, 2014/53/UE, 2014/30/UE w sprawie urządzeń informatycznych w zakresie bezpieczeństwa i zdrowia użytkowników oraz zakłóceń elektromagnetycznych. Deklaracja zgodności jest dostępna pod adresem www.picopix.philips.com. Ochrona środowiska w ramach zrównoważonego rozwoju jest główną troską spółki X-GEM SAS.
Opakowanie: obecność logo (zielonej kropki) oznacza, że dokonano wpłaty na rachunek zatwierdzonej krajowej organizacji na rzecz rozbudowy infrastruktury odzysku i recyklingu opakowań. Prosimy o przestrzeganie lokalnych przepisów w zakresie segregacji odpadów. Akumulatory: jeżeli produkt zawiera akumulatory, należy je oddać do utylizacji we właściwym punkcie zbiórki odpadów.
PHILIPS and the PHILIPS’ Shield Emblem are registered trademarks of Koninklijke Philips N.V. used under license. This product was brought to the market by X-GEM SAS, further referred to in this document as X-GEM SAS, and is the manufacturer of the product. 2017 È X-GEM SAS. All rights reserved. Headquarters: X-GEM SAS 9 rue de la Négresse 64200 Biarritz – FRANCE Tel: +33 (0)5 59 41 53 10 www.xgem.