Register your product and get support at www.philips.
Sommario Panoramica ............................................... 3 Stimato cliente ..................................................................... A proposito del manuale d’uso ........................................ Contenuto dell’imballaggio ............................................... Caratteristiche del prodotto ............................................ 3 3 3 3 1 Indicazioni generali di sicurezza ........ 4 Posizionamento dell’apparecchio ....................................
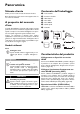
Panoramica Stimato cliente Contenuto dell’imballaggio Grazie per aver scelto il nostro Proiettore Pocket. Buon divertimento con il vostro nuovo apparecchio e le sue numerose funzioni! 1 – Telecomando 2 – Proiettore PicoPix 3 – Alimentatore 4 – Cavo USB 5 – Cavo HDMI 6 – Guida rapida 7 – Custodia A proposito del manuale d’uso La guida all’installazione riportata nelle pagine seguenti permette di mettere in funzione l’apparecchio in modo rapido e semplice.
1 Indicazioni generali di sicurezza Non apportare alcuna impostazione o modifica che non sia descritta in queste istruzioni per l’uso. In caso di utilizzo scorretto dell'apparecchio si possono riportare lesioni o danni fisici, provocare danni all'apparecchio o perdere dati. Osservare tutte le avvertenze e le informazioni per la sicurezza fornite. Posizionamento dell’apparecchio Il prodotto è solo per uso interno. L’apparecchio deve appoggiare in modo sicuro e stabile su una superficie piana.
Alimentazione Rete wireless (WLAN) Utilizzare solo l’alimentatore incluso (vedi Allegato / Caratteristiche tecniche). Verificare sulla targhetta che la tensione di rete dell’alimentatore coincida con la tensione di rete disponibile nel luogo di installazione. Il presente prodotto è compatibile con il tipo di voltaggio indicato. La capacità della batteria con il tempo diminuisce. Se l’apparecchio funziona soltanto quando collegato all’alimentatore, significa che la batteria è guasta.
2 Panoramica Lato superiore dell’apparecchio Lato inferiore dell’apparecchio 1 – Touchpad per lo spostamento e l'utilizzo del cursore del mouse (vedere anche capitolo Touchpad / Gesti, pagina 8) 2 – LED barra di stato Blu: Apparecchio acceso / Apparecchio in standby Spento: Apparecchio spento 3 – Ghiera per regolare la nitidezza delle immagini.
Vista laterale 1 – Apertura di reset Il proiettore Pocket non risponde più o si è bloccato: Inserire un oggetto sottile e appuntito nell'apertura di reset per eseguire un reset dell'hardware.
Lato inferiore dell’apparecchio 1 – Filettatura per cavalletto a Touchpad / Gesti Il touchpad è una superficie sensibile al tocco. Toccare il touchpad con uno o più dita per muovere il cursore, spostarsi nel menu, selezionare voci di menu o eseguire altre azioni. ATTENZIONE! Penna a sfera! Non utilizzare penne o altri oggetti sul touchpad. Gli oggetti duri o appuntiti possono danneggiarlo.
Area d'immissione L'area d'immissione è separata da quella di spostamento / scorrimento. Con i gesti nell'area d'immissione si controlla il cursore. Zoom – Posizionare il pollice e l'indice al centro dell'area d'immissione e allontanarli lentamente per ingrandire un'immagine o un documento. Posizionare il pollice e l'indice agli angoli dell'area d'immissione e avvicinarli lentamente per rimpicciolire un'immagine o un documento.
Telecomando B – Mette l'apparecchio in sospensione – Richiama il menu u – Richiama il menu principale v – Richiama il menu di ricerca ¿ – Indietro di un livello nel menu o di un livello nelle cartelle / annullamento di una funzione w – Sull'ingresso video esterno passa a HDMI, , oppure VGA x – Modalità DVB-T: passa ai preferiti 1 Tasti di spostamento à – Conferma la selezione / , À/Á – Tasti di navigazione / navigare nel menu / modificare le impostazioni / – Modificare le impostazioni / Durante
Descrizione delle funzioni di menu Simboli nella barra di stato 123456 1 Dopo l’accensione dell’apparecchio appare il menu principale. 2 Con i tasti di direzione À/Á selezionare il menu desiderato. 3 Confermare con à. 4 Premendo il tasto u si torna al menu principale.
3 Prima messa in funzione Posizionamento dell’apparecchio Nota E' possibile posizionare il dispositivo in orizzontale su un tavolo davanti alla superficie di proiezione e non è necessario posizionarlo in maniera obliqua rispetto ad essa. Il dispositivo compensa la distorsione dovuta alla proiezione obliqua (trasposizione).
2 Inserire la batteria nuova nello scomparto, avendo cura di rispettare la polarità, come indicato nel disegno riportato sul retro del telecomando. Verificare che i poli (+ e -) siano allineati correttamente. Utilizzo del telecomando Puntare il telecomando sul sensore nel lato posteriore dell‘apparecchio. Per funzionare correttamente, il telecomando deve essere posto a un’angolazione inferiore a 60° e a una distanza massima di 5 m.
Prima installazione 1 Premere per 3 secondi l'interruttore On/Off sul lato per accendere l'apparecchio. 2 Orientare l'apparecchio verso una superficie di proiezione o la parete. Prestare attenzione al fatto che la minima distanza dalla superficie di proiezione deve essere di 0,5 metri e la massima di 5 metri. Prestare attenzione ad una posizione stabile del proiettore. 3 Regolare la nitidezza con l’apposita ghiera sulla parte superiore dell’apparecchio.
4 Collegamento all’apparecchio di riproduzione Per collegare il proiettore, utilizzare soltanto i cavi di collegamento forniti oppure eventuali cavi di collegamento forniti come accessori. Collegamento a iPhone/iPad/ iPod Cavi di collegamento forniti Utilizzare il cavo HDMI per iPhone/iPad/iPod (non fornito in dotazione) per collegare il proiettore a un iPhone/iPad/iPod. Cavo HDMI Cavo USB Cavi di collegamento disponibili come accessori Cavo video Component YUV/YPbPr ...................................
Collegamento a uno smartphone Collegamento al computer (VGA) Utilizzare il cavo HDMI (non fornito in dotazione) per collegare il proiettore a uno smartphone. Nota VG Y-P A HDb-P MI r Molti computer portatili non attivano automaticamente l'uscita videro esterna quando viene collegato un secondo display – come un proiettore. Consultare il manuale del proprio computer portatile su come attivare l'uscita video esterna.
Collegare con il cavo adattatore audio/video (CVBS) Collegamento con i cavi Component-Video (YPbPr/ YUV) Utilizzare il cavo adattatore audio/video (cavo AV) (non fornito in dotazione) del proiettore per collegare un camcorder, un lettore DVD o una fotocamera digitale. Le prese di questi dispositivi sono di colore giallo (video), rosso (audio destro) e bianco (audio sinistro). Utilizzare questo tipo di collegamento per ottenere immagini della miglior qualità possibile.
Collegamento agli apparecchi multimediali mobili Collegamento delle cuffie Alcuni apparecchi video (per es.: Pocket Multimedia Player,..) richiedono cavi speciali per il collegamento. I cavi vengono forniti con l’apparecchio oppure si possono acquistare presso il produttore dell’apparecchio multimediale. Accertarsi che eventualmente funzionino soltanto i cavi originali del produttore dell'apparecchio. 1 Abbassare il volume del dispositivo prima di collegare le cuffie.
5 Memoria Inserire una scheda di memoria Collegamento del dispositivo di memoria USB V Y-PGA HDb-P MI r 1 Collegare il supporto dati USB alla porta USB sul lato dell’apparecchio. 1 Inserire una scheda di memoria con i contatti verso l'alto nello slot / sul retro del dispositivo. La cornice digitale supporta le seguenti schede di memoria: SD/SDHC/SDXC/MMC. 2 Spingere la scheda di memoria nel dispositivo fino a che scatta in posizione.
Collegamento al computer (USB) 5 Confermare per attivare la connessione. Utilizzando il cavo USB, è possibile collegare il proiettore Pocket a un computer per trasferire i file tra la memoria interna, una scheda di memoria inserita e il computer o per cancellarli. E' anche possibile riprodurre su computer i dati memorizzati sul proiettore Pocket. Nota VG Y-PbA HD -P MI r 1 Accendere l’apparecchio con l’interruttore ON/OFF posto sul lato. 2 Dopo la schermata di avvio appare il menu principale.
6 Rete wireless (WLAN) Si ha una rete wireless (Wireless Local Area Network, WLAN) quando almeno due computer, stampanti o altri dispositivi comunicano tra loro tramite onde radio (onde ad alta frequenza). La trasmissione dei dati nella rete wireless si basa sugli standard 802.11b, 802.11g e 802.11n. PERICOLO! Indicazioni sull’utilizzo della rete WLAN! La potenza di trasmissione dell’apparecchio può interferire con il funzionamento di impianti di sicurezza, apparecchiature mediche o apparecchi sensibili.
12 Con il touchpad o il mouse inserire la password sulla tastiera a video. 13 Fare clic su Collega. Con il tasto ¿ si retrocede di un livello nel menu. Configurare la rete wireless (WLAN) con le procedure guidate Con la funzione Wi-Fi Protected Setup (WPS) o con una scansione delle reti wireless è possibile collegare in modo semplice e rapido il proprio apparecchio a una rete wireless già esistente.
7 Riproduzione di contenuti multimediali Nota Nota Tasti di direzione Tutti i tasti rappresentati sono tasti del telecomando. Nota Possibilità d'impostazione Per un utilizzo ottimale dell'apparecchio, leggere le indicazioni relative alle possibilità d'impostazione nel capitolo Impostazioni. (vedere anche capitolo Impostazioni, pagina 36) Visualizzazione dei file video Vengono visualizzati soltanto quei file video riproducibili dal proiettore Pocket. 8 Premere à, per avviare la riproduzione.
Riproduzione video (Mini presa HDMI) 1 Collegare l'uscita video / audio del dispositivo esterno alla presa del proiettore Pocket. A tale scopo, utilizzare i cavi e gli adattatori cavi corrispondentix (vedere anche capitolo Collegamento all’apparecchio di riproduzione, pagina 15). 2 Leggere nel manuale di istruzioni dell’apparecchio esterno come attivare l’uscita video. Nella maggior parte dei casi nei rispettivi menu viene definito anche "TV out" o "Uscita TV".
Riproduzione musicale Nota Rotazione dell’immagine Toccare il touchpad con il pollice e sfiorarlo con l'indice in senso circolare per ruotare un'immagine (vedere anche capitolo Touchpad / Gesti, pagina 8). 10 Premere T per interrompere lo slide show. 11 Premere ¿ per terminare lo slide show e per tornare alla schermata di sintesi. 12 Premere ancora una volta il tasto ¿ per tornare al menu principale.
9 Premere T per interrompere la riproduzione o per continuarla. Nota Navigazione con la riproduzione delle immagini disattivata Premere / , per richiamare il titolo precedente / successivo. Premere T per interrompere la riproduzione o per continuarla. Premere ¿, per ritornare alla selezione. Riproduzione Office (YOZO Office) YOZO Office consente di visualizzare documenti Office. 1 Accendere l’apparecchio con l’interruttore ON/OFF posto sul lato. 2 Dopo la schermata di avvio appare il menu principale.
Gestione dei file 11 Selezionare con / Copia. Copiare i file È possibile copiare i file tra la memoria interna, il supporto di memoria USB collegato o la scheda di memoria. 1 Accendere l’apparecchio con l’interruttore ON/OFF posto sul lato. 2 Dopo la schermata di avvio appare il menu principale. 12 Confermare con à. 13 Selezionare con / in quale supporto di memoria si desidera copiare: Scheda SD, Memoria interna o memoria USB. 14 Confermare con à.
Cancellare i file 13 Selezionare con / se di desidera cancellare il file o se si desidera interrompere il processo. È possibile cancellare i file dalla memoria interna, dal supporto di memoria USB collegato o dalla scheda di memoria. 1 Accendere l’apparecchio con l’interruttore ON/OFF posto sul lato. 2 Dopo la schermata di avvio appare il menu principale. 14 Confermare con à. Nota 3 Selezionare con i tasti di navigazione Cartelle 4 Confermare con à.
8 Riproduzione TV digitale Nota Accessori necessari Per utilizzare la funzione di TV digitale del proiettore, è necessaria la Pico Station PPA7301 (non fornita in dotazione) o la chiavetta USB DVB-T PPA8301 (non fornita in dotazione). È possibile acquistare la docking station Pico Station e la chiavetta USB DVB-T con il tagliando per le ordinazioni.
Prima riproduzione Nota Tasti di direzione Tutti i tasti rappresentati sono tasti del telecomando. Al primo utilizzo della funzione DVB-T è necessario avviare la ricerca automatica dei canali. 1 Accendere l’apparecchio con l’interruttore ON/OFF posto sul lato. 2 Dopo la schermata di avvio appare il menu principale. Cercare canali 14 Con i tasti di direzione selezionare Scan Channels. 15 Confermare con à. 16 Con i tasti di direzione selezionare OK. 17 Confermare con à.
Televisione Nota Tasti di direzione Tutti i tasti rappresentati sono tasti del telecomando. 1 Accendere l’apparecchio con l’interruttore ON/OFF posto sul lato. 2 Dopo la schermata di avvio appare il menu principale. 3 Collegare l'antenna a (vedere anche capitolo Collegare l'antenna, pagina 29). 4 Con i tasti di direzione selezionare Digital TV. 5 Confermare con à. 6 Si aprirà il sottomenu. 7 Con i tasti di direzione selezionare Video Broadcast. 8 Confermare con à.
9 Android Il proiettore Pocket utilizza il sistema operativo Android. Installare le app di Android ATTENZIONE! Aprire Android Fare attenzione all'attendibilità delle fonti! Le app fornite da terzi possono essere dannose. Utilizzare solo pacchetti d'installazione provenienti da sorgenti affidabili. 1 Accendere l’apparecchio con l’interruttore ON/OFF posto sul lato. 2 Dopo la schermata di avvio appare il menu principale. È possibile installare altre applicazioni.
Installare Adobe Flash Player Per riprodurre i video di Youtube è necessario installare l'ultima versione di Adobe Flash Player. 1 Scaricare l'ultima versione del pacchetto d'installazione di Adobe Flash Player (flashplayer.apk) per Android. Per ulteriori informazioni consultare www.philips.com/support. 2 Salvare il pacchetto su una scheda di memoria. 3 Inserire la scheda di memoria nell'apparecchio (vedere anche capitolo Inserire una scheda di memoria, pagina 19).
Impostare la modalità browser 10 Con i tasti di direzione selezionare Impostazioni. Modificare la modalità browser per visualizzare pagine Internet che contengono elementi Flash. 1 Accendere l’apparecchio con l'interruttore ON/OFF posto sul lato. 2 Dopo la schermata di avvio appare il menu principale. 11 Confermare con à. 12 Con i tasti di direzione selezionare User agent. 3 Con i tasti di direzione selezionare Android. 4 Confermare con à. 5 Con i tasti di direzione selezionare Browser.
Ripristinare la modalità browser 1 Procedere come descritto nel capitolo Impostare la modalità browser (vedere anche capitolo Impostare la modalità browser, pagina 34). 2 Con i tasti di direzione selezionare iPad. 3 Confermare con à.
10 Impostazioni 1 Accendere l’apparecchio con l’interruttore ON/OFF posto sul lato. 2 Dopo la schermata di avvio appare il menu principale. 3 Con i tasti di direzione selezionare Impostazioni. 4 Confermare con à. 5 Selezionare con / dalle seguenti impostazioni. Modalità di proiezione Davanti – normale proiezione, l'apparecchio si trova davanti alla superficie di proiezione o allo schermo.
Casuale – Se questa funzione è attivata, la riproduzione avviene in ordine casuale. Altrimenti la riproduzione avviene in sequenza. Impostazioni foto Vista file – Visualizzazione delle immagini durante la selezione nel menù principale come Visualizzazione in miniatura o come Lista.
11 Assistenza Indicazioni per la cura della batteria La capacità della batteria con il tempo diminuisce. Osservando le seguenti indicazioni è possibile prolungare la durata della batteria: • Senza alimentazione di corrente il dispositivo viene alimentato con la batteria inserita. Se la batteria non dispone più di una capacità sufficiente, l'apparecchio si spegne. Collegare l'apparecchio all'alimentazione elettrica.
Pulizia PERICOLO! Istruzioni per la pulizia! Utilizzare un panno morbido, non sfilacciato. Non utilizzare detergenti liquidi o facilmente infiammabili, quali spray, abrasivi, lucidanti, alcool, eccetera. Non consentire che l’umidità penetri all’interno dell’apparecchio. Non utilizzare liquidi detergenti a spruzzo per pulire l'apparecchio. Pulire delicatamente le superfici indicate. Fare attenzione a non graffiare le superfici durante la pulizia.
Problemi / Soluzioni 1 Disattivare l’apparecchio con l’apposito interruttore ON/OFF sul lato. 2 Attendere almeno dieci secondi. 3 Accendere l’apparecchio con l’interruttore ON/OFF posto sul lato. 4 Se l’errore dovesse ripetersi, rivolgersi al rivenditore di fiducia. Guida rapida Qualora si riscontrasse un problema che non può essere risolto con le descrizioni contenute in questo manuale (vedi anche la guida seguente), procedere come segue.
Problemi Soluzioni L'apparecchio passa dal livello massimo di luminosità a quello minimo quando viene collegato tramite USB per la riproduzione di video. • • Se la temperatura ambiente è troppo alta, il dispositivo passa automaticamente dal massimo livello di luminosità al minimo livello, per proteggere i LED ad alta potenza. Utilizzare il dispositivo con temperature ambiente più basse.
12 Allegato Caratteristiche tecniche Accessori Dimensioni (L¦×¦H¦×¦P) ..........................105¦×¦32¦×¦105¦mm Peso ........................................................................... 0,284¦kg Temperatura ambientale consigliata per l'apparecchio.............................................................5¦–¦35¦ºC Umidità relativa...................... 15¦–¦85¦% (senza condensa) Formati di file ............. *.mp4, *.avi, *.mov, *.mkv, *.mpg, ..................................*.mpeg, *.flv, *.
Il marchio CE certifica che, in quanto a sicurezza, salvaguardia della salute dell'utente e interferenze elettromagnetiche, il prodotto è conforme alle direttive 1999/5/ CE, 2006/95/CE, 2004/108/CE e 2009/125/CE emanate dal Parlamento europeo e dal Consiglio per le apparecchiature terminali di telecomunicazione. La dichiarazione di conformità può essere visionata all'indirizzo www.picopix.philips.com.
PHILIPS and the PHILIPS’ Shield Emblem are registered trademarks of Koninklijke Philips Electronics N.V. and are used by Sagemcom Documents SAS under license from Koninklijke Philips Electronics N.V. È 2013 Sagemcom Documents SAS All rights reserved Sagemcom Documents SAS Documents Business Unit Headquarters : 250, route de l’Empereur 92848 Rueil-Malmaison Cedex · FRANCE Tel: +33 (0)1 57 61 10 00 · Fax: +33 (0)1 57 61 10 01 www.sagemcom.com Simplified Joint Stock Company · Capital 8.479.