Register your product and get support at www.philips.
Inhoudsopgave Overzicht................................................... 3 8 Digital TV-weergave ......................... 28 Geachte klant ....................................................................... Over deze handleiding ....................................................... Inhoud verpakking ............................................................... Product highlights ................................................................ Antenne aansluiten ................................
Overzicht Geachte klant Inhoud verpakking Wij bedanken u hartelijk dat u voor onze Pocket Projector gekozen hebt. Veel plezier met uw toestel en zijn veelvoudige functies! 1 – Afstandsbediening 2 – PicoPix-projector 3 – Netadapter 4 – USB-kabel 5 – HDMI-kabel 6 – Quick Start Guide 7 – Tas Over deze handleiding Met de installatiehulp op de volgende bladzijden kunt u uw toestel snel en gemakkelijk in gebruik nemen. Gedetailleerde beschrijvingen vindt u in de volgende hoofdstukken van deze handleiding.
1 Algemene veiligheidsinstructies Breng geen instellingen en veranderingen aan die niet in deze handleiding zijn beschreven. Door onoordeelkundig gebruik kan lichamelijk letsel of schade, toestelschade of gegevensverlies optreden. Let op alle aangegeven waarschuwings- en veiligheidsinstructies. Toestel opstellen Het toestel is uitsluitend bedoeld voor gebruik binnenshuis. Het toestel moet veilig en stabiel op een effen oppervlak staan.
Stroomverzorging Draadloos netwerk (WLAN) Gebruik uitsluitend de meegeleverde voedingsadapter (zie Bijlage/Technische gegevens). Controleer of de netspanning van de adapter overeenkomt met de netspanning die op de opstelplaats beschikbaar is. Het juiste voltage is op het toestel vermeld. De capaciteit van de accu wordt naar verloop van tijd langzaam minder. Wanneer het toestel alleen met de adapter werkt, is de accu defect. Neem contact op met een goedgekeurd reparatiecentrum om de accu te vervangen.
2 Overzicht Bovenzijde Zijaanzicht 1 – Touchpad voor de navigatie en bediening van de muisaanwijzer (zie ook hoofdstuk Touchpad/gebaren, pagina 8) 2 – LED-statusbalk Blauw: Apparaat ingeschakeld / apparaat in stand-by modus Uit: Apparaat is uitgeschakeld 3 – Instelwiel voor scherpstellen van het beeld. 1 – Reset-opening De Pocket Projector reageert niet meer of is gecrasht: U kunt een hardware-reset uitvoeren door een dun, puntig voorwerp in de reset-opening te steken.
1 ý – USB-aansluiting voor USB-opslagmedium, DVB-T-stick, muis of toetsenbord. 2 – Lens Onderzijde 1 – Statiefschroefdraad a a b Pico Station Vooraanzicht (niet meegeleverd) Het Pico Station dockingstation beschikt over een eigen accu, waarmee u de weergavetijd van het toestel verlengt. De ingebouwde luidsprekers bieden een beter geluidskwaliteit bij de weergave. Het Pico Station beschikt over een DVB-T-adapter, waarmee u een DVB-T-antenne direct kunt aansluiten.
Touchpad/gebaren Invoergedeelte De touchpad is een aanrakingsgevoelig oppervlak. Strijk met een of meer vingers over de touchpad om de cursor te bewegen, in het menu te navigeren en menupunten te kiezen, of andere handelingen uit te voeren. Het invoergedeelte wordt begrensd door het navigeergedeelte/beelverschuivingsgedeelte. U bestuurt u de cursor met gebaren in het invoergedeelte. VOORZICHTIG! Balpen! Gebruik geen balpen of andere voorwerpen om de touchpad te bedienen.
Zoom – Zet uw duim en wijsvinger in het midden van het invoergedeelte en spreid ze langzaam om een afbeelding of document te vergroten. Zet uw duim en wijsvinger in de hoeken van het invoergedeelte en breng ze langzaam bij elkaar om een afbeelding of document te verkleinen. Draaien – Zet uw duim op de touchpad en strijk met de wijsvinger in een cirkel in de richting waarin u de afbeelding wilt draaien.
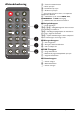
Afstandsbediening B – Toestel in ruststand zetten – Menu oproepen u – Hoofdmenu oproepen v – Zoekmenu oproepen ¿ – Een niveau terug in het menu, een mapniveau terug/functies afbreken w – omschakelen op de externe HDMI-, -, - of VGA-video-ingang x – DVB-T-modus: naar favorieten wisselen 1 Navigatieknoppen à – Keuze bevestigen / , À/Á – Navigatieknoppen/in het menu navigeren/instellingen veranderen / – Instellingen wijzigen/tijdens de muziekweergave vorige, volgende titel kiezen À/Á – Tijdens muz
Overzicht menufuncties 1 Na het inschakelen van het toestel verschijnt het hoofdmenu. 2 Kies met de navigatieknoppen À/Á het gewenste menu. 3 Bevestig met à. 4 Door meermaals op de knop u te drukken, keert u terug naar het hoofdmenu. Bron – Op de externe videoingang omschakelen naar HDMI, , of VGA.
3 Eerste ingebruikneming Toestel opstellen U kunt het toestel vlak opstellen op een tafel voor het projectievlak; het is niet nodig om het precies recht op het projectievlak te richten. Het toestel compenseert de vervorming van schuine projectie (kussenvervorming). Adapter aansluiten/accu opladen VOORZICHTIG! Netspanning en plaats van opstelling! Controleer of de netspanning van de adapter overeenkomt met de netspanning die op de opstelplaats beschikbaar is.
2 Plaats de nieuwe batterij met de plus- en minpool in het batterijvak zoals op de tekening op de achterkant van de afstandsbediening staat aangegeven. Let daarbij op de polariteit (+ en -)! Afstandsbediening gebruiken Richt de afstandsbediening op de sensor aan de achterkant van het toestel. De afstandsbediening werkt uitsluitend onder een hoek van maximaal 60° en op een afstand van maximaal 5 meter. Zorg dat zich geen obstakels bevinden tussen de afstandsbediening en de sensor.
Eerste installatie 1 Druk ca. 3 seconden op de aan-/uitschakelaar aan de zijkant om het toestel in te schakelen. 2 Richt het toestel op een projectievlak of wand. Let erop dat de afstand tot het projectievlak minimaal 0,5 meter en maximaal 5 meter mag bedragen. Let erop dat de projector op een stevige ondergrond staat. 3 Stel het beeld scherp met het wieltje aan de kant van de lens. 4 Kies met / de gewenste menutaal. 5 Bevestig met à.
4 Weergavetoestel aansluiten Gebruik voor het aansluiten van de projector alleen de meegeleverde verbindingskabels of een andere verbindingskabel die u als accessoire hebt gekocht. Een iPhone/iPad/iPod aansluiten Meegeleverde verbindingskabels Met de iPhone/iPad/iPod-HDMI-kabel (niet meegeleverd), sluit u de projector aan op een iPhone/iPad/iPod. HDMI-kabel USB kabel Als accessoires beschikbare verbindingskabels Componentvideokabel YUV/YPbPr .................................................
Een computer aansluiten (VGA) Aansluiten met audio/videoadapterkabel (CVBS) Opmerking Veel laptops activeren niet automatisch de externe videouitgang als er een tweede display zoals een projector wordt aangesloten. Kijk in het handboek van uw laptop na hoe u de externe videouitgang kunt activeren. Gebruik de Audio-/Video-adapterkabel (A/V-kabel) (niet meegeleverd) van de projector om camcorders, DVD-spelers of digitale camera’s aan te sluiten.
Met Component-videokabel (YPbPr/YUV) aansluiten Gebruik deze aansluiting om de hoogst mogelijke videokwaliteit te bereiken. Deze kabel kunt u als accessoire aanschaffen. De aansluitpunten van deze toestellen hebben voor het videosignaal de kleuren groen (Y), blauw (U/Pb), rood (V/Pr) en voor het audiosignaal de kleuren rood (audio rechts) en wit (audio links). Mobiele mediaspelers aansluiten Sommige videotoestellen (b.v. Pocket Multimedia Player) hebben een speciale aansluitkabel nodig.
Projector direct met WLAN aansluiten (WiFi-streaming) Aansluiten van de hoofdtelefoon Met de PicoPixWlink-software kunt u de projector via uw draadloze netwerk op een computer of een laptop aansluiten. Hiervoor moeten beide toestellen met hetzelfde draadloze netwerk verbonden zijn. 1 Installeer de PicoPixWlink-software (voorgeïnstalleerd op de projector ) op uw computer (zie ook hoofdstuk Op de computer aansluiten (USB), pagina 20).
5 Geheugen Geheugenkaart plaatsen USB-opslagmedium aansluiten V Y-PGA HDb-P MI r 1 Steek een geheugenkaart met de contactpunten naar boven in de / -sleuf aan de achterzijde van het toestel. Uw toestel ondersteunt de volgende geheugenkaarten: SD/SDHC/SDXC/MMC. 2 Schuif de geheugenkaart zo ver in het toestel totdat die vastklikt. 1 Sluit het USB-opslagmedium aan op het USB-aansluitpunt aan de achterzijde van het toestel.
Op de computer aansluiten (USB) 5 Bevestig om de verbinding te activeren. Met de USB-kabel kunt u de Pocket Projector aansluiten op een computer, zodat u bestanden kunt uitwisselen tussen de computer, het interne geheugen, een ingestoken geheugenkaart, of deze te verwijderen. U kunt op de Pocket Projector opgeslagen bestanden ook op de computer weergeven. VG Y-PbA HD -P MI r 1 Zet het toestel aan met de aan-/uitschakelaar aan de zijkant. 2 Na het startscherm verschijnt het hoofdmenu.
6 Draadloos netwerk (WLAN) In een draadloos netwerk (Wireless Local Area Network, WLAN) communiceren ten minste twee computers, printers of andere apparatuur via radiogolven (hoge frequentiebanden) met elkaar. De gegevensoverdracht in een draadloos netwerk verloopt via de normen 802.11b en 802.11g en 802.11n. 7 Kies met / Kopiëren. 8 Bevestig met à. 9 Wijzig de instellingen met / . 10 Bevestig met à. Met de knop ¿ gaat u een niveau terug in het menu.
Draadloos netwerk (WLAN) met de assistent instellen Digital Living Network Alliance (DLNA) Met behulp van de WiFi Protected Setup (WPS) of met de functie zoeken naar een netwerk in de buurt, kunt u uw toestel snel en gemakkelijk in een bestaand draadloos netwerk opnemen. Met WPS worden alle belangrijke instellingen zoals de netwerknaam (SSID) automatisch geconfigureerd en de verbinding met een veilige WPA-sleutel afgeschermd. Dit toestel ondersteunt Digital Living Network Alliance (DLNA).
7 Mediaweergave Opmerking Navigatieknoppen Alle weergegeven knoppen horen bij de afstandbediening. Opmerking Instellingsmogelijkheden Lees de aanwijzingen voor de instellingsmogelijkheden in het hoofdstuk Instellingen (zie ook hoofdstuk Instellingen, pagina 35) voor optimaal gebruik van uw toestel. Videoweergave Videoweergave (USB/SD-kaart/ intern geheugen/DLNA) 1 Zet het toestel aan met de aan-/uitschakelaar aan de zijkant. 2 Na het startscherm verschijnt het hoofdmenu.
Videoweergave (mini-HDMIaansluitpunt) 1 Sluit de video/audio-uitgang van het externe toestel aan op de -aansluitpunt van de Pocket Projector. Gebruik hiervoor de overeenkomstige kabels en kabeladapters (zie ook hoofdstuk Weergavetoestel aansluiten, pagina 15). 2 Lees de handleiding van uw externe toestel om te weten hoe u de video-uitgang inschakelt. Meestal wordt dit in de menu’s aangegeven als “TV out” of “TV-uitgang”. 3 Start de weergave op het externe toestel. 4 Pas het volume aan met /.
Diavoorstelling met achtergrondmuziek 1 2 3 4 5 7 Kies met / het bestand dat u wilt afspelen. Start de diashow. Druk op / , om de menubalk te openen. Kies met À/Á Ó. Bevestig met à. Kies met / het bestand dat u wilt afspelen. Opmerking Opslaglocatie Er kunnen alleen bestanden uit het interne geheugen/geheugenkaart/USB-opslagmedium worden weergegeven. 6 Bevestig met à om de achtergrondmuziek te starten.. 7 Druk op /, om het volume te regelen.
Office-weergave (YOZO Office) Met YOZO Office kunt u documenten weergeven. 1 Zet het toestel aan met de aan-/uitschakelaar aan de zijkant. 2 Na het startscherm verschijnt het hoofdmenu. 3 Kies met de navigatieknoppen Mapaanzicht. 4 Bevestig met à. 5 Met ingestoken geheugenkaart of USBopslagmedium: Kies met / het interne geheugen, het USB-opslagmedium of de geheugenkaart. 6 Bevestig met à. 7 Kies met / het bestand dat u wilt weergeven.
11 Kies met / Kopiëren. 12 Bevestig met à. 13 Kies met / naar welk opslagmedium de bestanden moeten worden gekopieerd: SD-kaart, Intern geheugen of USB-geheugen. 14 Bevestig met à. Opmerking Bestanden al aanwezig Wanneer bestanden met de zelfde naam al aanwezig zijn, dan kunt u met / en à aangeven of deze wel of niet overschreven moeten worden. Wanneer de bestanden niet overschreven moeten worden, dan wordt er een nummer aan de bestandsnaam toegevoegd. 3 Kies met de navigatieknoppen Mapaanzicht.
8 Digital TV-weergave Opmerking Benodigde accessoires Om de Digital TV-functie van uw projector te gebruiken, hebt u ofwel het Pico Station PPA7301 (niet meegeleverd), of de USB-DVBT-stick PPA8301 (niet meegeleverd) nodig. U kunt het Pico Station dockingstation en de USB-DVB-T-stick met de bestelbon bestellen.
Eerste weergave Opmerking Navigatieknoppen Alle weergegeven knoppen horen bij de afstandbediening. Bij de eerste ingebruikname van de DVB-T-functie moet de automatische zenderzoekfunctie worden gestart. 1 Zet het toestel aan met de aan-/uitschakelaar aan de zijkant. 2 Na het startscherm verschijnt het hoofdmenu. Zenders zoeken 14 Kies met de navigatieknoppen Scan Channels. 15 Bevestig met à. 16 Kies met de navigatieknoppen OK. 17 Bevestig met à. 18 Kies met de navigatieknoppen Auto. 19 Bevestig met à.
Televisie Opmerking Navigatieknoppen Alle weergegeven knoppen horen bij de afstandbediening. 1 Zet het toestel aan met de aan-/uitschakelaar aan de zijkant. 2 Na het startscherm verschijnt het hoofdmenu. 3 Sluit de antenne aan (zie ook hoofdstuk Antenne aansluiten, pagina 28). 4 Kies met de navigatieknoppen Digital TV. 5 Bevestig met à. 6 Het submenu verschijnt. 7 Kies met de navigatieknoppen Video Broadcast. 8 Bevestig met à. 9 De laatst bekeken zender wordt weergegeven. U wisselt de zender met z/{.
9 Android Uw Pocket Projector werkt met het Android-besturingssysteem. Android-apps installeren VOORZICHTIG! Android oproepen 1 Zet het toestel aan met de aan-/uitschakelaar aan de zijkant. 2 Na het startscherm verschijnt het hoofdmenu. Betrouwbare bronnen! Apps van onbekende herkomst kunnen schadelijk zijn. Gebruik alleen installatiepakketten uit betrouwbare bronnen. U kunt andere applicaties installeren. Gebruik APKinstallatiepakketten.
Adobe Flash Player installeren 12 Kies met de navigatietoetsen Install. U moet de nieuwste versie van Adobe Flash Player installeren om video's van Youtube af te spelen. 1 Download de nieuwste versie van het Adobe Flash Player-installatiepakket (flashplayer.apk) voor Android. Nadere inlichtingen vindt u op www.philips.com/support. 2 Sla het pakket op een geheugenkaart op. 3 Plaats de geheugenkaart in het apparaat (zie ook hoofdstuk Geheugenkaart plaatsen, pagina 19).
Browsermodus instellen 10 Kies met de navigatietoetsen Instellingen. Wijzig de browsermodus om webpagina's weer te geven, die Flash-elementen bevatten. 1 Zet het apparaat aan met de aan-/uitschakelaar aan de zijkant. 2 Na het startscherm verschijnt het hoofdmenu. 11 Bevestig met à. 12 Kies met de navigatietoetsen User agent. 3 Kies met de navigatietoetsen Android. 4 Bevestig met à. 5 Kies met de navigatietoetsen Browser. 13 Bevestig met à. 14 Kies met de navigatietoetsen Desktop. 6 Bevestig met à.
Browsermodus terugstellen 1 Ga te werk zoals beschreven is in het hoofdstuk browsermodus instellen (zie ook hoofdstuk Browsermodus instellen, pagina 33). 2 Kies met de navigatietoetsen iPad. 3 Bevestig met à.
10 Instellingen 1 Zet het toestel aan met de aan-/uitschakelaar aan de zijkant. 2 Na het startscherm verschijnt het hoofdmenu. 3 Kies met de navigatieknoppen Instellingen. 4 Bevestig met à. 5 Kies met / uit de volgende instellingen: 6 Bevestig met à. 7 U kunt de instellingen wijzigen met à, / , 8 Bevestig met à. Met de knop ¿ gaat u een niveau terug in het menu.
Tijd per foto – Afbeeldingstijd van foto’s tijdens de diashow Herhalen – Instellen van de manier waarop foto’s tijdens een diashow worden herhaald: Herhaling uitgeschakeld (Uit) alle foto’s in de map worden herhaald (Directory), alle foto’s worden herhaald (Alles).
11 Service Tips om de accu langer mee te laten gaan Accu opladen na volledige ontlading De capaciteit van de accu wordt naar verloop van tijd langzaam minder. U kunt de levensduur van uw accu verlengen wanneer u de volgende punten in acht houdt: • Zonder externe voeding wordt het toestel met de ingebouwde accu gebruikt. Als de accu niet meer over voldoende capaciteit beschikt, wordt het toestel uitgeschakeld. Sluit het toestel aan de externe voeding aan.
Reiniging GEVAAR! Aanwijzingen voor schoonmaken! Gebruik een zacht, pluisvrij doekje. Gebruik nooit vloeibare of licht ontvlambare reinigingsmiddelen (sprays, schurende middelen, politoeren, alcohol enz.). Er mag geen vocht in het toestel geraken. Spuit geen reinigingsvloeistof op het toestel. Veeg met een zachte doek over de beschreven oppervlaktes. Wees voorzichtig dat u geen krassen op de oppervlaktes veroorzaakt.
Problemen/oplossingen 1 Zet het toestel uit met de aan-/uitschakelaar aan de zijkant. 2 Wacht tenminste tien seconden. 3 Zet het toestel aan met de aan-/uitschakelaar aan de zijkant. 4 Mocht de fout regelmatig optreden, neem dan a.u.b. contact op met onze technische klantendienst of met uw vakhandelaar. Snelle hulp Mocht er een probleem optreden dat niet kan worden opgelost aan de hand van de beschrijvingen in deze handleiding (zie ook de volgende tips), ga dan als volgt te werk.
Problemen Oplossingen Het toestel is aan de voeding aangesloten en wordt scha- • kelt in stand-by-modus geschakeld De accu is geheel leeg. Het toestel kan na circa vijf minuten worden ingeschakeld en gebruikt (zie ook hoofdstuk Accu opladen na volledige ontlading, pagina 37). Wanneer het toestel via USB is aangesloten om video's af te spelen, schakelt het over van maximale helderheid op de minimale helderheidsstand.
12 Bijlage Technische specificaties Accessoires Afmetingen (b¦×¦h¦×¦d)...........................105¦×¦32¦×¦105¦mm Gewicht ..................................................................... 0,284¦kg Aanbevolen omgevingstemperatuur ...................5¦–¦35¦ºC Relatieve luchtvochtigheid.................................................... ................................... 15¦–¦85¦% (niet condenserend) Bestandsindelingen .... *.mp4, *.avi, *.mov, *.mkv, *.mpg, ..................................*.
De CE-markering geeft aan dat het product voldoet aan de hoofdvereisten op het gebied van consumentenveiligheid en elektromagnetische interferentie uit richtlijn 1999/5/EG, 2006/95/EG, 2004/108/EG en 2009/125/EG van de Europese Raad betreffende eindapparatuur voor telecommunicatie. De compatibiliteitsverklaring kunt u raadplegen op de website www.picopix.philips.com. Sagemcom Documents SAS hecht grote waarde aan milieubescherming in het kader van duurzame ontwikkeling.
Bijlage 43
PHILIPS and the PHILIPS’ Shield Emblem are registered trademarks of Koninklijke Philips Electronics N.V. and are used by Sagemcom Documents SAS under license from Koninklijke Philips Electronics N.V. È 2013 Sagemcom Documents SAS All rights reserved Sagemcom Documents SAS Documents Business Unit Headquarters : 250, route de l’Empereur 92848 Rueil-Malmaison Cedex · FRANCE Tel: +33 (0)1 57 61 10 00 · Fax: +33 (0)1 57 61 10 01 www.sagemcom.com Simplified Joint Stock Company · Capital 8.479.