Register your product and get support at www.philips.
Содержание Общие сведения ..................................... 3 Уважаемый покупатель, .................................................. 3 Об этом руководстве пользователя ............................ 3 1 Общая информация о технике безопасности ........................................... 4 Процедура настройки аппарата ................................... 4 Ремонт .................................................................................. 4 Электрическое питание .....................................
Общие сведения Уважаемый покупатель, Большое спасибо за выбор нашего карманного про ектора. Мы надеемся, что Вы получите удовольствие от работы с аппаратом и его многочисленных функций! Об этом руководстве пользователя С помощью приведенного далее руководства по установке вы сможете быстро приступить к эксплуатации вашего аппарата. Подробное описание функций приведено в последующих разделах руководства пользователя. Внимательно ознакомьтесь с руководством пользо вателя.
1 Общая информация о технике безопасности Не вносите никаких изменений и настроек, не описанных в этом руководстве пользователя. Неправильное использование может привести к травмиро ванию или материальному ущербу, повреждению устройства или потере данных. Соблюдайте все приведенные предупредительные указания и инструк ции по технике безопасности. Процедура настройки аппарата Это устройство предназначено только для индиви дуального использования. Аппарат следует установить на плоскую устойчивую поверхность.
Не пытайтесь заменить аккумулятор самостоя тельно. Неправильное обращение с аккумулятором или использование неправильного типа аккумуля тора может стать причиной повреждения устройс тва или травмирования. ОПАСНОСТЬ! Опасность взрыва при использовании неправильного типа аккумуляторов. Заменяйте аккумуляторы только такими же либо аккумуляторами совместимых типов. В случае использования элементов питания неправильного типа сущест вует вероятность взрыва.
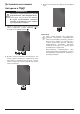
2 Общие сведения Верхняя сторона аппарата (1) – регулировочное колесико для резкости изображения. Замечания Расстояние до экранной поверхности должно составлять не менее 0,5 м и не более 5 м. Если карманный проектор установить вне данного промежутка, то невозможно достичь резкости изображения. Поэтому не вращайте регулировочное колесико с усилием, чтобы исключить риск повреждения объектива.
Пульт дистанционного управления – Режим ожидания / Включить устройство – увеличение отдельной фотографии.
Обзор функций меню 1 После включения устройства открывается главное меню. 2 С помощью кнопок навигации , À/Á выберите требуемое меню. 3 Подтвердите выбор с помощью à. 4 Путем многократного нажимания кнопки осуществляется возврат в главное меню. видео – выбрать файлы для воспроизведения видео источник – переключиться на внешний вход видео HDMI, , или VGA изображения – выбрать файлы для слайд-шоу обзор папок – выбрать файлы для воспроизве дения. Копирование или удаление файлов.
3 Ввод в эксплуатацию Процедура настройки аппарата Аппарат можно установить на плоской поверхности стола перед экранной поверхностью; нет необходимости направлять его на экранную поверхность под углом. Подключение блока питания / зарядить аккумулятор ОСТОРОЖНОСТЬ! Напряжение сети в месте установки! Проверьте, соответствует ли напряжение блока питания имеющемуся сетевому напряжению в месте установки. 1 Вставьте маленькую вилку кабеля сетевого адаптера в разъем на задней стороне устройства.
Установка или замена батареек в ПДУ 3 Вставьте блок батареек в ПДУ до щелчка фиксатора. ОПАСНОСТЬ! Опасность взрыва при использовании неправильного типа аккумуляторов. Используйте только батареи типа CR 2025. В случае использования элементов питания неправильного типа существует вероятность взрыва.. 1 Извлеките батарейный отсек из пульта дистанционного управления, оттянув задвижку ( ) и вытянув отсек аккумуляторов ( ).
Использование ПДУ Направьте ПДУ на датчик на задней стороне уст ройства. ПДУ корректно работает на расстоянии до 5 м от устройства и при угле, не превышающем 60 градусов. Убедитесь, что никакие предметы не загораживают пространство между ПДУ и принимаю щем сенсором на изделии. ОСТОРОЖНОСТЬ! r Применение батарей не по прямому назначению может привести к перегреву, взрыву, пожару, а также телесным повреждениям. Старые севшие батареи могут повредить пульт дистанционного управления.
4 Подключение к устройству воспроизведения Для подключения проектора используйте только входящие в комплект соединительные кабели или соединительные кабели, приобретенные в качестве принадлежностей. Входящие в комплект соединительные кабели Используйте VGA-аудиокабель (не входит в комплект поставки) для подключения проектора к компьютеру, ноутбуку или КПК. Проектор поддерживает следующие разрешения: VGA/SVGA/XGA. для обеспечения наилучших результатов установите раз решение компьютера на SVGA (800x600).
Подключение с помощью переходного кабеля аудио/ видео (CVBS) Используйте аудио/видеокабель (A/V-кабель) проектора для подключения видеокамеры, DVD-плеера или цифровых камер. Разъемы данного устройства окрашены в желтый (видео), красный (правый аудиоканал) и белый (левый аудиоканал) цвет. 1 Подключите AV-кабель (входит в комплект поставки) к гнезду проектора. 2 Соедините гнезда аудио-/видео видеоустройства с помощью обычного переходного кабеля с A/Vкабелем проектора.
Подключение к мобильным мультиме дийным устройствам Подключение наушников Для подключения некоторых видеоустройств (напр., карманные мультимедийные плееры) необходимы специальные кабели. Они поставляются вместе с устройством, либо их можно приобрести у производителя мультимедийного устройства. Обратите внимание на то, что устройства могут не работать в случае использования неоригинальных кабе лей. 1 Перед подключением наушников уменьшите силу звука аппарата.
5 Карта памяти / USB-накопитель Установка карты памяти Подключение USBнакопителя 1 Подсоедините USB среду хранения данных непосредственно к разъему USB, расположенному на левой стороне устройства. 1 Вставьте карту памяти контактами вверх в гнездо на задней панели аппарата. Оно поддерживают карты памяти следующих форматов: SD/ SDHC/SDXC/MMC. 2 Вводите карту памяти в гнездо, пока она не зафиксируется.
6 Воспроизведение носителей информации Замечания Навигационные кнопки Все изображенные кнопки являются кнопками пульта дистанционного управления. Воспроизведение видео Воспроизведение видео (USB/ SD-карта/внутренняя память) 1 Включите устройство при помощи выключателя на его боковой стороне. 2 После заставки появляется главное меню. 9 Нажмите на , чтобы прекратить воспроизведение и вернуться к списку. 10 Нажмите еще раз кнопку . для возврата в главное меню.
Воспроизведение видео (гнездо Mini-HDMI) 1 Выход аудио/видео внешнего устройства подкарманного проектора. ключите к гнезду Используйте для этого соответствующий кабель и кабельный адаптер (смотрите также раздел Подключение к устройству воспроизведения, Страница 12). 2 Прочитайте в руководстве по эксплуатации внешнего устройства описание процедуры включения видеовыхода. Как правило, в соответствующих меню он обозначается как «TV out» или «ТВвыход». 3 Запустите воспроизведение на внешнем устройстве.
Замечания Увеличить / уменьшить С помощью кнопки Вы можете уве личить изображение во время слайдшоу. С помощью кнопок можно передвигать увеличенное изоб ражение. 10 Нажмите на T, чтобы прервать слайд-шоу. 11 Нажмите кнопку для выхода из слайд-шоу и возврата в окно обзора. 12 Нажмите еще раз кнопку . для возврата в главное меню. Воспроизведение музыки Замечания Отключить воспроизведение изобра жения Для экономии энергии во время воспроиз ведения музыки воспроизведение изобра жения можно отключить.
7 С помощью ния. выберите файл для копирова- Замечания Файлы отсутствуют (0 файлов) Отображаются только те файлы, которые могут быть воспроизведены проек тором. 8 Выделите файл с помощью Á. При повторном нажатии кнопки выделение снимается. Замечания Выделение всей папки Можно также выделить всю папку для копирования всех находящихся в ней файлов. Если в папке находится большое количество файлов, копирование может занять определенное время. 9 С помощью 10 Нажмите à. 11 с помощью выберите другие файлы.
выберите, удалить ли файл 13 С помощью либо отменить удаление. 14 Подтвердите выбор с помощью à. Замечания Ошибка Если во время удаления произошла ошибка, то убедитесь в том, что на носитель не имеет защиты от записи. Замечания Удаление фотографий на карте памя ти При удалении фотографий через компью тер учитывайте то, что после установки карты памяти в цифровую камеру фотогра фии могут отображаться некорректно.
7 Настройки 1 Включите устройство при помощи выключателя на его боковой стороне. 2 После заставки появляется главное меню. 3 С помощью кнопок навигации выберите настройки 4 Подтвердите выбор с помощью à. 5 С помощью выберите из следующих настроек. 6 Подтвердите выбор с помощью à. 7 Изменяйте настройки с помощью à, , 8 Подтвердите выбор с помощью à. С помощью кнопки можно вернуться на один шаг в меню.
Настройки фотографий вид – представление изображений при выборе в главном меню как вид в миниатюре либо как спи сок. время на одно изображение – время показа одного изображения при демонстрации слайд-шоу повтор – установить тип повтора просмотра фото графий при слайд-шоу: Без повтора (выкл.), повтор отображения всех фотография в директории (директория), повтор отображения всех сохраненных фотографий (все).
8 Техническое обслуживание Указание по обращению с аккумулятором Зарядка аккумулятора при глубоком разряде Емкость аккумулятора со временем снижается. Можно продлить срок службы аккумулятора в случае соблюдения следующих указаний: r При отключении сетевого электропитания аппарат работает от встроенного аккумулятора. Если мощности аккумулятора уже недоста точно, то аппарат переходит в ждущий режим. Подключите аппарат к источнику сетевого питания.
Очистка Перегрев аппарата ОПАСНОСТЬ! Отключите аппарат! Отключите устройство при помощи выключателя, прежде чем извлекать отсоединять блок питания от сети. ОПАСНОСТЬ! Рекомендации по чистке! Для очистки используйте мягкую сухую безворсовую ткань. Не применяйте для очистки жидких, газообразных и горючих очистителей (аэрозоли, абразивные и полирующие средства, спирт и т.п.). Не допускайте попадания влаги внутрь аппарата. Не используйте для чистки устройства чистя щие спреи.
Устранение неисправностей рите также справочный текст ниже), то выполните следующие действия. 1 Выключите устройство при помощи выключателя на его боковой стороне. 2 Подождите не менее десяти секунд. 3 Включите устройство при помощи выключателя на его боковой стороне. 4 Если ошибка не устранена, то обращайтесь в службу технической поддержки или к вашему поставщику.
Неисправности Устранение Аппарат переходит с максимальной яркости в режим r минимальной яркости, когда аппарат подключен через USB-порт для воспроизведения видео. r Аппарат невозможно подключить через USB-порт к r устройству на основе операционной системы Android (например, мобильный телефон / смартфон с операционной системой Android).
9 Приложение Технические данные Габариты (Ш¦×¦В¦×¦Г) ............................. 105¦×¦31¦×¦105¦мм Вес ................................................................................. 0,27¦кг Рекомендуемая среда эксплуатации аппарата ............ ...............................................................................5¦–¦35¦ºC Относительная влажность воздуха ................................ .........................................20¦–¦80¦% (без конденсации) Форматы файлов................... *.
Маркировка СЕ свидетельствует о том, что изделие соответствует требованиям директив Европейского Парламента и Совета 1999/5/CE, 2006/95/CE, 2004/108 /CE и 2009/125/CE относительно оборудования информационных технологий, безопасности и охраны труда пользователей и электромагнитного излучения. Текст Декларации о соответствии можно прочитать на интернет-сайте www.picopix.philips.com. Sagemcom Documents SAS уделяет большое внимание сохранению окружающей среды в рамках кон цепции устойчивого развития.
PHILIPS and the PHILIPS’ Shield Emblem are registered trademarks of Koninklijke Philips N.V. and are used by Sagemcom Documents SAS under license from Koninklijke Philips N.V. È 201 Sagemcom Documents SAS All rights reserved Sagemcom Documents SAS Documents Business Unit Headquarters: CS 50001 92848 Rueil Cedex - FRANCE Tel: +33 (0)1 57 61 10 00 · Fax: +33 (0)1 57 61 10 01 www.sagemcom.