8848 Series Vejledning 43PUS8848 50PUS8848 55PUS8848 65PUS8848 75PUS8848 Register your product and get support at www.philips.
Indhold 1 Startskærm 4 1.1 Introduktion 4 1.2 Instrumentpanel og Indstillinger 1.3 Google TV og Basistilstand 1.4 Åbn startskærmen 9.1 Netværk og internet 34 6 10 Internettet 36 6 10.1 Start internettet 36 11 Kilder 37 11.1 Skift til en enhed 37 12 Hurtigmenu og Hyppige indstillinger 38 13 Skærm og lyd 39 13.1 Billede 39 42 2.3 Tip om placering 6 9.2 Google-konto 7 7 3 Fjernbetjening 8 3.1 Tastoversigt 8 3.2 Parring af fjernbetjeningen med TV'et 32 34 6 2.
17.4 Fra en USB-forbindelse 61 17.6 Se dine fotos 62 17.5 Afspil dine videoer 17.7 Afspil din musik 65 18.1 Philips TV Remote App 65 19 Spil 66 19.1 Det skal du bruge 66 19.3 Spil et spil fra spilkonsol eller computer 66 66 20 Netflix 68 21 Alexa 69 21.1 Om Alexa 69 22 Specifikationer 70 22.1 Miljø 70 22.3 Operativsystem 70 22.2 Strøm 22.4 Modtagelse 22.5 Skærmtype 22.6 Skærmens indgangsopløsning 22.7 Tilslutningsmuligheder 22.8 Lyd 22.9 Multimedie 70 70 71 71 71 71 71 73 23.
1 1.2 Startskærm Instrumentpanel og Indstillinger 1.1 Introduktion Instrumentpanel Instrumentpanelet er et sidepanel i Google TV, der giver adgang til Indstillinger, enhedsstyring, meddelelser og meget mere. For at drage fordel af dit Google TV skal du oprette forbindelse fra TV'et til internettet. Tryk på HOME på fjernbetjeningen for at hente startskærmen. Ligesom på din Android-smartphone eller tablet er startskærmen midt på TV-skærmen.
søge og betjene dit TV med din stemme. Du kan finde flere oplysninger på Googles supportside. Forskel på startskærmen Startskærmbilledet i Basistilstand har kun to rækker og ingen faner. Den første Hjem-række indeholder ikonerne Se tv, TV-guide, Kilder og Instrumentpanel for TV-funktioner. Den anden App-række indeholder alle forudinstallerede apps. Instrumentpanelet i Basistilstand inkluderer ikke en personlig profil og kan kun udføre ændringer af indstillinger og vise systemmeddelelser.
2 600x400, M8 (min.: 25 mm, maks.: 30 mm) Opsætning Forsigtig Vægmontering af TV'et kræver særlig ekspertise og bør kun udføres af kvalificerede fagfolk. Vægmonteringen til TV'et skal overholde sikkerhedskravene i forhold til TV'ets vægt. Læs også sikkerhedsforskrifterne, før du placerer TV'et. TP Vision Europe B.V. påtager sig intet ansvar for forkert montering eller montering, der resulterer i en ulykke eller personskade. 2.
Selvom dette TV har et meget lavt strømforbrug i standby-tilstand, bør stikket tages ud af stikkontakten, hvis TV'et ikke skal benyttes i en længere periode for at spare energi. Tryk på farvetasten Søgeord i Hjælp, og find Tænd TV for at få yderligere oplysninger om at tænde og slukke TV'et. 2.5 Antennekabel Tilslut antennestikket til Antennetilslutningen bag på TV'et, og kontrollér, at det sidder korrekt. Du kan tilslutte din egen antenne eller et antennesignal fra en antenneforening.
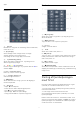
Skifter tilbage til at se TV eller forlader en interaktiv TVapplikation. Det virker dog muligvis ikke på nogle programmer. Adfærden afhænger af tredjeparts TVapps. 3 Fjernbetjening 3.1 Tastoversigt Top (type 2) Top (type 1) 1 – (Standby) / Til Tænder TV'et, eller sætter det på standby. Tryk længe i tre sekunder for at genstarte TV'et. 1 – (Standby) / Til Tænder TV'et, eller sætter det på standby. Tryk længe i tre sekunder for at genstarte TV'et.
apps. Nederst Mellem 1 – (TV-guide) /LIST Åbner eller lukker TV-guiden. Tryk langvarigt for at åbne kanallisten. 2 – (Lydstyrke) Tryk på + eller – for at justere lydstyrken. 3 – Taltaster Vælger en kanal direkte. 1 - OK-tast Bekræfter et valg eller en indstilling. Åbner kanallisten, mens du ser TV. 4 - TEXT Åbner eller lukker tekst/tekst-TV. 2 – (Tilbage) Skifter tilbage til den forrige kanal, du valgte. Vender tilbage til den forrige menu. Går tilbage til den forrige app/internetside.
Bemærk: mikrofonen er aktiv. 2 - Sig med tydelig udtale, hvad du søger efter. Når stemmeindtastningen er færdig, skal du slippe tasten for at starte søgningen. Det kan tage lidt tid, inden resultaterne vises. 3 - På listen over søgeresultater kan du vælge det emne, du ønsker. 1 - Når fjernbetjeningen er gået i parringstilstand, begynder den blå LED-indikatorring omkring mikrofonen foran på fjernbetjeningen at blinke.
1 - Når TV'et er tændt, skal du trykke på joystickknappen nederst på TV'et for at hente grundmenuen frem. 2 - Tryk venstre eller højre for at vælge Lydstyrke, Kanal eller Kilder. Vælg Demo for at starte en demofilm. 3 - Tryk op eller ned for at regulere lydstyrken eller finde næste eller forrige kanal. Tryk op eller ned for at gennemgå listen over kilder, herunder valg af tuner. Tryk på joystickknappen for at starte demofilmen. 4 - Menuen forsvinder automatisk. 4 Tænd/sluk 4.
pakke, du har brug for. Nogle pakker tilbyder en Hurtig eller Fuld installation af deres tilgængelige kanaler, vælg den ene eller den anden. TV'et installerer satellitkanalerne og radiostationerne. 9 - Vælg Afslut for at gemme satellitopsætningen samt installerede kanaler og radiostationer. 5 Kanalinstallation 5.1 Satellitinstallation Om installation af satellitter Indstillinger for satellitinstallation Op til 4 satellitter Indstillingerne for satellitinstallationen er forudindstillet efter dit land.
Kanalpakker User Band-frekvens Satellitudbydere kan tilbyde kanalpakker, som samler gratis kanaler og tilbyder en sortering, som passer til det enkelte land. Nogle satellitter tilbyder abonnementspakker - en samling af kanaler, du betaler for. Ud over det unikke brugerbåndnummer skal satellitmodtageren bruge frekvensen for det valgte brugerbåndnummer. Disse frekvenser vises for det meste ved siden af brugerbåndnummeret på en Unicable-koblingsboks.
• Hvis nogle kanaler ser ud til at være forsvundet eller fejlplaceret, kan stationen have ændret transponderplaceringen for disse kanaler. For at gendanne positionerne på kanallisten kan du prøve at opdatere kanalpakken. Homing Transponder og LNB I nogle lande kan du tilpasse ekspertindstillingerne for homing transponder og hver enkelt LNB. Disse indstillinger skal kun bruges eller ændres, når en normal installation mislykkes.
kanalopdatering, mens du ser TV, eller når TV'et er på standby. Fabriksnulstilling Du kan foretage en fuld TV-installation igen. TV'et bliver fuldt geninstalleret. Manuel kanalopdatering Sådan gentager du en fuld TV-installation: Du kan altid starte en kanalopdatering selv. 1 - Vælg Indstillinger > System > Om > Nulstil > Fabriksnulstilling, og tryk på OK. 2 - Indtast din PIN-kode, hvis det er nødvendigt. 3 - TV'et vil foretage fuld geninstallering.
Netværksfrekvens Modtagekvalitet Med Netværksfrekvenstilstand indstillet til Manuelt kan du her indtaste den netværksfrekvensværdi, du modtog fra din kabeloperatør. Brug taltasterne til at indtaste værdien. Du kan kontrollere en digital kanals kvalitet og signalstyrke. Har du din egen antenne, kan du ændre antennens placering for at forsøge at forbedre modtagelsen. Sådan kontrollerer du modtagekvaliteten for en digital kanal: Frekvensscanning 1 - Stil ind på kanalen.
Vælg Gem aktuel kanal eller Gem som ny kanal, og tryk på OK. Det nye kanalnummer vises kortvarigt. 5 - Når kopieringen er færdig, skal du USBflashdrevet ud igen. 6 - Tryk om nødvendigt på (venstre) gentagne gange for at lukke menuen. Trinene kan gentages, indtil du har fundet alle tilgængelige, analoge TV-kanaler. Du kan nu uploade den kopierede kanalliste til et andet Philips TV. 5.
2 - Tilslut USB-flashdrevet, der indeholder kanallisten til det andet TV. 3 - Vælg Indstillinger > Kanaler og indgange > Kanaler > Kopiering af kanalliste > Kopier til TV, og tryk på OK for at starte upload af kanallisten. Indtast din PIN-kode, hvis det er nødvendigt. 4 - En meddelelse bekræfter, når kanallisten er kopieret til TV'et. Tag USB-flashdrevet ud.
6 Åbn en kanalliste Kanaler 6.1 Ved siden af listen med alle kanaler kan du vælge en filtreret liste, eller du kan vælge en af de foretrukne lister, du har lavet. Installer kanaler Sådan åbner du den aktuelle kanalliste: 1 - Tryk på for at skifte til TV. 2 - Tryk på OK for at åbne den aktuelle kanalliste. 3 - Alternativt kan du trykke et langt tryk på TVguide for at åbne kanallisten. 4 - Tryk på Tilbage for at lukke kanallisten.
6.3 Lås en kanal Kanalliste, sortering Sådan låser og åbner du en kanal Du kan sortere i en kanalliste med alle kanaler. Du kan indstille kanallisten til kun at vise TV-kanaler eller radiostationer. Med hensyn til satellit-/antenne-/kabelkanaler kan du indstille listen til at vise de gratis eller kodede kanaler. Hvis du vil forhindre, at dine børn ser en kanal, kan du låse kanalen. Visning af en låst kanal kræver, at den 4-cifrede PIN-kode til Børnesikringen indtastes først.
aldersgrænse. 3 - Tilbage i Forældrevurdering skal du vælge alderen og trykke på OK. 4 - Tryk om nødvendigt på (venstre) gentagne gange for at lukke menuen. Undertekster fra tekst-TV Hvis du stiller ind på en analog kanal, skal du gøre undertekster tilgængelige for hver kanal manuelt. 1 - Skift til en kanal, og tryk på TEXT for at åbne tekst-TV. 2 - Tast sidenummeret for undertekster. 3 - Tryk på TEXT igen for at lukke tekst-TV. Vælg Ingen for at deaktivere forældrevurderingen.
Indstilling af primært og sekundært lydsprog: • Vælg Tale for at angive talepræference, Beskrivende eller 1 - Gå til Indstillinger > Kanaler og indgange > Kanaler. 2 - Vælg Primær lyd eller Sekundær lyd. 3 - Vælg det ønskede sprog, og tryk på OK. 4 - Tryk på (venstre) for at gå et trin tilbage, eller tryk på Tilbage for at lukke menuen. Undertekst. Dialogforbedring Indstillinger > Kanaler og indgange > Kanaler > Universel adgang > dialogforbedring.
Du kan nulstille dit TV's unikke enhedsidentifikator. Der oprettes et nyt ID. Dette vil erstatte dit enheds-ID med en ny identifikator. 2 - Tryk på OPTIONS, vælg Programoplysninger, og tryk på OK for at få vist generelle oplysninger om programmet. 3 - For at lukke dette skærmbillede skal du trykke på Tilbage for at gå tilbage til kanallisten. Common Interface Hvis du har installeret et CAM i det Fælles interfacestik, kan du se CAM og udbyderinformation eller udføre nogle CAM-relaterede indstillinger.
1 - Brug tastaturet på skærmen til at slette det aktuelle navn og indtaste et nyt. 2 - Når det er gjort, skal du vælge Luk og trykke på OK. Omplacer kanaler Kun på en Liste over foretrukne kan du ændre rækkefølgen af kanaler (omplacere). TV'et vil skifte til den nyoprettede Liste over foretrukne. Sådan ændrer du rækkefølgen af kanaler: 1 - Åbn den Liste over foretrukne, du vil omplacere. 2 - Tryk på OPTIONS, vælg Omplacer kanaler, og tryk på OK.
på OPTIONS, vælge Vis enhedstaster, vælge tasten og trykke på OK. 3 - Tryk på Tilbage for at skjule enhedstasterne. 4 - Tryk på Tilbage igen for at lukke tekst-TV. Om iTV Med interaktivt TV kombinerer visse digitale TVselskaber deres normale TV-programmer med oplysnings- eller underholdningssider. På nogle sider kan du reagere på et program eller en afstemning, foretage onlineshopping eller betale for et video-ondemand-program.
7 Søg efter genre TV-guide 7.1 Hvis oplysningerne er tilgængelige, kan du søge efter planlagte programmer efter genre som f.eks. film, sport osv. TV-guidedata Sådan søger du efter programmer efter genre: 1 - Tryk på TV GUIDE. 2 - Tryk på OPTIONS. 3 - Vælg Søg efter genre, og tryk på OK. 4 - Vælg den ønskede genre, og tryk på OK. Der vises en liste med de fundne programmer. 5 - Tryk på Tilbage for at lukke menuen.
8 HDMI ARC og eARC Tilslut enheder På TV'et er det kun HDMI 2, der understøtter HDMI ARC (Audio Return Channel – lydreturkanal) og HDMI eARC. 8.1 Om tilslutninger Hvis enheden, typisk et HTS (Home Theatre System), en soundbar eller en AV-modtager, også har HDMI ARC-tilslutning, skal du slutte den til HDMI 2 på TV'et. Med HDMI ARC-tilslutningen behøver du ikke at tilslutte det ekstra lydkabel, som sender TV-billedets lyd til HTS. HDMI ARC-tilslutningen kombinerer begge signaler.
Indstillinger > Kanaler og indgange > Indgange > EasyLink > EasyLink-fjernbetjening > Til. HDMI Ultra HD Sådan tændes eller slukkes EasyLink-funktionen på fjernbetjeningen. Bemærk, at du altid kan styre lydstyrken på tilsluttede HDMI CEC-kompatible enheder uanset denne indstilling. Dette TV kan vise Ultra HD-signaler. Nogle enheder – tilsluttet via HDMI – genkender ikke et TV med Ultra HD og fungerer muligvis ikke korrekt eller viser forvrænget billede eller lyd.
understøttes i Optimal (automatisk spil). 5.1 og 7.1 samt 32-kanals ukomprimeret lyd. HDMI eARC er kun til rådighed på HDMI 2. * Med understøttelse af Variabel HDMIopdateringshastighed/FreeSync Premium/G-Sync ændrer TV'et opdateringshastigheden i realtid i henhold til billedhastighedssignalet for at synkronisere med hvert enkelt billede. Den anvendes til at reducere forsinkelse, sløring og billedforvrængning for at opnå en bedre spiloplevelse.
8.4 Når du tænder for TV'et, kan det tage nogle få minutter, før CAM-modulet aktiveres. Hvis et CAMmodul indsættes, og abonnementet er betalt (abonnementsmetoderne kan variere), kan du se kodede kanaler, der understøttes af CAM-smartkortet. CAM med smartkort – CI+ CI+ Dette TV er klar til CI+ Conditional Access. CAM-modul og smartkort er udelukkende til dit TV. Hvis du tager CAM-modulet ud, vil du ikke længere kunne se kodede kanaler, der understøttes af CAMmodulet.
8.7 8.9 Øretelefoner USB-tastatur Du kan tilslutte et sæt hovedtelefoner til -stikket bag på TV'et. Stikket er et 3,5 mm mini-jackstik. Du kan regulere hovedtelefonernes lydstyrke separat. Connect Tilslut et USB-tastatur (USB-HID-type) for at indtaste tekst på dit TV. Sådan regulerer du lydstyrken: Brug én af de andre USB-tilslutninger for at tilslutte. 1 - Tryk på Lydstyrke , og vælg hovedtelefonikonet med pilene (venstre) eller (højre).
højere. Du kan ikke afspille en video med en standardopløsning, der er højere end Ultra HD, via nogen af USB-forbindelserne. TV'et registrerer enheden og åbner en liste, der viser indholdet. Hvis indholdslisten ikke vises automatisk, skal du trykke på SOURCES og vælge USB. Hvis du vil have flere oplysninger om visning af fotos, skal du trykke på farvetasten Søgeord i Hjælp og finde Fotos, videoer og musik.
deaktiveres VRR-understøttelse i TV'et. * Bemærk for brugere med AMD-grafikkort: Hvis du tilslutter computeren til TV'et via HDMI, skal du sikre dig, at følgende indstillinger på grafikkortet bruges til at opnå den rigtige ydeevne. – Hvis grafikkortets outputvideo er 4096 x 2160p eller 3840 x 2160p, og RGB-pixelformatet anvendes, skal RGB 4:4:4-pixelformatet Studio (begrænset RGB) indstilles på computerens grafikkort.
3 - En meddelelse bekræfter, når forbindelsen er oprettet. 9 Slut dit TV til 9.1 Problemer Netværk og internet Trådløst netværk blev ikke fundet eller er forvrænget • Mikrobølgeovne, DECT-telefoner eller andre Wi-Fi 802.11b/g/n/ac-enheder kan forstyrre et trådløst netværk. • Kontroller, at firewalls i dit netværk tillader adgang for den trådløse TV-forbindelse. • Hvis det trådløse netværk i dit hjem ikke fungerer korrekt, kan du prøve med en kablet netværksinstallation.
mailadresse og en adgangskode. Hvis du ikke har en Google-konto, kan du bruge din computer eller tablet til at oprette en (accounts.google.com). Hvis du ikke loggede på under den første TV-installation, kan du altid logge på senere. Netværks- og internetindstillinger Vis netværksindstillinger Indstillinger > Netværk og internet > Vis netværksindstillinger. Sådan logger du på, efter du har installeret dit TV: Du kan se alle aktuelle netværksindstillinger her.
10 Internettet 10.1 Start internettet Du kan surfe på internettet på dit fjernsyn. Du kan se alle internet-websites, men de fleste er ikke egnet til visning på en TV-skærm. • Visse tilføjelsesprogrammer (f.eks. til visning af sider eller videoer) er ikke til rådighed på dit TV. • Du kan ikke sende eller downloade filer. • Internetsider vises én side ad gangen og på fuldskærm. Sådan starter du internetbrowseren: 1 - Tryk på HOME.
11 Kilder 11.1 Skift til en enhed Du kan skifte til en hvilken som helst af de tilsluttede enheder fra listen over kilder. Du kan skifte til en tuner for at se TV eller åbne indholdet af en tilsluttet USBlagerenhed. Du kan skifte til de tilsluttede enheder for at se deres program, en digital modtager eller en Bluray-afspiller. Sådan skifter du til en tilsluttet enhed: 1 - Tryk på SOURCES for at åbne menuen Kilder. 2 - Vælg et af elementerne i kildelisten, og tryk på OK.
12 Hurtigmenu og Hyppige indstillinger I Hurtigmenu og Hyppige indstillinger kan du hurtigt få adgang til TV-funktioner eller indstillingsmenuer. Sådan åbnes Hurtigmenu og Hyppige indstillinger og en element: 1 - Tryk på Hurtigmenu/MENU for at åbne Hurtigmenu. 2 - Tryk på pilene (venstre) eller (højre) for at skifte mellem Hurtigmenu og Hyppige indstillinger. 3 - Vælg et element, og tryk på OK for at åbne eller starte det.
hjemmeunderholdningsoplevelse. • ECO – Den mest energibevidste indstilling. • Film – Ideel til film med original studieeffekt. • Spil* – Ideel til spil. • Skærm** – Ideel til visning af computerskærm. Den originale video vises med minimal behandling. • Calman – Til Calman-farvekalibrering. 13 Skærm og lyd 13.1 Billede * Billedtype - Spil er kun tilgængeligt i HDMI-videoog streamingvideoapps. ** Billedtype - Skærm er kun tilgængelig, når HDMIkildevideo er beregnet til PC-program.
Slå Automatisk filmbilledtype til/fra Gamma Indstillinger > Skærm og lyd > Billede > Automatisk filmbilledtype > Automatisk filmbilledtype. Indstillinger > Skærm og lyd > Billede > Kontrast > Mørke detaljer > Gamma. Indstil en ikke-lineær indstilling for billedets lysstyrke og kontrast. Tænd eller sluk for automatisk at registrere filmindhold, og indstil dine præferencer i Indstillinger > Skærm og lyd > Billede > Automatisk filmbilledtype > Foretrukken filmbilledtype.
HDR-effektindstillinger Farvestyring Indstillinger > Skærm og lyd > Billede > Kontrast > HDR-kontrol > HDR10-effekt/HDR10+-effekt/HLG-effekt. Indstillinger > Billede > Avanceret > Farve > Farvestyring. Indstilling af farvestyring er kun tilgængelig, når Farveforbedring er slået fra. Sådan justeres eller nulstilles til standardværdien for Hue, Mætning og Intensitet for farven rød, gul, grøn, cyan, blå og magenta. Hvis du vil nulstille alle værdier til standard, skal du vælge Nulstil alle til standard.
Bevægelse > Bevægelsestyper. 13.2 Bevægelsestyper giver optimerede tilstande for bevægelsesindstillinger til forskelligt videoindhold. Skærm Vælg en af bevægelsestyperne for at få en anden billedoplevelse i forbindelse med video. (Fra, Ægte biografoplevelse, Film, Standard, Glidende, Personlig) Billedformat Hvis billedet ikke udfylder hele skærmen, hvis der vises sorte bjælker i top og bund eller i begge sider, kan du indstille billedet, så det passer i fuldt skærmformat.
Vælg Til for at aktivere intelligent indstilling af equalizer baseret på lydindhold og brugerdefinerede indstillinger. 13.3 Lyd Lydtype Brugerdefineret AI-equalizer Vælg en type Indstillinger > Skærm og lyd > Indstillinger > Skærm og lyd > Lyd > Personlige indstillinger > Brugerdefineret AI-equalizer. Lyd > Lydtype. Tryk på Pile-/navigationstasterne for at justere AIequalizerniveauet. For nem justering af lyd kan du vælge en foruddefineret indstilling med lydtype.
appen på din telefon eller tablet. 2 - Brug Philips Sound-appen til at søge efter og konfigurere en DTS Play-Fi-kompatibel enhed. Sørg for, at DTS Play-Fi-enheden er tilsluttet det samme Wi-Fi-netværk som dit TV. 3 - På dit Philips TV skal du åbne den forudinstallerede DTS Play-Fi-app og vælge Tilslut højttalere for at søge efter DTS Play-Fi-kompatible enheder. 4 - Når DTS Play-Fi-enhederne er tilsluttet dit TV, kan du vælge enhederne på enhedslisten og justere lydstyrken.
Indstillinger > Skærm og lyd > Lyd > EasyLink 2.0>DRC. Vælg lydtype Indstillinger > Skærm og lyd > Lyd > EasyLink 2.0 > Lydtype. Vælg den foretrukne DRC (Dynamic Range Control). • Automatisk - dynamisk område justeres automatisk. • Til - optimer det dynamiske område. • Fra - slå dynamisk områdeindstilling fra. Vælg mellem de forudindstillede lydtyper. Der er dedikerede lydtyper til at se film, lytte til musik eller andet lydindhold. • Film - lydtype velegnet til film. • Musik - optimeret til musik.
1 - Hold fjernbetjeningen mod lyttepositionen, og peg den mod TV'et under indstillingsprocessen. 2 - Vælg Kalibrer nu eller Kalibrer igen for at starte kalibreringen. 3 - En testlyd afspilles og måles via fjernbetjeningen. Hold fjernbetjeningen, og peg den hen mod TV'et. Det kan tage flere sekunder. 4 - Når TV-højttalerne er kalibreret, skal du vælge Test for at lytte til lyden, før og efter TV-højttalerne er kalibreret.
indhold. Ambilight, Til eller Fra. Justering af digital udgang Skift video Indstillinger > Skærm og lyd > Lydudgang > Justering af digital udgang. Du kan indstille Ambilight, så den følger videoens eller lydens dynamik i et TV-program. Du kan også indstille Ambilight til at vise en forudindstillet farvestil, eller du kan slå Ambilight fra. Juster lydstyrkeniveauet på HDMI-lydsystemet. • Vælg Mere for at få højere lydstyrke. • Vælg Mindre for at få lavere lydstyrke.
foruddefinerede farvetyper. Ambisleep Sådan indstiller du Ambilight-stil: Ambisleep simulerer solnedgang, så du kan slappe af, før du falder i søvn. Når simulationen er færdig, skifter TV'et automatisk til standby. 1 - Tryk på AMBILIGHT. 2 - Rul for at vælge Følg farve. 3 - Vælg den ønskede stil, og tryk på OK. 4 - Tryk på (venstre) for at gå et trin tilbage, eller tryk på Tilbage for at lukke menuen.
Indstillinger > Skærm og lyd > Ambilight > Lounge Light > Aktiver ved standby. Varm hvid indstilling Tænd for at aktivere Lounge Light-tilstand, når TV'et er på standby. Indstillinger > Skærm og lyd > Ambilight > Avanceret > Varm hvid indstilling. Den varme hvide indstilling indstiller og låser din foretrukne farve for Ambilight. Når Ambilight-stil > Skift farve > Varm hvid låses op, kan du indstille og låse hvide farvevariationer for Ambilight.
højttaler-LED'er. Bemærk: Sluk ikke for netværksforbindelsen, for at Sunrisealarmen fungerer korrekt. Solopgangsalarm kan ikke køre, når TV'ets urfunktion er indstillet til manuel. Gå til indstillingsmenuen, og ændr urfunktionen til automatisk. Alarmen virker ikke, hvis Placering er indstillet til Butik. Nulstil konfiguration Indstillinger > Skærm og lyd > Ambilight > Philips Wireless Home Speakers > Nulstil konfiguration. Nulstil den aktuelle konfiguration af Philips Wireless Home Speakers.
* Bemærk: Hvis Google TV ikke findes i rækken med Dine apps, du kan søge det frem i søgefeltet for at Åbne eller Installere det. 14 Apps 14.1 Find flere oplysninger på www.support.google.com/googletv Om Apps Du kan finde dine foretrukne apps i rækken Dine apps i startmenuen. Musik Ligesom apps på din smartphone eller tablet giver apps på dit TV mulighed for særlige funktioner, der fremmer TV-oplevelsen. Du kan bruge WEBBROWSEREN til at surfe på internettet.
Betalinger 1 - Tryk på HJEM, og vælg fanen Apps. 2 - Vælg Google Play Games-appen, og åbn den. 3 - Vælg et spil, du ønsker at spille, eller vælg et nyt spil, du ønsker at installere, og tryk på OK. 4 - Når du er færdig, skal du trykke på Tilbage gentagne gange eller trykke på EXIT eller stoppe appen med den dertil beregnede afslut-/stopknap. For at foretage en betaling på Google Play på TV'et, skal du tilføje en betalingsmåde – et kreditkort (uden for USA) – til din Google-konto.
Find flere oplysninger på www.support.google.
15 og følg anvisningerne på skærmen. System Du kan også selv søge efter en opdatering af software. Under opdateringen af software er der ikke noget billede, og TV'et slukkes og tændes igen. Dette kan ske flere gange. Opdateringen kan tage et par minutter. Vent, indtil TV-billedet kommer tilbage. Undlad at trykke på tænd/sluk-knappen på TV'et eller på fjernbetjeningen under opdateringen af software. 15.1 Tilgængelighed Indstillinger > System > Tilgængelighed.
3 - Når opdateringen er udført, vender TV'et tilbage til den kanal, du så. Status Vis TV-statusoplysninger Hvis der opstår strømsvigt i forbindelse med opdateringen, må du aldrig fjerne USB-flashdrevet fra TV'et. Når strømmen kommer igen, forsætter opdateringen. Indstillinger > System > Om > Status. Sådan vises TV-status for IP-adresse, enhed, MACadresse, Bluetooth-adresse, serienummer osv. Slet filen autorun.upg fra USB-flashdrevet for at undgå utilsigtet opdatering af TV-softwaren.
Systemoplysninger 15.4 Sådan ser du den nuværende TV-softwareversion: Sprog 1 - Vælg Indstillinger > System > Om > Model, Android TV OS-version, Androidsikkerhedsrettelsesniveau, Kerneversion, Android TV OS-build, Softwareversion, Netflix ESN, Nagra-enheds-id. 2 - Versionen, frigivelsesnoterne og oprettelsesdatoen vises. Netflix ESN-nummeret og andre oplysninger vises også, hvis de er tilgængelige. 3 - Tryk om nødvendigt på (venstre) gentagne gange for at lukke menuen.
ikke trykkes på en tast på fjernbetjeningen i 4 timer. • TV'et slukker, hvis det ikke modtager et TV-signal eller en kommando fra fjernbetjeningen i 10 minutter. • Hvis du bruger TV'et som skærm eller bruger en digital modtager til at se TV (en set-top-boks - STB) uden at bruge TV-fjernbetjeningen, skal du deaktivere denne automatiske slukning for at indstille værdien til 0. 15.8 Strøm og energi Indstil funktionen, når der tændes Indstillinger > System > Funktion, når der tændes.
forhandlertilstand > Butikskonfiguration > Billede og lyd. 15.11 Børnesikring Vælg Optimeret til butik eller Brugerdefineret for billed- og lydindstillinger. Indstil kode og Ændre kode Indstil en ny kode, eller nulstil ændringskoden Indstillinger > System > kode/Ændre kode. Børnesikring > Angiv logoer og banner Indstil Indstillinger > System > Indstillinger for forhandlertilstand > Butikskonfiguration > Logoer og banner.
Du kan tilslutte eller frakoble en trådløs Bluetooth®-enhed. Du kan også fjerne en Bluetooth®-enhed. Hvis du fjerner en Bluetooth®-enhed, vil enhedens parring blive annulleret. 16 Fjernbetjening og tilbehør Sådan fjerner du Bluetooth®-enheden: 1 - Vælg Indstillinger > Fjernbetjeninger og tilbehør. 2 - Vælg en Bluetooth®-enhed på listen. 3 - Vælg Glem for at fjerne Bluetooth®-enheden. 4 - Tryk om nødvendigt på (venstre) gentagne gange for at lukke menuen. 16.
Opdater fjernbetjeningens software Opdater fjernbetjeningens software Indstillinger > Fjernbetjeninger og tilbehør > Indstillinger for fjernbetjening > Opdater fjernbetjeningens software. Kontroller, om der er tilgængelige opdateringer til fjernbetjeningens software. Hvis en ny softwareopdatering er tilgængelig til fjernbetjeningen, kan du starte opdateringen af softwaren.
17 3 - Du kan se alle dine foretrukne filer på listen. Videoer, fotos og musik 17.3 Menuen Mest populære og menuen Sidst afspillet 17.1 Fra en computer eller en hukommelsesenhed tilsluttet netværket (NAS) Få vist de mest populære filer, eller ryd listen 1 - Tryk på SOURCES, vælg USB, og tryk på OK. 2 - Vælg USB-enheder, og vælg Mest populære. 3 - Vælg én af filerne, og tryk på OK for at få vist filer, eller tryk på Ryd alle for at rydde listen.
Afspil videoer Videoindstillinger Åbn mappe med videoer 1 - Tryk på SOURCES, vælg USB, og tryk på OK. 2 - Vælg USB-enheder, og tryk derefter på (højre) for at vælge den ønskede USB-enhed. 3 - Vælg Videoer, hvorefter du kan trykke på Marker favorit for at føje videomappen til favoritmenuen – Favorit-programmer.
til favoritmenuen. Vis et 360 foto 1 - Tryk på SOURCES, vælg USB, og tryk på OK. 2 - Vælg USB-enheder, og tryk derefter på (højre) for at vælge den ønskede USB-enhed. 3 - Vælg 360 fotos, og vælg ét af fotoerne, hvorefter du kan trykke på Afspil alle for at afspille alle filer i mappen eller trykke på Marker favorit for at føje det valgte foto til favoritmenuen – Favorit-programmer.
en almindelig fotofremviser, behandles den som et almindeligt billede og vises som tilsvarende rektangulært (eller "fladt"), når den åbnes.
18 Smartphones og tablets 18.1 Philips TV Remote App Philips TV Remote App på din smartphone eller tablet er din nye bedste TV-ven. Med appen kan du skifte kanal og justere lydstyrken, ligesom med en fjernbetjening. Download Philips TV Remote App fra din foretrukne app-butik i dag. Philips TV Remote App fås til iOS og Android og er gratis. Alternativt kan du gå til Indstillinger > Netværk og internet > QR-kode for Remote App og trykke på OK. Derefter vises en QR-kode på TV-skærmen.
19 19.4 Spil Bjælke til spilstyring Bjælken til spilstyring er et integreret center for visning af oplysninger og opsætning af betjeningselementer under spil. Det gælder for både HDMI-kilde, så længe Billedtypen er indstillet til Spil/HDR Spil/Dolby Visionspil/Skærm/HDR-skærm. 19.
understøtter Ambilight-funktionen.
20 Netflix Hvis du har et Netflix-medlemsskab, kan du se Netflix på dette TV. Dit TV skal have forbindelse til internettet. I din region er Netflix muligvis kun tilgængelig med fremtidige softwareopdateringer. Åbn Netflix, tryk på for at åbne Netflix-appen. Du kan åbne Netflix med det samme fra et TV på standby. www.netflix.com Bemærkning til Netflix Spatial Audio Noget af Netflix-indholdet tilbyder Spatial Audiolydeffekt.
21 Opsætning af TV'et til Alexa 1 - Gå til Indstillinger>Netværk og internet> Avanceret > TV-kontrol med Amazon Alexa for at starte installationsprocessen. 2 - Du skal bruge Amazon Echo-enheden og Alexaassistentappen (på en mobilenhed eller som internetversion) for at kunne starte opsætningen. 3 - Følg anvisningerne på skærmen for at acceptere vilkårene i politik om beskyttelse af personlige oplysninger, navngiv dit TV, og log på din Googlekonto. Du skal bruge Google-kontoen til parring med Alexa-enheden.
Forhør dig på den lokale genbrugsstation for elektriske og elektroniske produkter. 22 Specifikationer Dine gamle produkter skal bortskaffes i overensstemmelse med den lokale lovgivning og ikke sammen med almindeligt husholdningsaffald. Korrekt bortskaffelse af udtjente produkter er med til at forhindre negativ påvirkning af miljø og mennesker. 22.1 Miljø Dit produkt indeholder batterier, som er omfattet af EU-direktivet 2006/66/EC, og som ikke må bortskaffes sammen med almindeligt husholdningsaffald.
Optimal, eller Optimal (automatisk spil 120Hz Pro) i HDMI 1 og HDMI 2. 22.
22.9 Multimedie Tilslutninger • USB 2.0/USB 3.0 • Ethernet LAN RJ-45 • Wi-Fi 802.11a/b/g/n/ac, Dual Band • Bluetooth® 5.0 Understøttede USB-filsystemer • FAT 16, FAT 32, NTFS, exFAT Afspilningsformater • Beholdere: PS, TS, M2TS, TTS, AVCHD, MP4, M4V, MKV, ASF, AVI, 3GP, Quicktime • Videocodec: AVI, MKV, H.264/MPEG-4 AVC, MPEG1, MPEG2, MPEG4, VP9, HEVC (H.265), AV1 • Lydcodec: MP3, WAV, AAC, WMA (v2 op til v9.
• Opdater softwaren - Kontroller tilgængelige softwareopdateringer. • Brugervejledning – Læs brugervejledningen for at få oplysninger om TV'et. • Kopi af indstillingslisten – Kopier TV-indstillingerne på et USB-flashdrev. • Fejlfinding - Find svar på ofte stillede spørgsmål. • Fabriksindstillinger - Nulstil alle indstillinger til fabriksindstillingerne. • Geninstaller TV – Geninstaller og gentag hele TVinstallationen. • Kontaktoplysninger - Viser telefonnummeret eller webadressen for dit land eller område.
1 - Vælg Hurtigmenu/MENU > Hjælp > Selvdiagnosticering, og tryk på OK. 2 - Vælg følgende punkter for at kontrollere konfigurationerne. • Kontrollér TV'et – Du kan kontrollere, om billede, lyd og andre indstillinger fungerer godt nok. • Kontroller netværket - Kontroller netværksforbindelsen. • Kontroller fjernbetjeningen - Udfør testen for at bekræfte den medfølgende fjernbetjenings funktionalitet.
Sørg for, at din pc kører med den understøttede opløsning og opdateringshastighed. • Sørg for, at HDMI-kablet med ultrahøj hastighed bruges til eARC-tilslutning. • Kun én eARC-enhed er tilgængelig ad gangen. Der vises intet lydstyrkeikon • Når en HDMI-CEC-lydenhed er tilsluttet og du bruger TV'ets fjernbetjening til at justere lydstyrken fra enheden, er dette normalt.
- 4K/Ultra HD (UHD): 25 Mbps 23.5 Onlinehjælp Bluetooth® Du kan finde løsninger på problemer, der vedrører dit Philips TV, ved at åbne vores onlinesupport. Du kan vælge sprog og indtaste produktets modelnummer. Kan ikke parre • Sørg for, at enheden er i parringstilstand. Læs brugervejledningen til enheden. • Placer den trådløse højttaler så tæt på TV'et som muligt. • Forsøg på at parre flere enheder med TV'et på samme tid kan muligvis ikke lade sig gøre. Gå til www.philips.
24 Risiko for beskadigelse af TV'et! Sikkerhed og pleje Før du slutter TV'et til strømmen, skal du sikre dig, at spændingen svarer til den værdi, der er trykt bagpå TV'et. Tilslut aldrig TV'et til stikkontakten, hvis spændingen er forskellig fra denne værdi. 24.1 Sikkerhed Faremomenter i forbindelse med stabilitet Vigtigt! Sørg for at læse og forstå alle sikkerhedsinstruktioner, før du bruger TV'et. Hvis der opstår skader, fordi instruktionerne ikke følges, bortfalder garantien.
• Risiko for brand eller eksplosion, hvis batteriet udskiftes med en forkert type. • Udskiftning af et batteri med en forkert type, der kan overvinde en beskyttelsesforanstaltning (f.eks. i forbindelse med visse typer litiumbatterier). • Bortskaffelse af et batteri i ild eller en varm ovn eller mekanisk knusning eller skæring af et batteri, der kan resultere i en eksplosion.
godkendt i henhold til denne brugervejledning, gør garantien ugyldig. 25 Vilkår for anvendelse Pixelegenskaber Dette TV-produkt har et højt antal farvepixler. Selv om det har en pixeleffektivitet på 99,999 % eller mere, kan der forekomme sorte prikker eller klare lyspunkter (røde, grønne eller blå) på skærmen. Dette er en konstruktionsmæssig egenskab ved skærmen (ligger inden for normale industristandarder) og er ikke en fejl.
25.2 Vilkår for anvendelse – SmartTV Du kan se vilkår for anvendelse, politik om personlige oplysninger samt angive indstillinger for personlige oplysninger for dit Smart TV. Sådan åbner du siden med vilkårene for anvendelse af Smart TV: 1 - Tryk på HOME for at åbne startmenuen. 2 - Vælg Apps for at åbne apps.
26 Ophavsrettigheder 26.1 Google TV Google TV er navnet på denne enheds softwareoplevelse og et varemærke tilhørende Google LLC. Google, YouTube og andre mærker er varemærker tilhørende Google LLC. 26.5 Dolby Vision og Dolby Atmos Dolby, Dolby Vision, Dolby Atmos og dobbelt-Dsymbolet er registrerede varemærker tilhørende Dolby Laboratories Licensing Corporation. Produceret under licens fra Dolby Laboratories. Fortroligt Ikke publiceret materiale. Copyright © 2012-2022 Dolby Laboratories.
26.8 Wi-Fi Alliance Wi-Fi CERTIFIED™-logoet er et registreret varemærke tilhørende Wi-Fi Alliance®. 26.9 Kensington (Hvis relevant) Kensington og Micro Saver er registrerede USvaremærker tilhørende ACCO World Corporation med udstedte registreringer og ansøgninger om registrering i andre dele af verden. 26.10 Andre varemærker Alle andre registrerede og uregistrerede varemærker tilhører de respektive ejere.
27 Ansvarsfraskrivelse vedrørende tjenester og/eller software fra tredjeparter Tjenester og/eller software fra tredjeparter kan ændres, ophæves eller opsiges uden varsel. TP Vision kan ikke tilskrives noget ansvar i sådanne tilfælde.
Indeks A Afspil mediefiler fra en computer eller NAS Alexa Almindeligt brugergrænsefladestik Ambilight, Brugerdef. farve Ambilight, indstillinger Ambilight, Til eller Fra.
Netværk, indstilling Netværk, kablet Netværk, tilslut Netværk, trådløst Netværksfrekvens Netværksfrekvenstilstand Netværksinstallation Nulstil O Onlinesupport Open source-software Opstartsmeddelelse Optimering af omgivende lysniveau P Personlig tilstand, Equalizer Personlig tilstand, Tydelig dialog Philips Wireless Home Speakers med Ambilight Problemer, billede Problemer, fjernbetjening Problemer, forkert sprog i menuerne Problemer, HDMI-tilslutning Problemer, kanaler Problemer, lyd Problemer, tilslutni
Powered by TCPDF (www.tcpdf.