
User's Manual


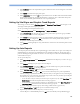
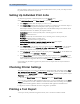


Table Of Contents
- Installation
- Basic Operation
- Introducing the IntelliVue MP2
- Controls, Indicators and Connectors
- Extending Measurements
- Operating and Navigating
- Operating Modes
- Understanding Screens
- Using the XDS Remote Display
- Using the Visitor Screen
- Understanding Profiles
- Understanding Settings
- Changing Measurement Settings
- Switching a Measurement On and Off
- Adjusting a Measurement Wave
- Using Labels
- Using IntelliVue Cableless Measurements
- Changing Monitor Settings
- Checking Your Monitor Revision
- Getting Started
- Disconnecting from AC Mains Power
- Monitoring After a Power Failure
- Networked Monitoring
- Capturing Alarm Reports and Printing
- What's New?
- What's New in Release J.0
- Flexible, Patient-oriented Workflow (with PIIC iX only)
- Alarm Functionality Enhancements
- Capture 12-Lead ECG Enhancements (with PIIC iX only)
- New "End Afib" and "End Irregular HR" Alarms
- Integrated Pulmonary Index for Microstream CO2
- Improved Visibility of Gridlines in Overlapping Waves
- Timeout for "Aged" Numerics
- What's New in Release H.0
- What's New in Release G.0?
- What's New in Release F.0?
- What's New in Release J.0
- Alarms
- Patient Alarms and INOPs
- Managing Patients and Equipment
- Patient Concepts
- Equipment Concepts
- Managing Patients
- Transferring Patients
- Managing Equipment
- Adding Equipment (PIIC iX)
- Removing Equipment
- Equipment Status Disputes
- Using the Equipment Window
- When Multiple Equipment is Used for One Patient
- Own Patient Overview Window
- Visual Alarm Status Information in the Own Patient Overview Window
- Assigning a Telemetry Transceiver with an SRR Adapter to a Monitor
- Controlling Other Devices from the Bedside
- Viewing and Silencing Other Device Alarms at the Bedside
- Switching Off or Pausing Alarms From Other Devices
- Using Standby
- ECG Source Tracking at the Information Center
- Synchronized Settings
- Information Center Compatibility
- ECG, Arrhythmia, ST and QT Monitoring
- Skin Preparation for Electrode Placement
- Connecting ECG Cables
- Selecting the Primary and Secondary ECG Leads
- Checking Paced Mode
- Understanding the ECG Display
- Monitoring Paced Patients
- Changing the Size of the ECG Wave
- Changing the Volume of the QRS Tone
- Changing the ECG Filter Settings
- Selecting Positions of Va and Vb Chest Leads (for 6-lead placement)
- Choosing EASI or Standard Lead Placement
- About ECG Leads
- ECG Lead Fallback
- ECG Lead Placements
- Capture 12-Lead
- Viewing the Realtime 12-Lead ECG
- Capturing the 12-Lead ECG
- Changing Settings for a Captured 12-Lead ECG
- Storing and Sending the 12-Lead ECG
- Printing the 12-Lead ECG
- Downloading Analysis Results (PIIC iX only)
- Reviewing Previewed or Stored 12-Lead Captures
- Information Center Remote Export (PIIC iX only)
- Information Center Remote Lock/Unlock (PIIC iX only)
- Capture 12-Lead Pop-up Keys
- Setting Up the 12-Lead ECG
- EASI ECG Lead Placement
- ECG and Arrhythmia Alarm Overview
- Using ECG Alarms
- ECG Safety Information
- About Arrhythmia Monitoring
- Switching Arrhythmia Analysis On and Off
- Choosing an ECG Lead for Arrhythmia Monitoring
- Understanding the Arrhythmia Display
- Arrhythmia Relearning
- Arrhythmia Alarms
- About ST Monitoring
- Switching ST or STE On and Off
- Understanding the ST Display and Windows
- Updating ST Baseline Snippets
- About the ST Measurement Points
- ST Alarms
- STE Alarms
- Viewing ST Maps
- About QT/QTc Interval Monitoring
- QT Alarms
- Switching QT Monitoring On and Off
- Monitoring Pulse Rate
- Monitoring Respiration Rate (Resp)
- Monitoring SpO2
- SpO2 Sensors
- Applying the Sensor
- Connecting SpO2 Cables
- Measuring SpO2
- Understanding the SpO2 Numerics
- Assessing a Suspicious SpO2 Reading
- Changing the Averaging Time
- Setting the Measurement Mode
- Understanding SpO2 Alarms
- Pleth Wave
- Perfusion Numeric
- Perfusion Change Indicator
- Setting SpO2/Pleth as Pulse Source
- Setting Up Tone Modulation
- Setting the QRS Volume
- Monitoring NBP
- Introducing the Oscillometric NBP Measurement
- Preparing to Measure NBP
- Starting and Stopping Measurements
- Enabling Automatic Mode and Setting Repetition Time
- Enabling Sequence Mode and Setting Up The Sequence
- Choosing the NBP Alarm Source
- Switching Pulse from NBP On/Off
- Assisting Venous Puncture
- Calibrating NBP
- Monitoring Temperature
- Monitoring Invasive Pressure
- Setting up the Pressure Measurement
- Zeroing the Pressure Transducer
- Adjusting the Calibration Factor
- Displaying a Mean Pressure Value Only
- Changing the Pressure Wave Scale
- Optimizing the Waveform
- Non-Physiological Artifact Suppression
- Choosing the Pressure Alarm Source
- Calibrating Reusable Transducer CPJ840J6
- Calculating Cerebral Perfusion Pressure
- Monitoring Carbon Dioxide
- Using a Telemetry Device and a Monitor (PIIC only)
- Enhancing Telemetry Monitoring with the Monitor
- Trends
- Recording
- Printing Patient Reports
- Starting Report Printouts
- Stopping Reports Printouts
- Setting Up Reports
- Setting Up Individual Print Jobs
- Checking Printer Settings
- Printing a Test Report
- Switching Printers On or Off for Reports
- Dashed Lines on Reports
- Unavailable Printer: Re-routing Reports
- Checking Report Status and Printing Manually
- Printer Status Messages
- Sample Report Printouts
- Care and Cleaning
- Using Batteries
- Maintenance and Troubleshooting
- Accessories
- ECG/Resp Accessories
- Invasive Pressure Accessories
- 5-Electrode One Piece Cables
- Set Combiners and Organizers
- NBP Accessories
- SpO2 Accessories
- Temperature Accessories
- Mainstream CO2 Accessories
- Sidestream CO2 Accessories
- Mainstream CO2 Accessories (for M3016A)
- Microstream CO2 Accessories
- Battery Accessories
- Specifications
- Indications for Use
- Use Environment
- Restricted Availability
- Manufacturer's Information
- Symbols
- Installation Safety Information
- Monitor Mounting Precautions
- Altitude Setting
- Monitor Safety Specifications
- EMC And Radio Regulatory Compliance
- Out-Of-Hospital Transport - Standards Compliance
- Physical Specifications
- Environmental Specifications
- Monitor Performance Specifications
- Monitor Interface Specifications
- 865297 Battery Extension Specifications
- M4607A Battery Specifications
- M4605A Battery Specifications
- Measurement Specifications
- Safety and Performance Tests
- Default Settings Appendix
- Country-Specific Default Settings
- Alarm and Measurement Default Settings
- Alarm Default Settings
- ECG, Arrhythmia, ST and QT Default Settings
- Pulse Default Settings
- Respiration Default Settings
- SpO2 Default Settings
- NBP Default Settings
- Temperature Default Settings
- Invasive Pressure Default Settings
- CO2 Default Settings

19 Printing Patient Reports
234
Be aware that the monitor's memory for reports is limited. If the memory is full, Auto Reports cannot
be printed and the information may be lost.
Setting Up Individual Print Jobs
To adjust the appearance of individual print jobs, in the Reports menu,
Select
Main Setup, Reports, then Setup Reports to enter the Setup Reports menu.
1 Select Report and then select the report you want to set up.
2 Select Report Type and then select the reports template you want the report selected in Step 2 to
use. The selection of templates listed depends on the report type selected.
Each template includes patient demographic data, and each Realtime Report also includes alarm
and INOP information. In addition, the templates include:
VisibleWaves: all waves currently visible, in the order they appear on the screen.
All Waves: all measured waves.
RT Waves: all currently measured realtime waves, according to the monitor's priority list.
Vital Signs: trend information in tabular form.
Graph Trend: trend information in graphic form.
ECG3X4, ECG6X2, ECG12X1, ECG4X2, ECG8X1,ECG12X1 (2P): ECG reports.
Alarm Limits: a list of all currently set alarm limits.
3 Select Report Size to set the paper size to be used for the report: Unspecified to use the default
size for the template chosen,
Universal, A4, Letter, LrgUniversal, A3, or Ledger. The list of
available sizes depends on the report type selected.
4 Select Orientation to set the orientation of the report printout: Unspecified to use the default size
for the template chosen,
Landscape or Portrait.
5 Select Target Device and choose which printer the print job will be sent to: Unspecified to use
the default printer, or choose from the list of printer names defined at the Information Center or
in the monitor's Configuration Mode (for example,
Remote 1 or Database).
Some settings may be inactive ("grayed-out") in this menu for reports that can only be started in a
special window.
Checking Printer Settings
The printer settings for your monitor are defined in Configuration Mode. The printer settings Paper
Size
, Resolution, Color Support, and Duplex Option for the active printer are visible but inactive
("grayed-out") in the
Setup Printers menu. When Print Database is selected as active printer only the
Paper Size setting will be shown.
• To enter the
Setup Printers menu, in the Reports menu, select Setup Printers.
If you are using an IntelliVue XDS Application print service, you may see XDS printers in the
Setup
Printers
menu that have "Local" or "Remote" in their name. Their names and settings can only be
configured in the XDS Application. Refer to the IntelliVue XDS Application Installation and
Configuration Guide for full details about the configuration possibilities.
Printing a Test Report
A test report can be printed in Configuration mode, refer to the Service Guide for details.