
Operating Instructions


22
Step 1
Set "SYNC" to "LL" and press the setting button.
→ The "SYNC" screen appears.
Step 2
Connect the video output signal and external synchronizing input signal of the camera to a 2-input oscilloscope, and move the cursor
to "COARSE".
Step 3
Adjust the oscilloscope to the vertical rate, and extend the vertical synchronizing part of the oscilloscope.
Move the cursor horizontally with use of the right or left button to roughly adjust the vertical phase.
The phase can be adjusted in 16 steps by 22.5 degrees.
1 (1--16) : 0 °/2 (1--16) : 22.5 °/· · ·/16 (1--16) : 337.5
Step 4
Move the cursor to "FINE", and fine adjust vertical phases.
11. Automatic adjustments of the focus [LENS]
PANASONIC (default): Select "PANASONIC" when using the factory-installed lens.
OTHER: Select "OTHER" when using a user-supplied lens.
12. Privacy zone setting [PRIVACY ZONE]
When undesired portions in the camera shooting area (on the screen) exist, those portions (privacy zone) are hidden. Up to 8 portions
can be specified for the privacy zone.
ON (1): Grays the zone.
ON (2): Mosaics the zone.
OFF (default): Displays the zone normally.
Follow the procedure below.
Note:
• Theprivacyzonefunctionisdisabledatinitializingtheunit,i.e.rightafterturningonthepower.
Step 1
Move the cursor to "PRIVACY ZONE", select "ON (1)" or "ON (2)", and press the setting button.
→ The zone setting screen appears.
Step 2
Move the cursor to the number at the right of the title and select the zone number using the right or left button.
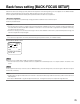
**SYSTEM SETUP**
SYNC INT
LENS PANASONIC
PRIVACY ZONE ON(1)
STABILIZER OFF
EL-ZOOM OFF
UPSIDE-DOWN OFF
RET TOP END
"SYSTEM SETUP" screen Zone setting screen
**ZONE NUMBER 1 /8**
POSITION PUSH SW
UPPER LEFT
DEL
RET TOP END