Panasonic" Portable Stereo CD System RX-DS05 Operating Instructions Instrucciones de funcionamiento Mode d’emploi ■i* ï ê‘- ( n COMPACT Before connecting, operating or adjusting this product, please read these instructions completeiy.
Dear customer Thank you for purchasing this product. For optimum performance and safety, please read these instructions carefuliy. (Back of product) (Komponentens bagside) (Produktets bakside) LUOKAN 1 LASERLAITE KLASS 1 LASER APPARAT DANSK BEMÆRK! DANGER INVISIBLE LASER RADIATION WHEN OPEN. AVOID DIRECT EXPOSURE TO BEAM. (Inside of product) ADVARSEL USWIGmSlRÄlKVEDÄBMNG.NAliaKKERmSAFBmERE ER UDE AF FURKFION. UN0GÄ UDSiEFFELSE FOR SFRALING.
Estimado cliente Muchísimas gracias por haber adquirido este aparato. Lea con atención estas instrucciones para obtener las máximas prestaciones y segu ridad. PRECAUCION: El voltaje de CA difiere según ia zona. Antes de usar este aparato, se debe fijar el voltaje de acuerdo con el de su zona. (Por más detalles, consultar la pá gina 9.) AVISO: PARA REDUCIR EL RIESGO DE INCENDIOS O SACUDIDAS ELÉC TRICAS, NO EXPONGA ESTE APA RATO A LA LLUVIA O A LA HU MEDAD.
Table of Contents Supplied accessories Accesorios suministrados Accessoires fournis Precautions ........................................... 6 Power Sources...................................... 8 Memory Back-up Batteries................... 10 Concerning the Remote Control ......... 12 Location of Controls............................. 14 Common Operations ............................ 18 Setting the Clock .................................. 20 Listening to the Radio..............................
índice Precauciones........................................... 7 Fuentes de alimentación ........................ 9 Pilas de apoyo a la memoria................. 11 Acerca del mando a distancia ............... 13 Ubicación de los controles..................... 15 Operaciones comunes........................... 19 Puesta de la hora...................................21 Escucha de la radio................................23 Escucha de cintas .................................31 Escucha de discos compactos........
Precautions •If this unit is not used for a iong period of time or is used oniy from an AC power source, remove all the batteries to prevent potentiai damage due to pos sible battery leakage. •Avoid using or piacing this unit near sources of heat. Do not ieave it in an automobiie exposed to direct sunlight for a long time with the doors and windows closed as this may deform the cabinet.
Precauciones • Si no piensa utilizar el aparato durante mucho tiempo, o si va a utilizarlo conec tado a una fuente de CA solamente, no se olvide de quitar todas las pilas para evitar los daños que podrían causar sus posibles fugas de electrólito. • Evite utilizar o poner este aparato cerca de fuentes de calor. No lo deje durante mucho tiempo en el interior de un automóvil ex puesto a los rayos directos del sol, con sus puertas y ventanas cerradas, porque la caja podría deformarse.
Power Sources To operate on AC power D Household power outlet Toma de alimentación del hogar Prise secteur Connect the included AC power cable to the AC socket of the unit and your household AC outlet. I FOR AREAS EXCEPT EUROPE | 1. Set the voltage. Use a flat-head screw driver to turn the voltage selector on the rear to the voltage setting for the area In which you will be using the system. If you set the selector to “OFF" position, this unit does not oprate. 2.
Fuentes de alimentación Alimentation Alimentation sur secteur Q Funcionamiento con CA H Conecte el cable de alimentación de CA Raccorder le cordon d’alimentation secteur suministrado al zócalo de CA del aparato y a fourni à la prise CA (AC) de l’appareil et à la la toma de CA del hogar. prise secteur. POUR LES REGIONS AUTRES QUE L’EUROPE EXCEPTO EUROPA 1. Ajuste de la tensión.
Memory Back-up Batteries It is recommended that the memory back-up batteries (not included) be installed first to prevent the memory contents from being lost when the power fails, the power cable has been disconnected or the batteries have become flat. Battery installation Insert four UM-3 (R6/LR6) batteries in the order numbered as illustrated. Battery life •The sen/ice life of these batteries is ap proximately one year.
Pilas de apoyo a la memoria Se recomienda instalar primero las pilas de apoyo a la memoria (no suministradas) para evitar que se pierda el contenido de la me moria cuando falle la alimentación, se des conecte el cable de alimentación o se ago ten las pilas.
Concerning the Remote Control Battery installation Q Insert two UM-4 (R03) batteries as illus trated. To remove the batteries, pull out the © side of battery No. 2. Insert the batteries in the correct polarities (©,0). Introduzca las pilas con las polaridades (© y 0) bien instaladas. Insérer les piles en respectant les polarités (©, ©). Battery life The battery life is about one year.
Acerca del mando a distancia A propos de la télécommande Instalación de las pilas Q Insertion des piles El Introduzca dos pilas UM-4 (ROS) como se muestra en la ilustración. Insérer deux piles UM-4 (R03) comme in diqué. Para quitar las pilas, tire hacia afuera del lado © de la pila número 2. Pour retirer les piles, tirer sur le côté @ de la plie No. 2.
Location of Controls Common operations Q 0 Preset equalizer button (PRESET EQ) © Display section ® Ciock check/adjust button (.CHECK/- ADJUST, CLOCK) 0 Timer check/adjust button (.CHECK/- ADJUST, TiMER) @ Memory button (MEMORY) ® Timer button (TiMER) (.PLAY..REC) @ Power/“STDBY (!) (AC)/ON” switch [POWER, STDBY (!) (AC)/ON] Press to switch the unit from on to standby mode or vice versa. In standby mode, the unit is still consuming a small amount of power.
Ubicación de los controles Emplacement des commandes Operaciones comunes El Opérations communes El 0 Botón de preajustes del ecuali- 0 Touche d’égaiisation prérégiée zador (PRESET EQ) (PRESET EQ) ® Sección de presentación visual @ Afficheur @ Botón de comprobación/ajuste del reloj (.CHECK/- ADJUST, CLOCK) @ Touche de vérification/régiage de i’horioge (.CHECK/- ADJUST, CLOCK) 0 Botón de comprobación/ajuste del temporizador (.
Uwation of Controls (Continued) Cassette deck section El ® Rec/rec pause button (•/• II REC/REC PAUSE) ® Fast forward/rewind button (FF, REW) ® Tape stop button (■ STOP) ® Playback/direction button (◄ ► PLAY/DIR) ® Cassette lid @ Cassette lid open iever CD section m Easy CD record button (EASY CD REC) Skip/search buttons (CD/PRESET TUNE [◄◄/v, ► W / a ) +, — buttons (TiME/TUNE/CD +, -) CD tray Piay/pause button (►/I I PLAY/PAUSE) CD stop button (■ STOP/CLEAR) CD tray open/close button (^ CD OPEN/CLOSE)
Ubicación de los controles Emplacement des commandes (Continuación) (Suite) Sección de la platina И Section platine-cassette H @ Botón de grabación/pausa de gra bación (•/• II REC/REC PAUSE) ® Touche d’enregistrement/pause d’enregistrement (•/• Il REC/REC PAUSE) ® Botones de avance rápíde/rebobínado (FF, REW) ® Botón de parada de cinta (■ STOP) ® Botón de reproducción/dirección (◄ ► PLAY/DIR) ® Tapa de ia cinta (§1 Palanca de abertura de la tapa de la cinta Sección del reproductor de discos compa
Common Operations Opening the top panel Wi Press TOP PANEL OPEN to open the panel. Press TOP PANEL CLOSE to close the panel. Top panel Panel superior Panneau supérieur When this unit is operated on battery power, the panei cannot be opened or cibsed by pressing OPEN or CLOSE on the remote control in the unit off mode. Turn the unit on first by pressing POWER before opening or closing the top panel. CD tray does not open or close even if you press Open or close while the top panel Is moving (for approx.
Operaciones comunes Abertura del panel superior H Pulse TOP PANEL OPEN para abrir el panel. Pulse TOP PANEL CLOSE para ce rrar el panel. Cuando este aparato funcione con las pilas, el panel no podrá abrirse ni cerrarse pulsando OPEN o CLOSE del mando a dis tancia mientras la alimentación del aparato esté desconectada. Conecte primero la ali mentación del aparato pulsando POWER del aparato principal antes de abrir o cerrar el panel.
Setting the Clock Thé clock has a 24-hour display. Example: Setting the clock to 16:20; 1 Press POWER. (This turns the unit on.) 2 Press CLOCK and hold until the time display starts flashing. 3 While the display is flashing; Press -I- or — to show desired time. 4 PressMEMORY. (The clock now starts operating, and the display returns to its original sta tus.) To display the clock (when the unit is on): Press CLOCK.
Puesta de la hora Réglage de V horloge EI reloj dispone de una visualización de 24 horas. L’horloge fonctionne sur un cycle de 24 heures. Ejemplo; Para poner las 16:20 en el reloj; Exemple: Pour régler l’horloge à 16h 20; 1 1 2 Pulse POWER. (De esta forma se enciende el apa rato.) 2 Pulse CLOCK y manténgalo pul sado hasta que la visualización de la hora empiece a parpadear. Misi : )l?a#aiSÆSi6:2oat : 1 Appuyer sur POWER. (Ceci allume l’appareil.
Usteni/ìff to the Radio FOR EUROPE Press BAND to display “LW” “MW” or “FM”. LW^MW-^FM—I c (The display changes each time the button is pressed.) I FOR AREAS EXCEPT EUROPE | Press BAND to display “AM” or “FM”. AM^FM—I c (The display changes each time the button is pressed.) 2 Press + or - to select the sta tion. +: The frequency is increased. The frequency is reduced. Keep + or quency - depressed display station with matically starts good then the and stops fre change.
Escucha de la radio Ecoute de la radio POUR L’EUROPE PARA EUROPA Appuyer sur “LW”, “MW” O “FM”. afficher “LW” ^LW^MW^FM^ ou “FM”. Puise BAND para visualizar BAND (GO), 1 de façon “MW” à (PO) “MW” W. “FM”o LW->MW^FM- LW^MW-^FM(La visualización cambia cada vez que se puisa el botón.) BAND para □ (L’affichage change chaque fois qu’on appuie sur la touche.) EXCEPTO EUROPA Pulse rimi SBAND (;Afô) 11,P,/T.
Listening to the Radio (Continued) Adjusting the antenna For FM reception: B Adjust the length and direction of the whip antenna. For AM (LW/MW) reception: ID Adjust the direction in which the main unit is pointed. For your reference; Radio broadcasts may be hard to receive in a moving vehicle or building because their signals are weak. In such cases, use the unit by a window.
Escucha de la radio Ecoute de la radio (Continuación) (Suite) Ajuste de la antena Réglage de l’antenne Para la recepción de FM: El Pour la réception FM: El Ajuste la longitud y la dirección de la antena Régler telescópica. tenne-fouet. la longueur et la direction de l’an il Iiî № lg ^ Para la recepción de AM (LW/MW): Pour la réception AM (GO/PO): 10 m Orienter Cambie la orientación del aparato principal. pareil.
Listening to the Radio (Continued) Preset tuning Once broadcast stations have been pro grammed, they can easily be tuned in. I FOR EUROPEI Up to ten LW, MW and FM stations each can be programmed. I FOR AREAS EXCEPT EUROPE | Up to ten AM and FM stations each can be programmed. Programming broadcast stations I FOR EUROI^ Press BAND to display “MW” or “FM”.
Escucha de la radio Ecoute de la radío (Continuación) (Suite) Sintonización de emisoras preajustadas Accord préréglé Una vez programadas las emisoras de ra diodifusión, éstas podrán sintonizarse fácil mente. I PARA EUROPA | Pueden programarse hasta diez emisoras de cada banda: LW, MW y FM. I EXCEPTO EUROPA | Pueden programarse hasta diez emisoras de cada banda: AM y FM. Une fois que les stations ont été program mées. elles s’accordent en toute facilité.
Listening to the Radio (Continued) Selecting the preset channel I FOR EUROpTI Press BAND to display “LW” “MW” or “FM”. LW^MW^FM(The display changes each time the button is pressed.) I FOR AREAS EXCEPT EUROPE | Press BAND to display “AM” or “FM”. AM->FM—I (The display changes each time the button is pressed.) Press K^/v or ^N/a to select the station. The station is changed each time the button is pressed. BAND Lzy CD/PRESETTUNE 28 C r > I o p. lU no in r;( C O ZJ C rII op on —3 OO.
Escucha de la radio Ecoute de la radio (Continuación) (Suite) Selección del canal de preajuste Sélection du canal préréglé PARA EUROPA I POUR L’EUROPE | Pulse BAND para “LW”, “MW” O “FM”. r->LW^MW^FM—I visualizar (La visualización cambia cada vez que se pulsa el botón.) I EXCEPTO EUROPA | Pulse BAND “AM” o “FM”. r^AM^FM —1 para visualizar (La visualización cambia cada vez que se pulsa el botón.) Pulse [◄◄/v o ►H/a para se leccionar la emisora. La emisora cambia cada vez que se pulsa el botón.
Lisíening to Tapes Only normal tapes can be used. 1 Press ■ STOP. 2 Pull the cassette lid open lever, load the tape and close the lid. The direction is automatically set to play the side facing up. is dis played). 3 Press ◄ > PLAY/DIR. Playback now starts. (^: The side which is facing up is played back. <0: The reverse side is played back. REW,FF To stop play: Press ■ STOP. To listen to the other side of the tape: Press ◄ ► PLAY/DIR during playback.
Escucha de cintas Sólo pueden utilizarse cintas normales. 1 2 3 Pulse ■ STOP. Tire de la palanca de abertura de la tapa de la cinta, introduzca ia cinta y cierre ia tapa. La dirección se ajusta automática mente para que se reproduzca el lado de avance (se visualiza [5 >). Pulse ◄ ► PLAY/DIR. La reproducción comienza. [5 >: Se reproduce el lado que queda hacia arriba. <»]: Se reproduce el lado de inver sión. Para parar la reproducción: Pulse ■ STOP.
Listening to Tapes (Continued) 32
Escucha de cintas Ecoute de cassettes (Continuación) (Suite) Tipo de cinta que puede reproducirse en este aparato: Types de bande qu’il est possible de lire sur I’appareil: Normal/TYPE I 0 Normal/TYPE I O CrOzTYPE II X Cr02 ATYPE II X MetamPE IV X MetamPE IV X ^ii/TYPE I O |#/TYPEII X Îfe*/TYPE1V X “000” E! Remise Para poner el contador de cinta a à “000” du compteur de bande El 000 ________________________ “ ” (Sólo puede realizarse desde el mando a distancia) (Accessible uniquem
Listening to CDs 1 Press ■ STOP/CLEAR. “NO appears on the display. 2 Press ^ CD OPEN/CLOSE, in sert a CD and press ^ CD OPEN/CLOSE again. Insert the CD with its label surface fac ing up. disc” Press ►/!! PLAY/PAUSE. Play starts from track 1 and continues to the iast track, after which it automaticaliy stops. To stop play; Press ■ STOP/CLEAR. To stop play temporarily; Press ►/!I PLAY/PAUSE. To resume play, press ►/II PLAY/PAUSE again.
Escucha de discos compactos 1 2 3 Pulse ■ STOP/CLEAR. “NO dISC” aparece en el visualizador. Pulse A CD OPEN/CLOSE, in serte un disco compacto y puise otra vez ^ CD OPEN/CLOSE. Inserte el disco compacto con la super ficie de la etiqueta hacia arriba. Pulse ►/! I PLAY/PAUSE. La reproducción comienza por la pri mera melodía y continúa hasta la última, tras lo cual se para automática mente. Para parar la reproducción: Pulse ■ STOP/CLEAR. Ecoute de disques compacts 1 2 3 Appuyer sur ■ STOP/CLEAR.
Listening to CDs (Continued) To repeat tracks Q (Available only from the remote control) Before play REPEAT. or dliring play, ■anviast press SLEEP DISPLAY ® О О FM MODE О To release repeat play: Press REPEAT again to turn off the (SI dispiay. For your reference: During program play (see page 38), when program play is released the repeat function is also released. B.
Escucha de discos compactos Ecoute de disques compacts (Continuación) (Suite) Para repetir melodías H Répétition de plages Q (Sólo puede realizarse desde el mando a distancia) (Accessible uniquement sur la télécom mande) Pulse REPEAT antes de la reproduc ción o durante ella. Appuyer sur REPEAT avant ou pen dant la lecture. Para cancelar la repetición de repro ducción; Vuelva a pulsar REPEAT para apagar la visualización [Q.
lAstening to CDs (Continued) Selecting and listening to your favorite tracks (Program play) 1/A I/V 51 23 I STOP/CLEAR Up to 36 tracks can be programmed. 1 Press ■ STOP/CLEAR. 2 Press + or — to select the de sired tracks. 3 4 Press MEMORY. 5 Press ►/I I PLAY/PAUSE. The programmedTracks are played in the programmed sequence, and play stops autorriatically. Repeat steps 2 end 3. To clear program play: Press ■ STOP/CLEAR in the stop mode.
Escucha de discos compactos Ecoute de disques compacts (Continuación) (Suite) Selección y escucha de sus melodías favoritas (Reproducción programada) Sélection et écoute de plages données (Lecture programmée) Pueden programarse hasta 36 melodías. 1 2 Pulse ■ STOP/CLEAR. Pulse + o - para seleccionar las melodías deseadas. 3 Pulse MEMORY. 4 Repita los pasos 2 y 3. 5 Pulse ►/! I PLAY/PAUSE.
Changing the Sound Qiialily Four different sound qijality effects (XBS=extra bass, clear, soft and vocal) are preset in this unit. Press PRESET EQ to select the de sired sound quality effect. XBS^CLEAR->SOFT^VOCAL^OFF(The display changed each time the button is pressed.) Types of preset souhd quality effects m _________ XBS: This gives an added punch to rock music, etc. CLEAR: This boosts the treble range of music. SOFT: This produces a soft; background music effect. VOCAL: This enhances vocals.
Cambio de la calidad del sonido En este aparato se encuentran preajustados cuatro efectos diferentes de calidad de sonido [extragraves (XBS), claro, suave y voces]. Pulse PRESET EQ para seleccionar el efecto deseado de calidad de so nido. Réglage de la tonalité Quatre effets de tonalité différents (XBS= grave renforcé, clair, doux et voix) ont été préréglés dans l’appareil. Appuyer sur PRESET EQ pour sélec tionner l’effet de tonalité voulu.
Recording CDs Recording and GD play starts at the same time automatically. Only normal tapes can be used. REC/REC PAUSE 1 Load the tape with the side to be recorded first facing up. Find the position on the tape where the recording is to start. When recording from the Start of side A or B, have the leader tape wound up before proceeding. H 2 insert the CD and press ■ STOP/ CLEAR. 3 Select the mode with REV MODE on the remote pontrol. '^y.
Grabación de discos compactos La grabación y la reproducción de un disco compacto empiezan automáticamente al mismo tiempo. Sólo pueden utilizarse cintas normales. 1 2 3 4 Introduzca la cinta con el lado que vaya a ser grabado en pri mer lugar hacia arriba. Encuentre la posición de la cinta donde vaya a iniciar la grabación. Cuando grabe desde el comienzo del lado A o B. bobine la cinta guía antes de proseguir. Q Introduzca el disco compacto y pulse ■ STOP/CLEAR.
Recording CDs (Continued) Type of tape which can be used for recording: Normal/TYPE I 0 CrOs/TYPE II X Metal/TYPE IV X For your reference: • In order to prevent trouble caused by flat batteries, it is reCorrimended that you either supply power to the unit from the househpid AC outlet i or replace all the batteries with new ones when you are re cording something which is important to you. •Any change made to the volume or sound quality during recording will not affect the recording.
Grabación de discos compactos Enregistrement de disques compacts (Continuación) (Suite) Cintas que pueden utilizarse para la gra bación; Types de bande qu’il est possible d’en registrer sur l’appareil: Normal/TYPE I 0 Normal/TYPE I 0 #Ü/TYPE I 0 CrO/TYPE If X CrOaTYPE II X i#/TYPEII X Metal/TYPE IV X Metal/TYPE IV X /gJi/TYPElV X Para su referencia: •Cuando se hagan grabaciones impor tantes se recomienda suministrar alimen tación al aparato desde la toma de CA del hogar o cambiar
Recording CDs (Continued) Easy CD recording All the tracks are recorded in their original sequence onto a single tape. (The reverse mode is set to Only part of a track may be recorded at the end of the side facing up. This track will be re-recorded in its entirety at the beginning of the reverse side. Preparation: Insert the CD. 1 2 Press ■ STOP/CLEAR. Before loading the tape, press EASY CDREC. The display shows the length of the tape required to record all the tracks on the CD.
Grabación de discos compactos Enregistrement de disques compacts (Continuación) (Suite) Grabación sencilla de discos compactos Enregistrement simplifié de CD Todas las melodías se grabarán en su orden original en una sola cinta. (El modo de inver sión está ajustado a Cuando la grabación de una melodía quede interrumpida al final del lado de avance de la cinta, esa melodía se grabará en su totali dad al principio del lado de inversión.
Recording Radio Programs Only normal tapes can be used. 1 Load the tape with the side to be recorded facing up. Find the position on the tape where the recording is to start. When recording from the start of side A or B, have the ieader tape wound up before proceeding. (See page 42.) 2 Seiect the desired station. (See pages 22 to 28.) 3 Press REV MODE on the remote controi to seiect the mode. (See page 42.) 4 Press •/• 11REC/REC PAUSE. g>: Recording starts from the side facing up.
Grabación de radiodifusión es Sólo pueden utilizarse cintas normales. 1 Introduzca la cinta con el lado que vaya a ser grabado en pri mer lugar hacia arriba. Encuentre la posición de la cinta donde vaya a iniciar la grabación. Cuando grabe desde el comienzo del lado A o B, bobine la cinta guía antes de proseguir. (Consulte la página 43.) 2 Seleccione la emisora deseada. (Consulte las páginas 23 a 29.) 3 Pulse REV MODE del mando a distancia para seleccionar el modo. (Consulte la página 43.
Seiiing the Play Timer Make sure that you have set the clock. (See page 20.) 3-4 7 6 Example; Setting the timer to play a CD from 7:00 to 8:30; 1 2 Press POWER. Press «CHECK/« ADJUST (TIMER) and hold until the ON tiine starts flashing. 3 © Press + or - to show the time to start playing. @ Press MEMORY. (The OFF time starts flash ing.) 4 ® Press + or -to show the time to finish playing. (2) Press MEMORY. 5 Get the music source ready. Listening to the radio: See pages 22 to 28.
Puesta del temporìzador de reproducción Réglage de la minuterie de lecture Asegúrese de haber puesto en hora el reloj, (Consulte la página 21.) Bien s’assurer que Гоп а réglé l’horloge. (Voir page 21.) Ejemplo: Puesta del temporizador para reproducir un disco compacto desde las 7:00 hasta las 8:30. Exemple: Pour régler la minuterie en vue de la lec ture d’un disque de 7h 00 à 8h 30; 1 Pulse POWER. 2 Pulse .
Setting the Play Timer (Continued) To release the timer function: (only when the unjt is on) Press TIMER and clear the timer play dis play. The timer does not operate- but the time setting is stored in the memq|y. To check what has been pro grammed: Press .CHECK/-ADJUST (TiMER). The dispiay changes automatically as fol lows; 1. Programmed time 2. Programmed source 3. Volume level during operation To enjoy play after programming: (after step 7) 1. Start playing the desired sound source. 2.
Puesta del temporizador de reproducción Réglage de la minuterie de lecture (Continuación) (Suite) Para cancelar la función del tempori zador: (sólo cuando la alimentación del aparato esté conectada) Pulse TIMER y borre la presentación visual de reproducción con temporizador. El temporizador no funcionará pero el ajuste de la hora quedará almacenado en la me moria. Annulation de la minuterie: (uniquement si l’appareil est allumé) Appuyer sur TIMER pour annuler l’affichage de lecture par minuterie.
Settinfí the Recording Timer Make sure that you have set the clock. (See page 20.) You can record a desired radió broadcast at a set time. Example: Setting the timer td record an FM pro gram from 13:00 to 14:30; 1 Press POWER. 2 Press eCHECK/-ADJUST (TIMER) and hold until the ON time starts flashing. 3 © Press + or - to show the time to start recording. @ Press MEMORY. (The OFF time starts flash 4 © Press -t- or — to show the time to finish recording. © Press MEMORY. ing.
Puesta del temporizador de grabación Réglage de la minuterie d'enregistrement Asegúrese de haber puesto en hora el reloj. (Consulte la página 21.) Podrá grabar una emisora de radio deseada a la hora puesta. Bien s’assurer que Гоп а réglé l’horloge. (Voir page 21.) Il est possible d’enregistrer l’émission de radio voulue à l’heure voulue. Ejemplo: Puesta del temporizador para grabar un programa de FM desde las 13:00 hasta las 14:30.
Setting the Recording Timer (Continued) To release the tirher function: (only when the urtit is on) Press TIMER and clear the timer recording display. The timer does not operate but the time setting is stored in thè memory. To check what has been pro grammed: Press •CHECK/« ADJUST (TIMER). The display changes automatically as follows: 1. Programmed tinie 2. Programmed source 3. Volume level during operation To enjoy play after programming: (after step 6) 1. Start playing the desired sound source. 2.
Puesta del temporizador de grabación Réglage de la minuterie d'enregistrement (Continuación) (Suite) Para cancelar la función del tem porizador: (sólo cuando la alimentación dei aparato esté conectada) Pulse TIMER y borre la presentación visual de la grabación con temporizador, El temporizador no funciona, pero el ajuste de la hora se mantiene en la memoria. Annulation de ia minuterie: (uniquement si l’appareii est allumé) Appuyer sur TIMER pour annuler l’affichage d’enregistrement par minuterie.
Using the Sleep Timer (Available only from the remote control) The unit off time can be set up to two hours ahead of the present time. While the unit is on; Press SLEEP to select the desired time. 0:30-> 1:00^ 1:30-»2:00^OFF □ (The display changes each time the button is pressed.) SLEEP DISPLAY FM MODE О The unit is turned off after the time set has elapsed. SLEEP o BAND ™NER (^ B.P V PRESET TUNE Л О О О - CD-------------- RANDOM To reiease the timer function: Press SLEEP to select “SLEEP-OFF”.
Utilización del temporizador para dormir. Utilisation du temporisateur {Solo puede realizarse desde el mando a distancia) (Accessible uniquement sur la télécom mande) A partir de la hora actual, el tiempo tras el cual va a apagarse el aparato puede ajustarse hasta alcanzar un máximo de 2 horas. L’heure d’extinction de l’appareil pourra être réglée dans la limite de deux heures à compter de l’heure actuelle. Mientras el aparato está encendido: Pulse SLEEP para seleccionar el tiempo deseado.
Using Two Timer functions The sleep timer can be used in combination with the piay or recording timer. Using the sleep timer in combination with the play timers Example: Falling asleep while listening to an FM program and waking up the next morning listening to a CD; 1. Program the CD play using the piay timer. (See page 50;) 2. Select the broadcast station. (See pages 22 to 28.) 3. Operate the sleep timer. (See page 58.
Utilización de las funciones de dos temporizadores El temporizador para dormir puede utilizarse en combinación con el temporizador de re producción o de grabación. Utilización del temporizador para dormir en combinación con el temporizador de reproducción H Ejemplo: Para quedarse dormido mientras es cucha un programa de FM y despertarse la mañana siguiente escuchando un dis co compacto; 1. Programe la reproducción de discos compactos utilizando ei temporizador de reproducción. (Consulte la página 51.
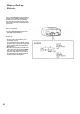
Using Microphone/ Headphones Using Microphone Karaoke 1. Lower the volume and connect the microphone (not included). 2. Start playing a CD or tape or turn on the radio. 3. Start karaoke singing and adjust the vol ume.: Recording karaoke sound with accompaniment from a CD Microphone (plug type; Mini) Micrófono (tipo de clavija: miniclavija) Microphone (type de fiche: Mini) mmmt ■■ mm) 1. Lower the volurhe and connect the microphone. 2. insert the CD and program desired track. (See page 38.) 3.
Utilización de micrófono/ auriculares Utilisation d'un microphone/casque Utilización de micrófono El Utilisation d’un microphone El Karaoke Karaoké Baje el volumen y conecte el micrófono (no suministrado). 2. Inicie la reproducción de un disco com pacto o de una cinta o encienda la radio. 3. Empiece a cantar karaoke y ajuste el volumen. 1. Réduire le volume et raccorder un micro phone (non fournies). 2. Commencer la lecture du disque ou de la cassette ou allumer la radio. 3.
Concerning Compact Discs Only cotripeict discs Having this mark can be used with this unit. El COMPACT To remove a disc from its case ID m DIGITAL AUDIO Press the center holder and lift the disc hold ing by the edges. To hold the disc B m Hold the disc by the edges so the surface is not soiled with fingerprints. Fingerprints, dirt and scratches can cause skipping and distortion. To store a disc in its case Q Insert the disc with iabei facing upwards and press downward at the center.
Acerca de los discos compactos A propos des disques compacts En este aparato sólo pueden utilizarse los discos compactos que tengan esta marca. B Seuls les disques portant ce label pourront être lus sur l’appareil. H Presione sobre el soporte central y levante el disco sujetándolo por los bordes. Manipulation du disque B Para sujetar el disco B Tenir le disque par les bords de façon à ne pas salir la surface avec les doigts.
Concerning Cassette Tapes Selection of cassette tapes_ Cassette tape exceeding 90 minutes: These tapes are handy for their long play back and recording tirne but be careful about repeatedly stopping, starting, rewinding and fast fonwarding these tapes in short intervals as they are thin, tend to stretch and may become entangled in the deck mechanism. Endless tapes: Failure to operate these tapes correctly may cause the tape to wind around the revolving parts.
Acerca de las cintas de casete A propos des cassettes Choix des cassettes Selección de cintas de casete Cintas de casete de más de 90 minutos: Cassettes de pius de 90 minutes: Estas cintas son muy convenientes pues su duración para reproducción y grabación es proiongada, pero se debe tener cuidado para no parar, reproducir, rebobinar y avanzar rápidamente estas cintas a intervaios cortos porque son finas, tienden a es tirarse y se pueden enredar en ia piatina.
Maintenance Maintenance of external surfaces To clean this unit, use a soft,dry cloth. If the surfaces are extremely dirty, use a soft cloth dipped in a soap-and%ater solution or a weak detergent solution. Wring the cloth well before wiping the unit. Wipe once again with a soft, dry cloth. Never use alcohol, paint thinner, benzine, or cherhically treated cloths to clean this unit. Such chemicals may damage the finish of your system.
Mantenimiento Entretien Mantenimiento de las superficies externas Entretien des surfaces extérieures Para limpiar este aparato, utilice un paño suave y seco. Si las superficies están muy sucias, utilice un paño humedecido en una solución de agua y jabón o en una solución de deter gente suave. Pour nettoyer l’appareil, utiliser un chiffon doux et sec. Si les surfaces sont très sales, utiliser un chiffon doux trempé dans une solution d’eau et de savon ou de détergent doux.
MaifUenance (Continued) About condensation * • “Condensation” water refers which form, to for the droplets example, on a of cold winter’s day on the window panes in a warm room.
Mantenimiento Entretien (Continuación) (Suite) Acerca de la condensación A propos de la condensation La “condensación” se refiere a las gotas de agua que se forman, por ejemplo, en los cristales de las ventanas de una habitación caliente en un día de invierno.
Quick Reference of Remote Control Operations Common operations To open the top panel OPEN О , To close the top panel CLOSE О 0 on Turn the unit on and off. (When using the battery power, you can only turn off.) шшя Adjusting the volume - VOLUME Ч- Selecting the display DISPLAY О One-touch play (Radio) (CD) (Tape) BAND О О О Sound quality adjustment/timer operations Selecting the equalizer effects SLEEP DISPLAY @ o PRESETEQ M MODE BAND CD CD B.
Quick Reference of Remote Control Operations (Continued) CD operations starting play Temporarily stopping play Stopping play To clear program play To skip tracks To search forward or backward ►/II О ■/CLEAR О О о (Keep pressing) О о Listening to track(s) repeatedly REPEAT О Listening to tracks at random RANDOM О Tape operations starting playback Changing the direction Fast forwarding о FF О Rewinding REW О Stopping the tape Selecting the reverse mode ■ о REV MODE О Resetting the tape coun
Referencia rápida de las operaciones del mando a distancia Operaciones comunes Para abrir el panel superior OPEN SLEEP DISPLAY OO FM MQDE O O BAND ™'‘“ O B.P V PRESET TUNEA OOO Para perrar el panel superior CLOSE RANDOM 1^^ ' O ООО REPEAT B/CLEAR >-/ll ()C)C) ■ TAPE • '• REVMODE REW O O O C-RESET '■ '4^ O O O TOP PANEL Oo Encerjdido y apagado del aparato. (Cuando utilice las pilas sólo podra apagar.
Referencia rápida de las operaciones del mando a distancia (Continuación) Operaciones del disco compacto Inicio de reproducción Parada temporal de la reproducción Parada de la reproducción Para cancelar la reproducción programada Para saltar melodías Para buscar hacia adelante o hacia atrás ►/II O ■/CLEAR O O o (Manténgalos pulsados) O o Escucha repetida de melodía(s) REPEAT O Escucha aleatoria de melodías RANDOM O Operaciones de la cinta Inicio de reproducoión Cambio de dirección o Avance rápido
Référence rapide des fonctions de la télécommande Opérations communes à tous les maillons Pour ouvrir le panneau supérieur О О OPEN SLEEP DISPLAY ОО FM MODE BAND CD СЭ Pour refermer le panneau supérieur B.P VPRESETTUNEA CLOSE Ооо RANDOM CD О О REPEAT B/CLEAR >^/ll Allumage et extinction de l’appareil. (En alimentation sur piles, l’extinction seule est possible.
Référence rapide des fonctions de la télécommande (Suite) Opérations du lecteur CD Début de la lecture Arrêt temporaire de la lecture ►/Il O Arrêt de la lecture Annulation de la lecture programmée ■/CLEAR O Saut de plages OO Recherche avant ou arrière (Maintenir enfoncé) OO Lecture répétée de plage(s) REPEAT O Lecture aléatoire des plages RANDOM O Opérations de la platine-cassette Début de la lecture Inversion du sens de défilement CJ Avance rapide FF O Rembobinage REW O Arrêt de la bande ■
птжш о OPEN SLEEP DISPLAY ()(} FMMODE О о %щтжш B.PV PRESET TUNE A О О 'О RANDOM CLOSE оо О ■ <3 ; : REPEAT ■/CLEAR I ^/11 О CZ) CD 1М1Ичая --------- TAPE --------REV MODE REW FF Оо О «т^шрлшю © ■ 0-RESET CD [CD О -CLOSE------OPEN - VOLUME + Оо С ,J_ > TOP PANEL PRESET EQ о CD DISPLAY О . (*#«) (CD) (5Ш) BAND ►/II ■<► ООО {Ф кШ Ш Ш , 1М7Р||5#Шо) SLEEP: DISPLAY © ОО О PM MODE PRESETЕО B.
6L О i3S3H-0 #1! „ООО,, о 11 зао П лзц ^HÍíEííl&ílTgÉílí О ■ о о мзы 3d ^Bés-SîT# èôiwii)' фйШЭД' о о lAIOONVd О iV3d3d О о С#а) оо О щмчшт^ gts» ^ВДГШ0521 UV313/B о #И:§:¥Т*} #B:g:ííqr#éaS 11/^ ä.
Troubleshooting Guide Before requesting service for this unit, check the chart below for a possible cause of the problem you are experiencing. Some simple checks or a minor adjustment on your part may eliminate the problem and restore proper operation.
Troubleshooting Guide (Continued) Problem Probable cause(s) Suggested Remedy While using the remote control No operation. Are the batteries flat? Replace them with new ones. Have the batteries been installed incorrectly with their (+) and (-) polarities reversed? Align the (+) and (-) polarities correctly.
Guía para la localización de las fallas Antes de acudir en busca de ayuda para reparar el presente aparato, convendrá revisar el cuadro que sigue para determinar si es posible solucionar el desperfecto de la forma expuesta a continuación. Una simple verificación o ajuste puede eliminar el problema y hacer que el aparato funcione.
Guía para la localización de las fallas (Continuación) Problema Causa(s) probable(s) Remedio sugerido Mientras utiliza el mando a distancia El mando no funciona. ¿Están agotadas las pilas? Reemplácelas por otras nuevas. ¿Ha instalado las pilas con sus polaridades (-I-) y (-) invertidas? Alinee correctamente las polaridades (-I-) y (-).
Guide de dépannaf^e Avant de demander à un personnel qualifié de venir dépanner cet appareil, consulter ce tableau pour savoir si ie problème ne peut pas être réso tel que décrit ci-dessous. Une simple vérification ou un réglage mineur de votre part peut résoudre le problème et rétablir un fonctionnement correct.
Guide de dépannage (Suite) Problème Cause(s) probable(s) Solution A rutiNsation de la télécommande Pas de fonctionnement. Les piles sont-elles usées? Les remplacer pas des neuves. Les piles ont-elles été mal installées, avec les polarités {-L) et (-) inversées? Aligner les polarités (-I-) et (-) correctement.
9S (»#) ¿SStlí Ш3> Wîf#ît S1Í ш °Sf¡l^t|aí|rif (М1М/М1) lAlV ‘’Síí^k^ílfS^S :¥*# ¿«aswissí °WMÄ :¥*f» °тш± ёветв^!/ ¿flïffiSWao ¿ii¥Swao ¿ÄffxsiiSW'&asgo» ¿1Ж¥М¥аО ;¥ : 1МШЩ ‘№=WS»liS ‘Mmül#: "аэужтшшшш °S?îiîirl|±-6-®*G3 ёвао»ад ° '-7 Ф щ т ш ш ш ш т т Ш ' : ' °iíW: „toH„ ^ т т -м щ т °вад¥ш№тш1^9'иш» °¥ííTí „гоп,, °тщ тш °lEflR „lion., °¥ííTÍ „(^W) з„ ¿^ÄS¥4«X}» °ш - )п«( + )шт^^шнш ¿шжщ^ « ( - ) аш ( + ) щж " Ш Ш Ш Ш Ш О Ч Ш Ж Ш Ш .
ISHf'Sililliilfo + )S#D( ^ )iMo *11* itli Pi It, a SO^ /cll Ira IS ii SI iS III il * 1$,/tlJi 0 T? 1^0 iI?®*®4Til^(#ia;ffl®^SE0#Sla£Stif7E0tSI m ? TutSIxlHi, IHiSiliilijSo IISlKHEP#Slli3Hf SLEEP) #*iftlT, IfillR'ji-iao (TIMER, TIMER-RECcH 10/111x2 4isa;.iitit.Atit ACifa® (iicitii) LW 144-288kHz(9kHz-ii7®) MW 522-1611MHz(9kHz^a) FM iitb ACitei'l MIX MIC : 5*-ll(200-600lifc) PHONES : 3211; /^■+(SXiiX;?il) 87.5-108.
J■ I Matsushita Electric Industrial Co., Ltd. Central P.O.