System Setup Guide Home Network System HUB Model No. KX-HNB600AZ Thank you for purchasing a Panasonic product. This document explains how to configure the hub and access it using a mobile device. These steps must be followed before you can use the system. For details about how to use the system, refer to the User’s Guide (page 17). Please read this document before using the unit and save it for future reference. HNB600AZ_(en_en)_0325_ver.040.
Table of Contents Introduction Accessory information ..................................3 Expanding the Panasonic Home Network System .........................................................4 Important Information About this system .........................................6 For your safety .............................................6 Important safety instructions ........................8 Security cautions ..........................................8 For best performance ..................................
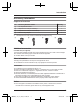
Introduction Accessory information Supplied accessories No. Accessory item/Part number A AC adaptor/PNLV236AL B Telephone line cord (for Australia)*1 1 C Telephone line cord (for New Zealand) 1 D Wall mounting adaptor 1 *1 Quantity 1 The telephone line cord comes connected with the telephone plug. A B C D Additional accessories microSD card (not supplied) A commercially-available microSD card must be inserted into the hub in order to record images from cameras.
Introduction Expanding the Panasonic Home Network System The Panasonic Home Network System is a wireless system that lets you create a powerful network of devices, such as cameras, sensors, and smart plugs, and control them all with an easy-to-use app. Compatible devices are explained below. For information about the Home Network app, refer to the User’s Guide (page 17). The maximum number of devices for each device type is listed below. Digital Cordless Handset (KX-HNH100AZ: 6 max.
Introduction Smart Plug (KX-HNA101AZ: 50 max.*2) R Can be turned on and off using the handset or Home Network app, when triggered by a sensor, or according to a schedule R Built-in overcurrent and overwattage detection for added peace of mind R Power consumption is logged for your reference *1 *2 Optional handsets may be a different colour from that of the handset supplied as part of a pre-configured bundle.
Important Information About this system R This system is an auxiliary system; it is not designed to provide complete protection from property loss. Panasonic will not be held responsible in the event that property loss occurs while this system is in operation. R The system’s wireless features are subject to interference, therefore functionality in all situations cannot be guaranteed.
Important Information hearing aids, to determine if they are adequately shielded from external RF (radio frequency) energy. DECT features operate between 1.88 GHz and 1.90 GHz with a peak transmission power of 250 mW. Wi-Fi features operate between 2.412 GHz and 2.472 GHz with a peak transmission power of 100 mW. R Do not use the product in health care facilities if any regulations posted in the area instruct you not to do so.
Important Information Important safety instructions When using your product, basic safety precautions should always be followed to reduce the risk of fire, electric shock, and injury to persons, including the following: 1. Do not use this product near water for example, near a bathtub, washbowl, kitchen sink, or laundry tub, in a wet basement or near a swimming pool. 2. Avoid using a telephone (including a cordless type) during an electrical storm.
Important Information For best performance Hub location/avoiding noise The hub and other compatible Panasonic devices use radio waves to communicate with each other. R For maximum coverage and noise-free communications, place your hub: – at a convenient, high, and central location with no obstructions between the devices and hub in an indoor environment. – away from electronic appliances such as TVs, radios, personal computers, wireless devices, or other phones.
Important Information please contact your local authorities or dealer and ask for the correct method of disposal. 10 HNB600AZ_(en_en)_0325_ver.040.
Setup Part names and functions A LED indicator You can use the LED indicator to confirm the hub’s status. B Indicator Status Off No power, or LED indicator is turned off*1 Green, lit Normal operation, connected to wireless router*1 C D E F G H I Speaker LED indicator DC socket LINE socket MWi-Fi SETUPN Used when performing initial setup. microSD card slot Used when inserting a microSD card. Remove the label when inserting. M HANDSET/LOCATORN Used when registering a handset.
Setup R The unit’s answering system will not answer incoming calls on your FaxAbility number. (for New Zealand) Connections Insert the AC adaptor plug firmly into the DC socket. Secure the AC adaptor cord by wrapping it around the hook. Connect the AC adaptor to the power outlet. Insert the telephone line cord into the LINE socket and a telephone line socket until you hear a click. DSL/ADSL service users only: Connect your DSL/ADSL filter (not supplied)*1.
Setup the adaptor may cause it to become disconnected. Power failure R The hub will not work during a power failure. R The hub’s telephone features will not work during a power failure. We recommend connecting a corded-type telephone that does not use an AC adaptor to your telephone line. Wi-Fi® settings Compatible mobile devices iPhone 4 or later, iPad, or iPad mini (iOS 6.0 or later) or an Android™ device (Android 4.
Setup wait approx. 10 minutes and perform this procedure from the beginning. 5 6 When prompted, press MWi-Fi SETUPN on the hub. R The LED indicator blinks in yellow. R The app temporarily changes your mobile device’s Wi-Fi setting so that it connects to the hub directly. 4 If necessary, enter the password required to connect to your wireless router and then tap [Next]. R The hub and your mobile device connect to your wireless router. 5 When prompted, press MWi-Fi SETUPN on the hub.
Setup Do not place the hub in areas where the following materials or objects are located between the hub and the wireless router. These materials and objects may interfere with wireless communication or cause wireless transmission speed to become slower.
Setup Registering other devices to the hub This procedure is not required for devices that were included as part of a bundle. Before you can use devices such as cameras, sensors, and smart plugs, they must be registered to the hub. If you purchased devices separately (i.e., not as part of a bundle), you must register each device to the hub. You can register each device by using the registration buttons or the [Home Network] app.
Appendix Wireless communication range (DECT) The wireless communication range of each device in the system from the hub is approximately 50 m indoors and approximately 300 m outdoors. Wireless communication may be unreliable when the following obstacles are located between the hub and other system devices.
Appendix 2 Wall mounting You can use the included wall mounting adaptor to wall mount the hub if desired. Note: R Make sure that the wall and the fixing method are strong enough to support the weight of the unit. R Drive the screws (not supplied) into the wall. 1 Connect the AC adaptor and the telephone line cord to the hub. R Secure the AC adaptor cord by wrapping it around the hook. Slide the wall mounting adaptor up until it clicks into place.
Appendix 3 Mount the hub on a wall then slide down to secure in place. R Pass the AC adaptor cord and the telephone line cord through the groove (1) in the wall mounting adaptor. Wrap up the telephone line cord as shown to prevent the cord from being pinched. 2 Screws 3 83 mm 4 To telephone line socket Note: R Use the following template below when determining the location of the screw holes. 1 2 3 83 mm 4 19 HNB600AZ_(en_en)_0325_ver.040.
Appendix Removing the wall mounting adaptor While pushing the release levers (A) away from the centre of the wall mounting adaptor, slide the adaptor down (B). A A B Specifications R Standards DECT: DECT (Digital Enhanced Cordless Telecommunications) GAP (Generic Access Profile) Wi-Fi: IEEE 802.11b/g/n R Frequency range DECT: 1.88 GHz – 1.90 GHz Wi-Fi: 2.412 GHz – 2.472 GHz (channels 1 – 13) R RF transmission power DECT: Approx.
Appendix Open source software notice R Parts of this product use open source software supplied based on the relevant conditions of the Free Software Foundation’s GPL and/or LGPL and other conditions. Please read all licence information and copyright notices related to the open source software used by this product. This information is available at the following web page: www.panasonic.net/pcc/support/tel/ homenetwork/ At least three (3) years from delivery of this product, Panasonic System Networks Co.
Appendix Warranty (for New Zealand) Panasonic New Zealand undertakes to: Repair or at its option, replace without cost to the owner, either for material or labour, any part which is found to be defective within two years of the date of purchase. THIS EXPRESS WARRANTY DOES NOT COVER: 1) Pick up and delivery. 2) Batteries. 3) Repairs when the product has not been used in accordance with the Operating Instructions Manual or has been modified.
Notes 23 HNB600AZ_(en_en)_0325_ver.040.
For your future reference We recommend keeping a record of the following information to assist with any repair under warranty. Serial No. Date of purchase (found on the bottom of the unit) Name and address of dealer Attach your purchase receipt here. For Australia Customer Care Centre Tel. No.: 132600 or website www.panasonic.com/au For New Zealand Customer Care Centre Tel. No.: (09) 272 0178 or website www.panasonic.