
User's Manual


15
■ Installations and Connections
Refer to qualified service personnel for details.
■
Battery Charge and Replacement
(WX-CH2050A/WX-CT2020)
Refer to WX-CT2020/WX-CH2050A Operating Instructions
for details.
■ Setup Procedures
(WX-CH2050A/WX-CT2020)
Note: Setup of WX-CC2010 should only be performed by
qualified service personnel or system installers.
● Opening the Switch Pocket
Refer to WX-CT2020/WX-CH2050A Operating Instructions
for details.
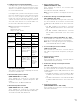
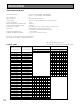
● Channel Group Selection
Refer to p. 18 for the frequency table.
OFF: The person is assigned as assistant personnel.
● DIP Switch Setup
Refer to WX-CT2020/WX-CH2050A Operating Instructions
for details.
● Channel Interference Check
Refer to WX-CT2020/WX-CH2050A Operating Instructions
for details.
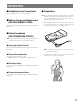
■ Preparation
Note: The following procedure applies when using WX-
CT2020 Order Taker Unit and WX-C1027A Headset. If
you use WX-CH2050A All-in-One Headset, refer to the
operating instructions of the headset.
1. After loading a battery into the order taker unit, insert
the headset plug into the earphone input jack and
microphone input jack on the order taker unit.
Note: Confirm that the plug has completely been
inserted into the jack.
2. Position the microphone boom and wear the order
taker unit case as shown in the figure.
PREPARATIONS