
User Guide

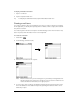


Table Of Contents
- Treo™ 90 Handheld User Guide
- Macintosh Edition
- Contents
- Introduction to Your Treo™ 90 Handheld
- Getting to know your handheld
- Charging the battery
- Using the stylus to get things done
- Elements of the handheld interface
- Customizing your handheld
- Connecting the HotSync cable
- Using desktop software
- Entering Data in Your Handheld
- Managing Your Applications
- Using the Applications Launcher
- Choosing preferences
- Installing and removing applications
- Working with expansion cards
- Security
- Applications Overview
- Common Tasks
- Application-Specific Tasks
- Date Book Plus
- Working in Day View
- Scheduling an event
- Rescheduling an event
- Setting an alarm for an event
- Scheduling repeating or continuous events
- Changing the Date Book Plus view
- Working in Week View
- Working in Week View with Text
- Working in Month View
- Working in Year View
- Working in List View
- Spotting event conflicts
- Working with floating events
- Working with To Do items
- Using the Daily Journal
- Using templates
- Date Book Plus menus
- Contacts
- To Do List
- Memo Pad
- CityTime
- Calculator
- Expense
- Date Book Plus
- Setting Preferences for Your Handheld
- In the Preferences screens, you can do the following:
- Viewing Preferences
- Buttons Preferences
- Connection Preferences
- Date & Time Preferences
- Digitizer Preferences
- Formats Preferences
- General Preferences
- Network Preferences and TCP/IP software
- Selecting a service
- Entering a user name
- Entering a password
- Selecting a connection
- Adding telephone settings
- Connecting to your service
- Creating additional service templates
- Adding detailed information to a service template
- Creating a login script
- Deleting a service template
- Network Preferences menu commands
- TCP/IP troubleshooting
- Owner Preferences
- Phone Preferences
- ShortCuts Preferences
- Advanced HotSync® Operations
- Selecting HotSync setup options
- Customizing HotSync application settings
- IR HotSync operations
- Conducting a modem HotSync operation
- Creating a user profile
- Synchronizing with your desktop e-mail application
- In Palm Mail, you can do the following:
- Setting up Mail on the desktop
- Synchronizing Palm Mail with your E-Mail application
- Using Palm Mail on your handheld
- Viewing e-mail items
- Creating e-mail items
- Looking up an address
- Adding details to e-mail items
- Storing e-mail to be sent later
- Filing e-mail
- Deleting e-mail
- Message list options
- Sorting the Message list
- Palm Mail HotSync options
- Palm Mail menus
- Using the Wireless Application Suite
- To install the Wireless Application Suite:
- Preparing for mobile communications
- Blazer Web Browser
- Palm™ SMS
- One-Touch Mail
- Maintaining Your Handheld
- Troubleshooting Tips
- Non-ASCII Characters for Login Scripts
- Warranty and Other Product Information
- Index

Chapter 8 Page 165
The following details are available:
Note: The Priority and BCC settings are valid only for the current e-mail item and must be set
for each item you create.
Setting a priority
To set a priority for your e-mail item:
1. In the New Message screen, tap Details.
2. Tap the Priority pick list and select the priority you want.
3. Hold Option and press Return to finish.
Tip: Your handheld can flag e-mail items with a specific priority only if your desktop e-mail
application supports this feature.
Priority Flags an e-mail item as High, Normal, or Low priority.
BCC Creates a blind carbon copy field in the New Message screen.
Signature Attaches previously defined text as the closing of an e-mail item. See page
166 for details.
Confirm Read Requests a confirmation telling you when the e-mail item was read.
Confirm
Delivery
Requests a confirmation telling you when the e-mail item was delivered.
Tap here
Tap here
Tap to select priority