
Owner's Manual
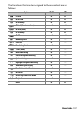


Table Of Contents
- User Manual
- Table of Contents
- Get SnapBridge Now!
- Supplied Accessories
- Parts & Controls
- Introduction
- First Steps
- Connecting Using SnapBridge
- Tutorial
- Basic Photography and Playback
- Matching Settings to the Subject or Situation (Scene Mode)
- Special Effects
- P, S, A, and M Modes
- User Settings: U1 and U2 Modes
- Release Mode
- Image Recording Options
- Focus
- ISO Sensitivity
- Exposure
- White Balance
- Image Enhancement
- Flash Photography
- Remote Control Photography
- Recording and Viewing Movies
- Other Shooting Options
- More on Playback
- Menu List
- Technical Notes
- Troubleshooting
- Specs
- Index
- Menu Guide
- Table of Contents
- Menu Guide
- Defaults
- The Playback Menu: Managing Images
- The Photo Shooting Menu: Shooting Options
- Reset Photo Shooting Menu
- Storage Folder
- File Naming
- Flash Control
- Choose Image Area
- Image Quality
- Image Size
- NEF (RAW) Recording
- ISO Sensitivity Settings
- White Balance
- Set Picture Control
- Manage Picture Control
- Color Space
- Active D-Lighting
- Long Exposure NR (Long Exposure Noise Reduction)
- High ISO NR
- Vignette Control
- Auto Distortion Control
- Flicker Reduction
- Remote Control Mode (ML-L3)
- Auto Bracketing Set
- Multiple Exposure
- HDR (High Dynamic Range)
- Interval Timer Shooting
- The Movie Shooting Menu: Movie Shooting Options
- Reset Movie Shooting Menu
- File Naming
- Choose Image Area
- Frame Size/Frame Rate
- Movie Quality
- Movie File Type
- ISO Sensitivity Settings
- White Balance
- Set Picture Control
- Manage Picture Control
- Active D-Lighting
- High ISO NR
- Flicker Reduction
- Microphone Sensitivity
- Frequency Response
- Wind Noise Reduction
- Electronic VR
- Time-Lapse Movie
- Custom Settings: Fine-Tuning Camera Settings
- The Setup Menu: Camera Setup
- Format Memory Card
- Save User Settings
- Reset User Settings
- Language
- Time Zone and Date
- Monitor Brightness
- Monitor Color Balance
- Virtual Horizon
- Information Display
- Auto Info Display
- Info Display Auto Off
- AF Fine-Tune
- Clean Image Sensor
- Lock Mirror up for Cleaning
- Image Dust Off Ref Photo
- Image Comment
- Copyright Information
- Beep Options
- Touch Controls
- Flash Warning
- HDMI
- Location Data
- Wireless Remote (WR) Options
- Assign Remote (WR) Fn Button
- Airplane Mode
- Connect to Smart Device
- Send to Smart Device (Auto)
- Wi-Fi
- Bluetooth
- Eye-Fi Upload
- Conformity Marking
- Battery Info
- Slot Empty Release Lock
- Save/Load Settings
- Reset All Settings
- Firmware Version
- The Retouch Menu: Creating Retouched Copies
- My Menu/Recent Settings
- Optional Flash Units
- Technical Notes
- SnapBridge Connection Guide (Android)
- SnapBridge Connection Guide (iOS)
- Warranty

114 Menu Guide
This option determines the role assigned
to the J button during viewfinder
photography, playback, and live view
(regardless of the option selected,
pressing J when a movie is displayed
full frame starts movie playback).
❚❚ Shooting Mode
❚❚ Playback Mode
f2: OK Button
G button ➜ A Custom Settings menu
Option Role assigned to J button
J
Select center
focus point
Select the center focus point.
K
Highlight active
focus point
Highlight the active focus point.
None
Pressing the J button has no effect in
viewfinder photography.
Option Role assigned to J button
Q
Thumbnail on/off
Toggle between full-frame and thumbnail
playback.
R
View histograms
In both full-frame and thumbnail playback,
a histogram is displayed while the J button is
pressed.
p
Zoom on/off
Toggle between full-frame or thumbnail
playback and playback zoom. Choose the initial
zoom setting from Low magnification (50%),
1 : 1 (100%), and High magnification (200%).
The zoom display will center on the active focus
point.