
Owner's Manual


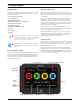

Table Of Contents
- D810 Camera Users Manual
- For Your Safety
- Compatible Lenses
- Approved Memory Cards
- Table of Contents
- Supplied Accessories
- Parts & Controls
- Introduction
- First Steps
- Camera Menus
- Basic Photography and Playback
- Live View Photography
- Movie Live View
- Image Recording Options
- Focus
- Release Mode
- ISO Sensitivity
- Exposure
- White Balance
- Image Enhancement
- Flash Photography
- Other Shooting Options
- More About Playback
- Connections
- Menu Guide
- Defaults
- The Playback Menu: Managing Images
- The Shooting Menu: Shooting Options
- Custom Settings: Fine-Tuning Camera Settings
- Custom Settings
- Custom Settings Bank
- a: Autofocus
- a1: AF-C Priority Selection
- a2: AF-S Priority Selection
- a3: Focus Tracking with Lock-On
- a4: AF Activation
- a5: Focus Point Illumination
- a6: AF Point Illumination
- a7: Focus Point Wrap-Around
- a8: Number of Focus Points
- a9: Store by Orientation
- a10: Built-in AF-assist Illuminator
- a11: Limit AF-Area Mode Selection
- a12: Autofocus Mode Restrictions
- b: Metering/Exposure
- c: Timers/AE Lock
- d: Shooting/Display
- d1: Beep
- d2: CL Mode Shooting Speed
- d3: Max. Continuous Release
- d4: Exposure Delay Mode
- d5: Electronic Front-Curtain Shutter
- d6: File Number Sequence
- d7: Viewfinder Grid Display
- d8: ISO Display and Adjustment
- d9: Screen Tips
- d10: Information Display
- d11: LCD Illumination
- d12: MB-D12 Battery Type
- d13: Battery Order
- e: Bracketing/Flash
- f: Controls
- f1: LCD Illuminator Switch
- f2: Multi Selector Center Button
- f3: Multi Selector
- f4: Assign Fn Button
- f5: Assign Preview Button
- f6: Assign AE-L/AF-L button
- f7: Shutter Spd & Aperture Lock
- f8: Assign BKT Button
- f9: Customize Command Dials
- f10: Release Button to Use Dial
- f11: Slot Empty Release Lock
- f12: Reverse Indicators
- f13: Assign Movie Record Button
- f14: Live View Button Options
- f15: Assign MB-D12 AF-ON
- f16: Assign Remote (WR) Fn Button
- f17: Lens Focus Function Buttons
- g: Movie
- Custom Settings
- The Setup Menu: Camera Setup
- The Retouch Menu: Creating Retouched Copies
- My Menu/Recent Settings
- Technical Notes
- Compatible Lenses
- Optional Flash Units (Speedlights)
- Other Accessories
- Caring for the Camera
- Caring for the Camera and Battery: Cautions
- Exposure Program
- Troubleshooting
- Error Messages
- Specifications
- Approved Memory Cards
- Memory Card Capacity
- Battery Life
- Lenses That May Block the Built-in Flash and AF-Assist Illuminator
- Index
- Troubleshooting
- Error Messages
- Specs
- Index
- AF-S Nikkor 35mm f/1.8G ED Lens Users Manual
- AF-S Nikkor 50mm f/1.8G Lens Users Manual
- AF-S Nikkor 85mm f/1.8G Lens Users Manual
- Atomos Ninja-2 Quick Start Guide
- Atomos Ninja-2 User Manual
- Table of Contents
- Warranty
- Introduction
- Supplied Accessories
- What Else is Needed
- Mounting disks in the Master Caddy
- Connecting the Ninja-2 and powering up
- Ninja-2 connections
- Other physical features
- Using the Ninja-2
- Monitoring and Recording
- Timecode
- Pulldown
- Playback & Playout
- Connecting and Editing
- Using Ninja-2 with external power supplies
- Using Ninja-2 with Atomos Connect Converters
- Software updates
- Specs

Using the Ninja-2
The Ninja-2 is controlled via an intuitive touchscreen interface. There are
large, obvious controls for Record, Play, Monitor, and Menu, as well as
the following information:
• Current input format and status
• Codec currently in use
• Remaining battery power
• Which of the two batteries is currently active
• Headphone/Line Out volume
• Audio Input Level meters
• Remaining Recording time on disk
• Timecode
• Record Trigger
• Unit name
Watch out for any items on the screen that are marked by a
small blue arrow. If you touch these items you will be taken
to other options depending on context. If you touch them
repeatedly, you will cycle through related options
A large blue arrow in the top right of the screen will
take you out of lower-level menus back to the main
control screen
The User Interface in detail
Even though the Ninja-2 is an extremely sophisticated and technically
advanced device, we have taken a minimalist approach to the interface.
We’ve only included controls that you really need. This is important in
a device that has to be ready for use at all times and must therefore be
simple to operate while in use.
The Ninja-2 Touchscreen
Ninja-2 features a very high quality 800x480 pixel video touch screen.
Most of us are now familiar with the idea of touchscreens, but there is an
important difference between Ninja-2’s screen and those you might find
on a smartphone.
Ninja-2’s screen is pressure and touch sensitive. It takes more than a
glancing brush of a finger to trigger the screen. For some applications,
(like dragging and dropping) this would be a disadvantage, but for the
Ninja-2 it is an important feature, because if the screen was too sensitive,
it would be easy to accidentally trigger Ninja-2 operations, potentially
interrupting a recording, for example.
With the Ninja-2 screen, you have to firmly push the screen for an
instruction to register. This gives a very positive feel to the device and
confidence that commands won’t be given in error.
Be definite and deliberate in your pressing on icons on the screen and
the Ninja-2 will be very responsive. Remember this is not a capacitive
touch device like many Smart Phones; holding contact with the icon for a
millisecond will ensure accurate and rapid response.
The Home Screen
This is the screen you see whenever you are not in a function or sub-menu,
and it is the first screen that the Ninja-2 boots into when you turn it on. All
functions are one touch away: simply touch the screen on any function to
be taken to that function’s screen.
There are four brightly coloured icons labelled R
HF 3OD\ 0RQ
and
0HQX. In the lower centre of the screen is a timecode display with
+RXUV0LQXWHV6HFRQGV)UDPHV. Below this, on the lower
edge is the Unit Name: a customisable label that identifies media from
your when it is connected to a computer.
7. Using the Ninja-2
Timecode
Record
Trigger
Current Video
Input Format
Recording Format
Headphone Line Out Volume
Time Remaining
Unit Name
Continuous Power Battery Indicator
Audio
Input Level
Meters
Atomos Ninja-2 – User Manual Edition 3: May 2013 10